Oh my goodness, you’re in for a treat! Remember that feeling of unwrapping a Snickers bar as a kid? The way the chocolate cracked, the caramel oozed, and those salty peanuts crunched? That’s exactly what I wanted to capture in this cake. My Best Chocolate Snickers Cake Decadent and From Scratch recipe came from pure nostalgia – and maybe a little late-night chocolate craving!
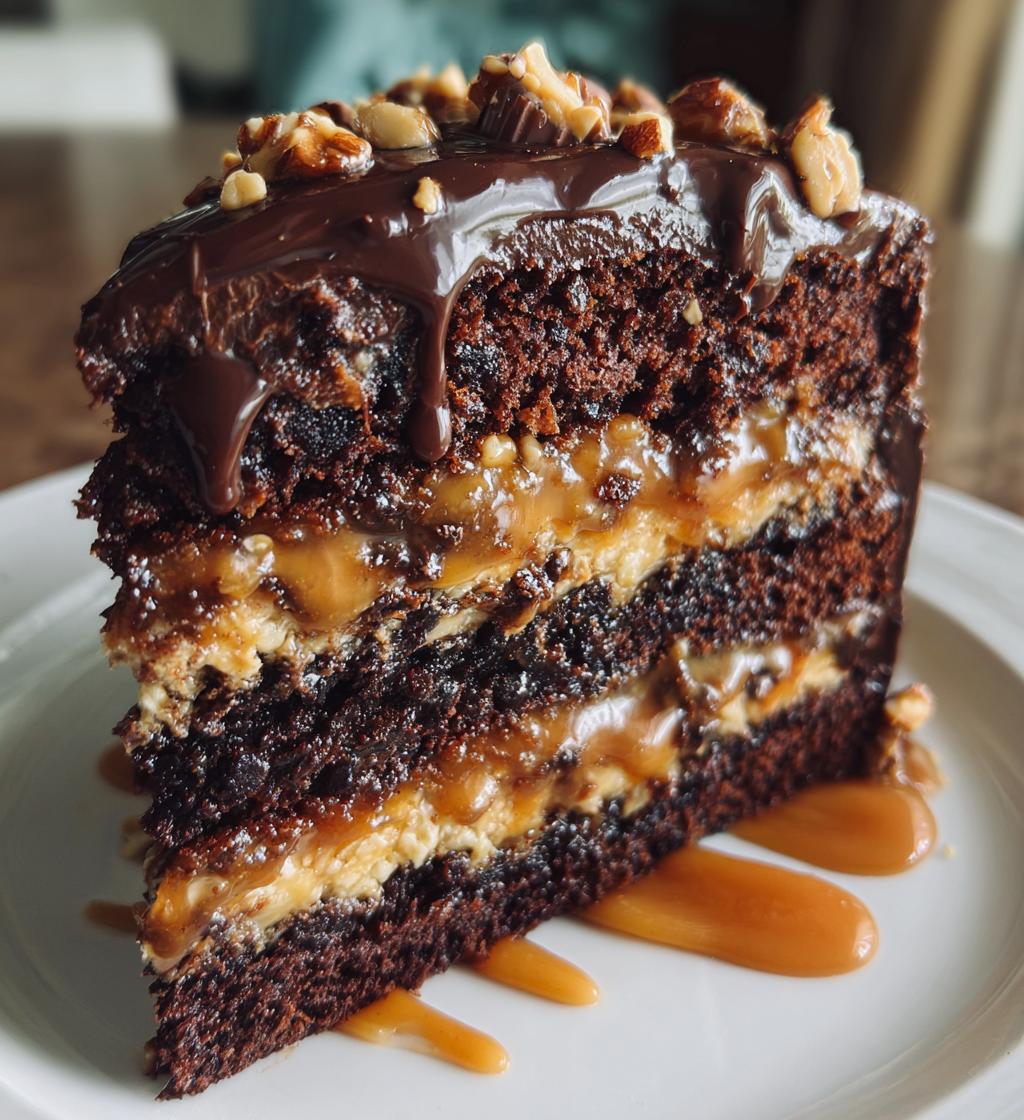
This isn’t just any chocolate cake. It’s layers of moist, from-scratch chocolate cake hugging gooey caramel and crunchy peanuts, all wrapped in silky chocolate ganache. The first time I made it for my niece’s birthday, she declared it “better than candy aisle Snickers!” And trust me, when your ganache drips down those cake layers perfectly, you’ll feel like a dessert rockstar.
Why You’ll Love The Best Chocolate Snickers Cake Decadent and From Scratch
Let me tell you why this cake will become your new obsession:
- It’s like biting into that perfect Snickers bar – but in cake form (and let’s be honest, everything’s better as cake!)
- The homemade caramel seeps into the chocolate layers, creating these incredible moist pockets of flavor
- You get that awesome salty-sweet crunch from the peanuts – no boring one-note chocolate cake here
- It looks super fancy with that drippy ganache, but the steps are actually simple enough for a weeknight bake
- Nothing beats the proud feeling when someone asks “Where’d you buy this?” and you get to say “I made it!”
Seriously, this cake disappears faster than Halloween candy in my house. The first slice is always gone before I can even take proper photos!
Ingredients for The Best Chocolate Snickers Cake Decadent and From Scratch
Alright, let’s gather our goodies! I’ve made this cake so many times I could probably recite these ingredients in my sleep. Here’s everything you’ll need to create this chocolate-peanut-caramel masterpiece:
For the Cake:
- 2 cups all-purpose flour (spooned and leveled – no packing!)
- 1 3/4 cups granulated sugar (yes, it’s a lot – we’re making dessert here!)
- 3/4 cup unsweetened cocoa powder (go for the good stuff – it makes a difference)
- 1 1/2 tsp baking powder
- 1 1/2 tsp baking soda
- 1 tsp salt (trust me, it balances the sweetness)
- 2 large eggs (room temperature please – take them out when you start gathering ingredients)
- 1 cup whole milk (the fat equals flavor in this case)
- 1/2 cup vegetable oil (I use canola, but any neutral oil works)
- 2 tsp vanilla extract (the real stuff, not imitation)
- 1 cup boiling water (sounds weird, but it’s the secret to super moist cake)
For the Filling & Topping:
- 1 cup caramel sauce (homemade or store-bought – I won’t judge!)
- 1 cup chopped peanuts (salted gives that perfect sweet-salty contrast)
- 1 cup heavy cream (cold is best for ganache)
- 1 cup semi-sweet chocolate chips (or chop up a good chocolate bar if you’re feeling fancy)
Quick tip: Measure everything before you start mixing. It makes the whole process smoother and prevents that “oh no I forgot the eggs!” moment we’ve all had. Now let’s get baking!
Equipment You’ll Need
Okay, let’s talk tools! You don’t need anything fancy – just the basics from any home baker’s kitchen:
- Two 9-inch round cake pans (I swear by the non-stick ones)
- A sturdy mixing bowl (big enough for batter explosions)
- Whisk and rubber spatula (for scraping every last bit of batter)
- Hand mixer or stand mixer (but honestly, you can mix by hand if needed)
- Saucepan for the ganache (small works great)
That’s it! No special gadgets required – just good old-fashioned baking love.
How to Make The Best Chocolate Snickers Cake Decadent and From Scratch
Alright, here we go – the fun part! I’ll walk you through each step just like I’m right there in the kitchen with you. Don’t let the layers scare you – it’s easier than it looks, I promise!
Step 1: Prepare the Cake Batter
First, crank that oven to 350°F (175°C) – we want it nice and hot when our batter’s ready. Now grab your big mixing bowl and whisk together all your dry ingredients (flour, sugar, cocoa powder, baking powder, baking soda, and salt). Get them really combined – no cocoa powder lumps allowed!
Next, make a well in the center and add your eggs, milk, oil, and vanilla. Here’s where my hand mixer earns its keep – beat everything on medium for about 2 minutes until it’s smooth and gorgeous. Now the magic: slowly stir in that boiling water. The batter will get super thin – that’s perfect! It’s what gives our cake that melt-in-your-mouth texture.
Step 2: Bake and Cool the Layers
Pour the batter evenly between your prepared pans (I do a little dance to make sure they’re equal). Slide them into the oven and set your timer for 30 minutes – but start checking at 25. You’ll know they’re done when a toothpick comes out with just a few moist crumbs (no wet batter!).
Here’s the hard part: let them cool in the pans for 10 minutes before flipping them onto a rack. I know, I know – the caramel is calling your name. But trust me, this patience prevents crumbly disasters!
Step 3: Assemble with Caramel and Peanuts
Once completely cool (seriously, no cheating!), place your first layer on a plate or cake stand. Spread that glorious caramel sauce almost to the edges – leave about a half-inch border so it doesn’t squish out. Now the fun part: sprinkle those chopped peanuts evenly over the caramel, pressing gently so they stick.
Carefully place the second layer on top. If it slides a bit, no worries – just nudge it back. The ganache will cover any imperfections (that’s my baking motto!).
Step 4: Add the Chocolate Ganache
Time for the grand finale! Heat your heavy cream in a small saucepan until it just starts simmering (little bubbles at the edges). Pour it over your chocolate chips in a heatproof bowl and let it sit for 1 minute – this is key for smooth ganache. Now stir slowly until it’s silky and combined.
Let it cool slightly (about 5 minutes) so it thickens a touch, then pour over your cake, encouraging some to drip down the sides. Use an offset spatula to smooth the top if needed. Now the hardest wait of all – 1 hour in the fridge to set before slicing. But oh, that first bite will be worth it!
Tips for Perfect The Best Chocolate Snickers Cake Decadent and From Scratch
After making this cake more times than I can count (and licking the bowl even more), I’ve picked up some game-changing tricks that’ll take your Snickers cake from good to “Oh my gosh, give me the recipe!” level:
- Chill before slicing: I know it’s torture, but letting the cake set in the fridge for at least an hour means clean slices without the ganache smearing everywhere. Use a sharp knife dipped in hot water for picture-perfect pieces.
- Cocoa matters: Splurge on the good stuff – Dutch-process cocoa powder gives that deep, rich chocolate flavor that makes this cake special. My favorite trick? I mix a tablespoon of instant espresso powder into the dry ingredients – it intensifies the chocolate flavor without tasting like coffee!
- Caramel control: If your caramel sauce is too runny, pop it in the fridge for 15 minutes before spreading. Too thick? Microwave for 5-second bursts until spreadable. And here’s my secret – I always warm my jar of caramel upside down so the lid doesn’t get sticky!
- Peanut perfection: Toast those peanuts for 5 minutes in a dry skillet before chopping. The extra crunch and nutty aroma take this cake over the top. If someone has a nut allergy, pretzel pieces make an awesome salty-crunchy substitute.
- Ganache grace: If your ganache splits (we’ve all been there!), whisk in a teaspoon of room temperature butter or a splash of hot cream to bring it back together. And for picture-perfect drips, use a spoon to gently guide the ganache down the sides in controlled drips.
One last tip from my many kitchen experiments: this cake actually tastes better the next day! The flavors meld together beautifully if you can resist digging in right away. (No judgment if you can’t – I rarely manage to wait either!)
Ingredient Substitutions and Variations
Life happens, and sometimes you need to swap things out – here are my tried-and-true variations that still deliver that amazing Snickers cake magic:
- Gluten-free? Swap the all-purpose flour for your favorite 1:1 gluten-free blend (I like Bob’s Red Mill). The texture stays perfect!
- No caramel sauce? Melt 1 cup of soft caramels with 2 tablespoons of cream – or go wild with peanut butter instead for a different twist.
- Nut allergies? Use toasted sunflower seeds or crushed pretzels for that essential crunch.
- Dairy-free? Coconut milk works beautifully in both the cake and ganache – just use dairy-free chocolate chips too.
My philosophy? Baking should be flexible – make it work with what you’ve got, and it’ll still be delicious!
Serving and Storing The Best Chocolate Snickers Cake Decadent and From Scratch
Okay, let’s talk about the best ways to serve and keep this beauty fresh! After all that work, you want every slice to be as amazing as the first, right?
Serving Tips:
- Serve this cake chilled – the caramel firms up just enough to hold its shape when sliced, but still gives you that dreamy ooze.
- Let slices sit at room temperature for 5-10 minutes before serving if you prefer a softer texture (my husband swears by this method).
- For extra decadence, warm each slice for 10 seconds in the microwave – just enough to make the caramel go all melty again.
- Top with a scoop of vanilla ice cream or a drizzle of extra caramel if you’re feeling extra indulgent (birthdays demand this treatment in my house!).
Storage Secrets:
- Store leftovers (ha! as if!) in an airtight container in the fridge for up to 3 days. The flavors actually deepen and get even better on day two!
- Press plastic wrap directly onto any cut edges to prevent drying out – or do what I do and just eat it all within 24 hours.
- For longer storage, you can freeze individual slices wrapped tightly in plastic then foil for up to 1 month. Thaw in the fridge overnight.
- Pro tip: If your cake starts to dry out (unlikely, but possible), brush the cut edges with simple syrup before serving to revive it.
Remember, this cake is best enjoyed with good friends and zero guilt – so go ahead, take that second slice!
Frequently Asked Questions
I’ve gotten so many questions about this cake over the years – here are the ones that pop up most often (along with all my hard-earned answers!):
Can I use store-bought caramel sauce?
Absolutely! While I love homemade caramel, sometimes you just need the convenience. Look for thick caramel sauce in jars near the ice cream toppings – the kind that slowly drips off a spoon is perfect. My grocery store brand works just as well as fancy artisanal versions for this recipe.
How do I prevent my ganache from splitting?
Oh honey, I’ve been there! The key is patience. Make sure your cream is hot but not boiling (tiny bubbles at the edges) and let it sit on the chocolate for a full minute before stirring. If it does separate, whisk in a teaspoon of room temp butter or a splash of hot cream to bring it back together.
Can I make this cake ahead of time?
You bet! The baked layers (wrapped tightly) keep beautifully at room temp for a day or frozen for a month. Assemble with caramel and ganache the day you plan to serve for best texture. The fully assembled cake holds up great in the fridge overnight too – just let slices come to room temp before serving.
Why add boiling water to the batter?
I know it sounds crazy, but that hot water “blooms” the cocoa powder, intensifying the chocolate flavor. It also creates an ultra-moist crumb. Don’t worry – the batter will look thin, but it bakes up perfectly every time!
Can I use a different pan size?
Of course! For a 9×13-inch sheet cake, bake 35-40 minutes. Cupcakes take about 18-20 minutes – fill liners halfway and skip the layer assembly (just top each with caramel, peanuts, and ganache). Adjust baking times as needed – the toothpick test never lies!
Nutritional Information
Okay, let’s be real – we’re not eating Snickers cake for the health benefits! But since folks ask, here’s the scoop: Nutritional values are estimates and vary based on ingredients used. This indulgent dessert packs rich chocolate, gooey caramel, and crunchy peanuts into every bite – so savor it guilt-free!
I believe treats like this are all about balance – enjoy a slice (or two!) with your morning coffee or as a special weekend dessert. Life’s too short not to celebrate with cake!
Try this recipe and share your results in the comments – I’d love to hear how your Snickers cake turned out! Did you add any fun twists? Did it disappear as fast as mine always does? Happy baking!
Print
Best Chocolate Snickers Cake Recipe With Irresistible Layers
- Total Time: 1 hour 55 minutes (includes cooling and chilling)
- Yield: 12 servings 1x
- Diet: Vegetarian
Description
A rich and indulgent chocolate cake inspired by the flavors of a Snickers bar. Made from scratch with layers of moist chocolate cake, caramel, peanuts, and chocolate ganache.
Ingredients
- 2 cups all-purpose flour
- 1 3/4 cups granulated sugar
- 3/4 cup unsweetened cocoa powder
- 1 1/2 tsp baking powder
- 1 1/2 tsp baking soda
- 1 tsp salt
- 2 large eggs
- 1 cup whole milk
- 1/2 cup vegetable oil
- 2 tsp vanilla extract
- 1 cup boiling water
- 1 cup caramel sauce
- 1 cup chopped peanuts
- 1 cup heavy cream
- 1 cup semi-sweet chocolate chips
Instructions
- Preheat your oven to 350°F (175°C). Grease and flour two 9-inch round cake pans.
- In a large bowl, mix flour, sugar, cocoa powder, baking powder, baking soda, and salt.
- Add eggs, milk, oil, and vanilla. Beat on medium speed for 2 minutes.
- Stir in boiling water until the batter is smooth. Pour into prepared pans.
- Bake for 30-35 minutes or until a toothpick comes out clean. Cool for 10 minutes before removing from pans.
- Once cooled, spread caramel sauce over the first cake layer. Sprinkle with chopped peanuts.
- Place the second cake layer on top.
- Heat heavy cream until simmering, then pour over chocolate chips. Stir until smooth to make ganache.
- Pour ganache over the cake, letting it drip down the sides.
- Chill for at least 1 hour before serving.
Notes
- Use room-temperature eggs for better mixing.
- Let the cake cool completely before adding toppings to prevent melting.
- Store leftovers in an airtight container in the fridge for up to 3 days.
- Prep Time: 20 minutes
- Cook Time: 35 minutes
- Category: Dessert
- Method: Baking
- Cuisine: American
Nutrition
- Serving Size: 1 slice
- Calories: 450
- Sugar: 35g
- Sodium: 400mg
- Fat: 22g
- Saturated Fat: 8g
- Unsaturated Fat: 12g
- Trans Fat: 0g
- Carbohydrates: 60g
- Fiber: 4g
- Protein: 8g
- Cholesterol: 45mg
Keywords: chocolate cake, Snickers cake, homemade dessert, caramel peanuts, chocolate ganache