
There’s something magical about a classic Black Forest Cake with whipped cream that takes me right back to my first bite at a tiny bakery in Cologne. Layers of rich chocolate sponge, clouds of barely sweetened cream, and those tart cherries – it’s pure perfection on a plate. This isn’t just any cake; it’s Germany’s gift to dessert lovers everywhere. What I love most is how the flavors play together – the deep cocoa, the bright fruit, and that silky whipped cream tying it all together. My version stays true to tradition but with a few tricks I’ve picked up over years of (sometimes messy) baking experiments. Whether it’s for a special occasion or just because, this beauty always disappears faster than you can say “seconds please!”
Why You’ll Love This Black Forest Cake with Whipped Cream
Let me count the ways this cake will steal your heart (and probably your willpower)! Here’s why it’s become my go-to celebration dessert:
- That chocolate sponge – oh my gosh – it’s rich but not too sweet, with just the right amount of bounce when you take a bite.
- The whipped cream is barely sweetened so it lets the cherries and chocolate shine, and it melts in your mouth like a cloud.
- Speaking of cherries – they burst with juice in every forkful, giving that perfect tangy contrast to the sweet layers.
- It looks like a showstopper with those chocolate shavings tumbling down the sides, but trust me, it’s way easier to make than it looks.
- Nostalgia in every bite – whether it reminds you of European cafes or family gatherings, this cake just feels special.
I’ve served this at birthdays, dinner parties, even just because Tuesdays – and without fail, someone always asks for the recipe!
Ingredients for Black Forest Cake with Whipped Cream
Here’s everything you’ll need to make this dreamy cake. I’ve included precise measurements and prep details to make sure your cake turns out perfect every time. Trust me, it’s worth being exact here!
- 200g all-purpose flour, sifted – sifting makes the sponge light and airy.
- 50g cocoa powder (unsweetened) – go for the good stuff; it makes all the difference.
- 200g granulated sugar – just the right amount to balance the chocolate and cherries.
- 1 tsp baking powder – helps the cake rise beautifully.
- 1/2 tsp salt – a pinch to enhance all the flavors.
- 4 large eggs, room temperature – they mix better when not cold.
- 100ml vegetable oil – keeps the cake moist without butter’s heaviness.
- 100ml milk – whole milk works best for richness.
- 1 tsp vanilla extract – a little extra flavor boost.
- 400ml heavy cream, chilled – cold cream whips up fluffier.
- 2 tbsp powdered sugar – just enough to sweeten the cream lightly.
- 1 can (400g) pitted cherries, drained – drain them well to avoid soggy layers.
- 2 tbsp cherry liqueur (optional) – adds a grown-up twist, but you can skip it.
- 50g dark chocolate shavings – for that classic Black Forest look.
Ingredient Notes & Substitutions
Don’t stress if you’re missing something – here are a few easy swaps and tips:
- If you’re skipping the cherry liqueur, use cherry juice for a similar flavor without the alcohol.
- For a dairy-free version, swap the heavy cream with coconut cream (chill it overnight first).
- Drain those cherries really well – I even pat them dry with a paper towel to avoid a soggy cake.
- If you’re using fresh cherries, pit them carefully and macerate them with a bit of sugar for extra juiciness.
With these ingredients, you’re well on your way to a stunning Black Forest Cake. Let’s get baking!
Equipment Needed for Black Forest Cake with Whipped Cream
Okay, confession time – I may have slightly over-collected baking tools over the years (don’t judge!), but here’s the honest truth about what you really need to make this Black Forest Cake shine:
- Two 8-inch round cake pans – these are the perfect size for nice, tall layers. No fancy non-stick required – just good old parchment paper does the trick!
- A stand mixer or hand mixer – you could whip the cream by hand, but your arms will thank you for using electric help.
- A sturdy rubber spatula – my kitchen MVP for folding batter and scraping every last bit of cream from bowls.
- A pastry brush – for gently brushing that cherry liqueur between layers (or cherry juice if you’re keeping it kid-friendly).
- A sharp serrated knife – the secret weapon for splitting cake layers evenly without crumbling.
- A cooling rack – crucial for letting those cakes cool properly so they don’t get soggy.
- Piping bag with star tip (optional) – makes those pretty whipped cream borders, but a spoon works just fine too!
That’s really it! No fancy gadgets required – just solid basics that’ll last you through countless baking adventures. I promise this cake is totally doable even if your kitchen isn’t stocked like a bakery.
How to Make Black Forest Cake with Whipped Cream
Alright, let’s dive into the fun part! I’ll walk you through each step like we’re baking together in my kitchen. Don’t worry if it seems like a lot – once you get going, it all comes together beautifully. Just follow these steps and you’ll have a showstopper in no time!
- Preheat your oven to 350°F (180°C) and grease two 8-inch cake pans. Line the bottoms with parchment paper – this little trick saves so many cakes from sticking disasters!
- Whisk together the dry ingredients – flour, cocoa powder, sugar, baking powder, and salt. I like to sift them directly into my mixing bowl to avoid lumps. Those cocoa clumps can be sneaky!
- Add the wet ingredients – eggs, oil, milk, and vanilla. Mix just until smooth – overmixing makes the cake tough, and we want that perfect tender crumb.
- Divide the batter evenly between your prepared pans. A kitchen scale helps here, but if you don’t have one, just eyeball it. Bake for 25-30 minutes until a toothpick comes out clean.
- Cool completely – I mean it! At least an hour. Warm cakes crumble when you try to slice them, and we need clean layers for assembly.
- Whip the cream with powdered sugar until stiff peaks form. Pro tip: chill your bowl and beaters first – cold tools make fluffier cream!
Assembling the Layers
This is where the magic happens! Here’s how I build my Black Forest Cake layer by layer:
- First, slice each cooled cake in half horizontally using a serrated knife. Go slow and use a gentle sawing motion – no rushing this step!
- Brush each layer lightly with cherry liqueur (or juice) – just enough to moisten, not soak. Think of it like giving the cake a little flavor hug.
- Spread a thin layer of whipped cream on the first cake layer, then scatter drained cherries evenly. Don’t overdo it – about 2 tablespoons of cherries per layer is perfect.
- Repeat with remaining layers, ending with a plain cake layer on top. Press down gently as you go to keep everything stable.
- Crumb coat the whole cake with a thin layer of cream to seal in crumbs. Chill for 15 minutes before the final frosting – this makes all the difference for a clean finish!
Decorating Tips
Now for the fun part – making it look as good as it tastes! Here are my go-to decorating tricks:
- For chocolate shavings, use a vegetable peeler on a bar of room-temperature dark chocolate. Angle the peeler to get those perfect curls that tumble down the sides.
- Pipe whipped cream borders using a star tip – or just dollop it on with a spoon for a rustic look. Either way tastes delicious!
- Add whole cherries on top for a pop of color – I like to cluster them in the center like a little cherry crown.
- Chill before serving – at least 2 hours. This lets the flavors meld and makes slicing so much cleaner.
See? Not so complicated when you take it step by step. Now step back and admire your masterpiece – you’ve just made a classic Black Forest Cake!
Tips for Perfect Black Forest Cake with Whipped Cream
After more Black Forest Cake attempts than I can count (some more successful than others!), here are my hard-earned secrets for perfection:
- Chill everything for the whipped cream – bowl, beaters, even the cream itself. Cold tools mean fluffier peaks that hold their shape.
- Room-temperature eggs blend smoother into batter. Just set them out 30 minutes before baking – no fancy tricks needed!
- Level your cake layers with a serrated knife before assembling. A flat surface means no lopsided disasters.
- Drain cherries like your cake depends on it (because it does!). I even pat them dry with paper towels for extra insurance.
- Don’t rush the chilling – that 2-hour wait lets flavors marry and makes slicing clean.
Follow these simple tricks, and you’ll avoid all the mistakes I made the hard way!
Serving and Storing Black Forest Cake with Whipped Cream
Okay, here’s the deal – as tempting as it is to dive right in, this cake needs to chill (literally!) before serving. Trust me, I learned this the hard way after one too many collapsed slices! Here’s how to handle this beauty:
Serving temperature: Straight from the fridge is perfect – about 2 hours after assembling. The cream firms up just enough to hold its shape, but the cake stays beautifully moist. If it’s been chilling overnight, let it sit out for 10 minutes to take the edge off the cold.
Slice size: Use a sharp knife dipped in hot water (and dried!) for clean cuts. Each slice should be about 1-inch thick – rich enough to satisfy but not overwhelm. Pro tip: wipe the knife between slices for picture-perfect presentation every time!
Storing: Cover loosely with plastic wrap or a cake dome and refrigerate for up to 3 days. The whipped cream stays fresh, and the flavors actually improve! Just avoid the freezer – the cream gets icy and the texture suffers. If you must freeze, wrap individual slices tightly and thaw overnight in the fridge.
One last secret – this cake disappears fastest when served with coffee after dinner. Something about that chocolate-cherry combo makes everyone magically find room for dessert!
Black Forest Cake with Whipped Cream FAQs
I get asked these questions ALL the time when I make this cake – so let me save you some trouble with answers from my own messy (but delicious!) experiences:
Can I use fresh cherries instead of canned?
Absolutely! Fresh cherries give amazing flavor. Just pit about 2 cups (about 400g) and macerate them with 1 tbsp sugar for 30 minutes to draw out juices. Drain well – even better than the canned ones! The syrup makes a great liqueur substitute too.
Help! My layers keep sliding. How do I prevent this?
Oh honey, I’ve been there! Three tricks: 1) Make sure your whipped cream is stiff peaks, 2) Chill the cake for 15 minutes after the crumb coat, and 3) Don’t overdo the cherry juice between layers – just a light brush does the job.
Can I make this cake ahead of time?
You bet! The baked cakes freeze beautifully for up to a month (wrap tightly in plastic). Or assemble the whole cake 1 day ahead – the flavors actually improve! Just add final decorations right before serving so they stay fresh.
My cream keeps deflating – what am I doing wrong?
Two likely culprits: 1) Your cream wasn’t cold enough (chill everything – bowl, beaters, even the cream itself!), or 2) You overmixed. Stop as soon as peaks hold their shape. If it’s a hot day, work near an open fridge – I’m not kidding!
How do I get those perfect chocolate shavings?
Here’s my no-fail method: Use a room-temperature chocolate bar (cold chocolate cracks) and a vegetable peeler. Angle it about 45 degrees and pull toward you in one smooth motion. The first few might be messy – consider those chef’s snacks!
Nutritional Information
Let’s be real – when you’re eating a slice of this glorious Black Forest Cake, nutrition labels are probably the last thing on your mind! But since you asked (or maybe just feel like you should know), here’s the general scoop. Keep in mind these are estimates – your exact numbers might vary depending on ingredients and how generous you are with that whipped cream!
Each slice (about 1/8 of the cake) contains roughly:
- 450 calories (worth every single one!)
- 25g fat (mostly from that heavenly cream and chocolate)
- 50g carbs (it is cake after all)
- 6g protein (surprisingly not zero!)
Remember, these values are just guidelines – your actual numbers might differ based on specific ingredients and substitutions. The important thing? That first blissful bite where all the flavors come together in perfect harmony. Some things are just too good to measure!
Share Your Black Forest Cake with Whipped Cream
I’d love to see your masterpiece! Snap a photo of your Black Forest Cake and tag me – nothing makes me happier than seeing your baking adventures. Drop a comment below if you have questions or just want to brag about your creation. Happy baking, friends!
Print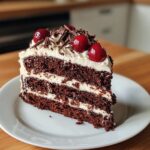
Indulge in Heavenly 4-Layer Black Forest Cake with Whipped Cream
- Total Time: 3 hours (includes chilling)
- Yield: 1 cake (8 servings) 1x
- Diet: Vegetarian
Description
A classic Black Forest Cake with layers of chocolate sponge, whipped cream, and cherries.
Ingredients
- 200g all-purpose flour
- 50g cocoa powder
- 200g granulated sugar
- 1 tsp baking powder
- 1/2 tsp salt
- 4 large eggs
- 100ml vegetable oil
- 100ml milk
- 1 tsp vanilla extract
- 400ml heavy cream
- 2 tbsp powdered sugar
- 1 can (400g) pitted cherries, drained
- 2 tbsp cherry liqueur (optional)
- 50g dark chocolate shavings
Instructions
- Preheat oven to 350°F (180°C). Grease and line two 8-inch cake pans.
- Whisk flour, cocoa powder, sugar, baking powder, and salt in a bowl.
- Add eggs, oil, milk, and vanilla extract. Mix until smooth.
- Divide batter between pans. Bake for 25-30 minutes until a toothpick comes out clean.
- Cool cakes completely. Slice each into two layers.
- Whip cream with powdered sugar until stiff peaks form.
- Brush cake layers with cherry liqueur if using.
- Spread whipped cream between layers, adding cherries.
- Frost the outside with remaining cream. Decorate with chocolate shavings.
- Chill for 2 hours before serving.
Notes
- Use high-quality cocoa for best flavor.
- Drain cherries well to avoid a soggy cake.
- For a non-alcoholic version, replace liqueur with cherry juice.
- Chill the bowl and beaters before whipping cream.
- Prep Time: 30 minutes
- Cook Time: 30 minutes
- Category: Dessert
- Method: Baking
- Cuisine: German
Nutrition
- Serving Size: 1 slice
- Calories: 450
- Sugar: 35g
- Sodium: 150mg
- Fat: 25g
- Saturated Fat: 12g
- Unsaturated Fat: 10g
- Trans Fat: 0g
- Carbohydrates: 50g
- Fiber: 3g
- Protein: 6g
- Cholesterol: 120mg
Keywords: Black Forest Cake, Chocolate Cake, Whipped Cream, German Dessert