Ah, the magic of Christmas gatherings! Nothing brings people together quite like a beautifully arranged cheese board, and I’m here to share my secrets for creating the most delightful *Christmas cheese boards*. You know, those vibrant platters filled with a variety of cheeses, meats, and fruits that make everyone’s eyes light up? They’ve become my go-to centerpiece for holiday celebrations, and trust me, they’re a total crowd-pleaser!
Some of my fondest memories are tied to these festive boards. I remember one year, my cousin brought her little ones, and they were so excited to pick out their favorite cheeses and fruits. The laughter and joy as they tried to balance crackers piled high with goodies made my heart swell. It’s these little moments that turn a simple appetizer into a cherished family tradition.
Whether you’re hosting a cozy get-together or a grand holiday party, a Christmas cheese board is perfect for sharing and snacking. The best part? It’s incredibly easy to put together, and you can customize it to suit everyone’s tastes! So, let’s dive in and create a cheese board that’ll spark joy and deliciousness this holiday season.
Ingredients List
Creating your festive Christmas cheese board is simple and fun! Here’s what you’ll need to get started:
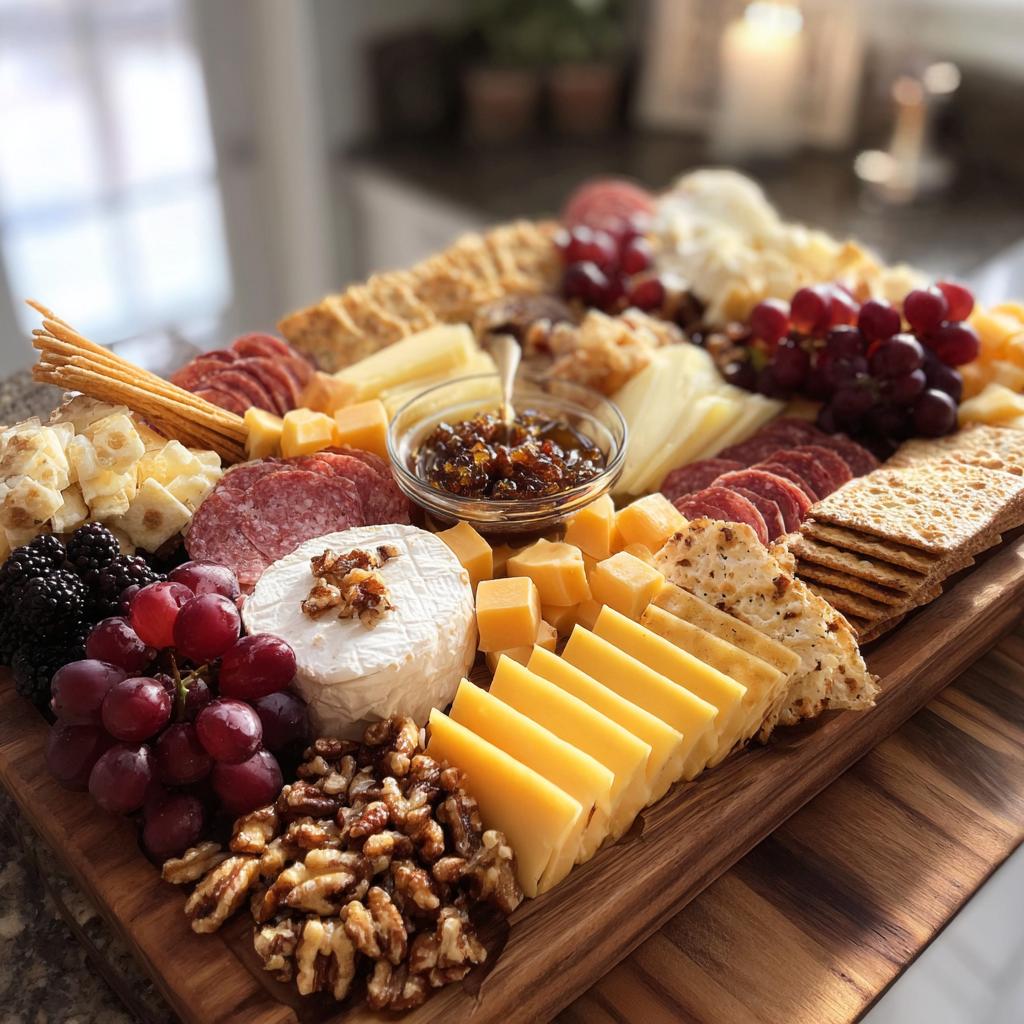
- Assorted cheeses (cheddar, brie, gouda) – 500g: Choose a mix of hard and soft cheeses for a delightful texture contrast.
- Salami – 200g: Thinly sliced for easy snacking; it adds a savory touch to balance the cheese.
- Crackers – 150g: Pick a variety, like buttery and whole grain, to add crunch and flavor.
- Fresh fruits (grapes, figs) – 200g: Seasonal fruits add color and sweetness; grapes are always a hit, while figs bring a gourmet flair.
- Nuts (walnuts, almonds) – 100g: A handful of mixed nuts adds a delightful crunch and healthy fat.
- Honey – 50g: Drizzle this on top for a sweet finish that pairs beautifully with the cheese.
Feel free to mix and match with your favorites, but I promise you can’t go wrong with this combination! Each ingredient brings something special to the table, making your Christmas cheese board a feast for the eyes and the palate.
How to Prepare Christmas Cheese Boards
Alright, let’s get into the fun part! Preparing your Christmas cheese board is like crafting a masterpiece, and I’m here to guide you through each step. Ready? Let’s go!
- Start with the cheeses: Begin by taking your assorted cheeses out of the fridge. Let them sit at room temperature for about 30 minutes before serving. This enhances their flavors and gives you that creamy, dreamy texture we all love!
- Arrange the cheeses: Grab a large wooden board or a festive platter. Place the cheeses on the board first, spacing them out so that there’s room for all the goodies to come. I like to cut some slices of cheese and leave others whole for a rustic look.
- Add the salami and crackers: Now, let’s create some visual interest! Arrange the salami slices around the cheeses, maybe in a fan shape or piled for a casual vibe. Next, tuck the crackers in neatly, ensuring they’re easily accessible for munching.
- Place fresh fruits: The fresh fruits are where the magic happens! Scatter the grapes and figs artfully around the cheeses, filling in any gaps. This not only adds a pop of color but also invites guests to mix flavors, which is always fun!
- Sprinkle the nuts: Grab your handful of nuts and sprinkle them over the board. This adds texture and a bit of crunch, which perfectly complements the creaminess of the cheeses. I like to use walnuts and almonds for their rich flavors.
- Drizzle with honey: Finally, for a touch of sweetness, drizzle honey over the board. Aim for a few spots on the cheese and maybe a little on the fruits too. It’s a delightful surprise that everyone will love!
And voilà! Your Christmas cheese board is ready to dazzle your guests! Take a moment to step back and admire your creation before diving in. Remember, the best part is sharing—not just the food, but the joy that comes with it. Happy holiday snacking!
Why You’ll Love This Recipe
This Christmas cheese board is not just a feast for the eyes; it’s a celebration of flavors and a breeze to prepare! Here are a few reasons why you’ll adore this recipe:
- Quick preparation: With just 15 minutes of prep time, you can whip up an impressive cheese board that looks like it took hours to create.
- No cooking required: This recipe is perfect for those busy holiday seasons when you want to spend more time with family and less time in the kitchen.
- Customizable: You can easily tailor your cheese board to suit everyone’s tastes. Swap out cheeses, add different fruits, or mix in your favorite nuts!
- Visually stunning: The vibrant colors of the cheeses, fruits, and nuts create a beautiful centerpiece that’s sure to wow your guests.
- Perfect for sharing: Cheese boards encourage mingling and sharing, making them ideal for gatherings where you want everyone to connect.
Trust me, once you make this festive cheese board, it’ll become a holiday staple you can’t wait to recreate year after year!
Tips for Success
Creating the perfect Christmas cheese board is all about balance, variety, and a touch of creativity! Here are some of my favorite pro tips to elevate your cheese board game and impress your guests:
- Balance flavors: Aim for a mix of sharp, creamy, sweet, and savory flavors. Pair a sharp cheddar with a creamy brie, and don’t forget the sweetness of honey and fruits to balance the savory salami.
- Mix textures: Combining different textures keeps things interesting! Include a hard cheese, a soft cheese, crunchy nuts, and crispy crackers. This way, every bite offers something new and exciting!
- Seasonal touches: Use seasonal fruits like pomegranates or citrus slices during the holidays. They not only add color but also enhance the festive feel of your board.
- Garnish with herbs: Fresh herbs like rosemary or thyme can add a lovely aromatic touch. Just a few sprigs tucked in can elevate the presentation and flavor.
- Don’t overcrowd: While it’s tempting to fill every inch of the board, leaving some space allows each ingredient to shine. It also makes it easier for guests to grab what they want!
- Provide serving utensils: Make sure to include cheese knives or small spoons for honey. This keeps things neat and gives your guests an easy way to serve themselves.
- Let it breathe: Remember to take the cheeses out of the fridge about 30 minutes before serving. This allows them to reach room temperature, enhancing their flavors and textures.
By keeping these tips in mind, you’ll create a stunning and delicious Christmas cheese board that will have everyone coming back for more. Happy assembling!
Variations
One of the best things about creating Christmas cheese boards is the endless possibilities for variations! You can mix and match ingredients to suit your tastes or the season. Here are some fun ideas to inspire your creativity:
- Change up the cheeses: Instead of cheddar, brie, and gouda, try blue cheese for a bold flavor, goat cheese for a tangy twist, or a smoked cheese for a hint of depth. Mixing different cheese types can create an exciting flavor profile!
- Explore different meats: If salami isn’t your favorite, consider prosciutto for a delicate touch or spicy chorizo for some heat. You can even include marinated olives or a selection of pâté for a gourmet flair.
- Seasonal fruits: During the winter months, consider adding clementines, persimmons, or roasted chestnuts. These not only add flavor but also bring a festive pop of color to your board!
- Include spreads: Elevate your cheese board by adding unique spreads such as fig jam, spicy mustard, or a savory tapenade. These can complement your cheeses and enhance the overall experience.
- Experiment with different nuts: While walnuts and almonds are great, try pecans for sweetness, hazelnuts for a buttery taste, or even spiced nuts for a little kick. They’ll add an extra layer of flavor and crunch!
- Herbal infusions: Add sprigs of fresh herbs, such as basil or mint, to enhance the aroma and visual appeal. You can also incorporate herb-infused oils for drizzling or dipping.
Don’t be afraid to get creative and let your personal taste shine through! Each variation can turn your Christmas cheese board into a fresh and exciting experience, making it something new and wonderful every time you serve it. Happy experimenting!
Serving Suggestions
Now that you’ve crafted the perfect Christmas cheese board, let’s talk about what to serve alongside it to create an unforgettable experience for your guests. These complementary items will elevate your spread and enhance the flavors of your cheese board:
- Wines: A glass of wine can really enhance your cheese board experience! Pair your cheeses with a crisp white wine like Sauvignon Blanc or a light red like Pinot Noir. If you’re feeling adventurous, a sparkling wine adds a celebratory touch and pairs beautifully with the richness of cheeses.
- Charcuterie: While your cheese board takes center stage, a few slices of cured meats like prosciutto or pepperoni can add depth. They provide a savory contrast to the creamy cheeses and sweet fruits, making every bite more exciting!
- Breads: Offer an assortment of fresh breads or breadsticks for a delightful crunch. A crusty baguette or some soft focaccia complements the cheeses perfectly and gives guests something to stack their toppings onto.
- Dips and spreads: Include a few dips like hummus, olive tapenade, or a savory pesto. These spreads can add variety and fun for guests who want to mix and match flavors.
- Salads: A light, refreshing salad can balance the richness of the cheese board. Try a simple arugula salad with lemon vinaigrette or a winter salad with roasted beets and goat cheese for a festive touch.
- Fruits and veggies: Fresh vegetable sticks like carrots, celery, or bell peppers can provide a refreshing crunch. You can also add extra seasonal fruits like pomegranates or persimmons to tie in with the festive theme.
These serving suggestions not only enhance your cheese board but also create a beautifully balanced spread that’s sure to please all your guests. So go ahead and mix and match, and let the festivities begin!
Storage & Reheating Instructions
So, you’ve enjoyed your fabulous Christmas cheese board, but what if you have some leftovers? No worries, I’ve got you covered! Proper storage will keep those delicious ingredients fresh for your next snacking adventure.
First things first, let’s talk about storage. If you have any leftover cheeses, fruits, or meats, it’s essential to store them correctly. Here’s how:
- Cheeses: Wrap each cheese tightly in wax paper or parchment paper, then place them in an airtight container. This method helps prevent them from drying out while allowing them to breathe. Keeping them in the fridge is crucial to maintain their freshness!
- Fruits: If you have leftover fresh fruits like grapes or figs, store them in a sealed container in the refrigerator. Make sure they’re dry before storing to avoid any mushiness. For fruits that have been cut, like figs, it’s best to consume them within a day or two for optimal taste.
- Meats: Store any leftover salami or other meats in an airtight container in the fridge. Try to consume them within a few days for the best flavor and safety.
- Crackers and nuts: These can be stored in their original packaging or in a zip-top bag. Keep them in a cool, dry place to maintain their crispness. I usually keep nuts in the fridge if I want them to last longer!
- Honey: Honey can be left at room temperature in its original container. Just make sure to keep it sealed to prevent crystallization.
Now, if you’re ready to refresh your cheese board for a second round, here’s what I do:
- Rearrange and revive: Take the cheeses out of the fridge about 30 minutes before serving again to let them come to room temperature, just like before! This will bring back that creamy texture and enhance the flavors.
- Add fresh touches: If your fruits are looking a bit sad, consider adding a few new, fresh pieces to brighten things up! A sprinkle of fresh nuts can also rejuvenate the board.
- Drizzle again: A quick drizzle of honey or a new spread can give your board an entirely new life, making it feel fresh and exciting.
And there you have it! With these simple storage tips and refreshing ideas, you can enjoy your Christmas cheese board long after the festivities are over. Happy snacking!
Nutritional Information
Understanding the nutritional values of your delightful Christmas cheese board can help you keep track of what you’re enjoying. Here’s an estimate of the nutritional information for a typical serving size of 100g:
- Calories: 350
- Fat: 25g
- Saturated Fat: 10g
- Unsaturated Fat: 15g
- Trans Fat: 0g
- Cholesterol: 30mg
- Sodium: 450mg
- Carbohydrates: 20g
- Fiber: 3g
- Sugar: 5g
- Protein: 12g
Keep in mind that these values are estimates and can vary based on the specific ingredients you choose. But don’t stress too much about the numbers; it’s all about enjoying the flavors and the moments shared with your loved ones around the cheese board!
FAQ Section
Got questions about creating the perfect Christmas cheese board? Don’t worry, I’ve got you covered! Here are some common queries I get, along with my best answers to help you out:
- What are the best cheese pairings for a cheese board?
When it comes to cheese pairings, I always recommend a combination of hard and soft cheeses. A sharp cheddar pairs beautifully with creamy brie, while a nutty gouda adds depth. Don’t forget to include a blue cheese for those who love bold flavors, and always complement them with fruits and nuts for a balanced experience! - How can I keep the ingredients fresh?
To keep your cheese board ingredients fresh, store cheeses wrapped in wax or parchment paper in the fridge. Fresh fruits should be kept dry and in airtight containers, while meats should be stored in sealed containers as well. Always let your cheeses come to room temperature before serving to enhance their flavors! - Can I prepare the cheese board in advance?
Yes, you can prep certain components in advance! I recommend chopping fruits and meats a few hours before serving, but hold off on setting up the entire board until just before your guests arrive. This way, everything stays fresh and visually appealing! - What should I do if I have leftover cheese?
If you have leftover cheese, wrap it tightly in wax paper or parchment, then store it in an airtight container in the fridge. Most cheeses will last several days this way. Just remember to let them sit out for about 30 minutes before serving again, so they regain their creamy texture! - Are there any dietary considerations I should keep in mind?
Absolutely! If you’re hosting guests with dietary restrictions, consider including a variety of cheeses, some dairy-free options, and gluten-free crackers. You might also want to add extra fruits and veggies to accommodate everyone’s preferences. Always ask your guests about their needs beforehand to ensure everyone can enjoy the spread!
Feel free to reach out if you have more questions or need personalized tips! Enjoy your cheese board adventures!
Print
Christmas Cheese Boards: 5 Tips to Create Magic
- Total Time: 15 minutes
- Yield: Serves 6-8
- Diet: Vegetarian
Description
A festive and colorful cheese board for Christmas gatherings.
Ingredients
- Assorted cheeses (cheddar, brie, gouda) – 500g
- Salami – 200g
- Crackers – 150g
- Fresh fruits (grapes, figs) – 200g
- Nuts (walnuts, almonds) – 100g
- Honey – 50g
Instructions
- Arrange the cheeses on a large board.
- Add salami and crackers around the cheeses.
- Place fresh fruits in between the cheeses.
- Sprinkle nuts over the board.
- Drizzle honey on top for sweetness.
Notes
- Use seasonal fruits for a festive touch.
- Include a variety of textures in cheeses.
- Pair with wine for an enhanced experience.
- Prep Time: 15 minutes
- Cook Time: 0 minutes
- Category: Appetizer
- Method: No-cook
- Cuisine: International
Nutrition
- Serving Size: 100g
- Calories: 350
- Sugar: 5g
- Sodium: 450mg
- Fat: 25g
- Saturated Fat: 10g
- Unsaturated Fat: 15g
- Trans Fat: 0g
- Carbohydrates: 20g
- Fiber: 3g
- Protein: 12g
- Cholesterol: 30mg
Keywords: christmas cheese boards