
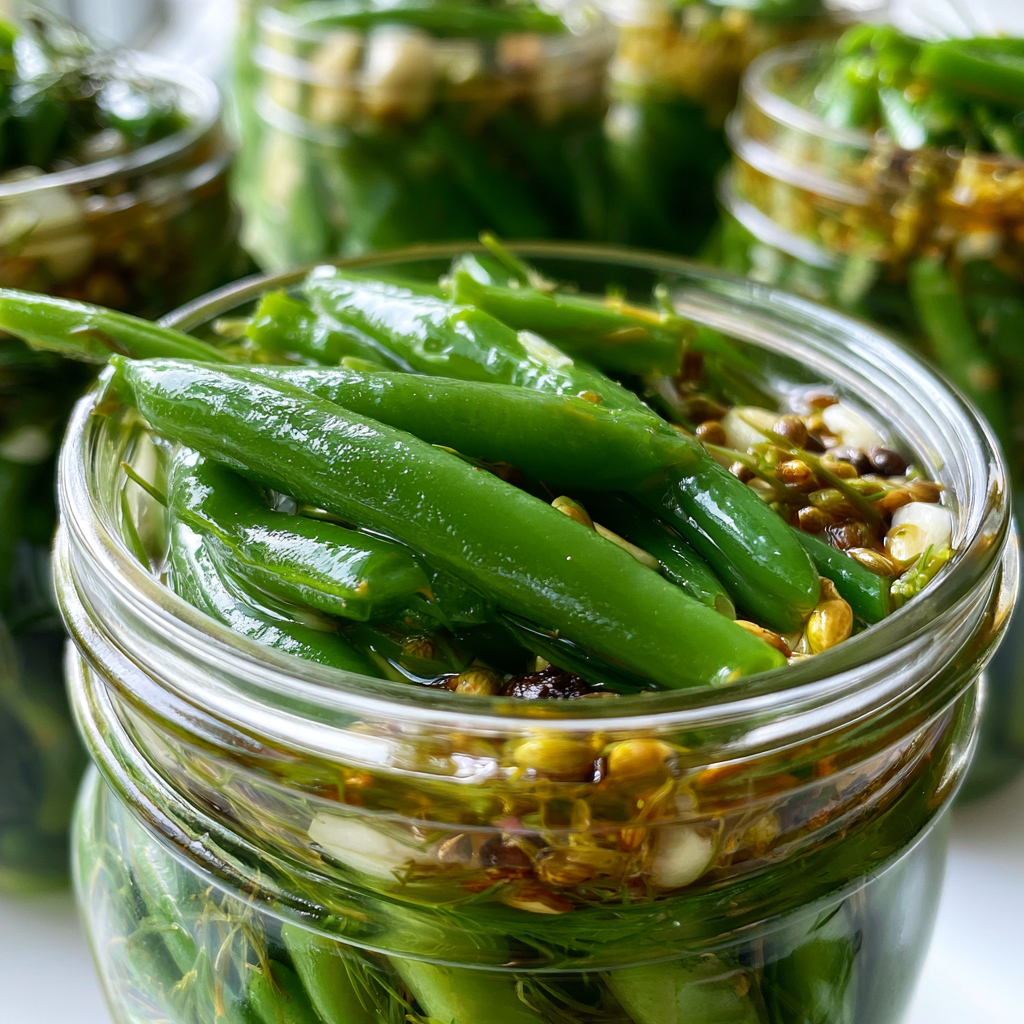
Dilly Beans: 30-Minute Crisp and Tangy Pickled Delight
Are you ready to discover a flavorful new snack? Dilly beans are a fantastic way to enjoy crisp green beans with a tangy twist. This recipe not only saves time but also delivers a punch of flavor that will leave your taste buds dancing. Have you ever wondered how to make a pickled snack that’s both quick and easy? Imagine the aroma of fresh dill mingling with garlic, creating an irresistible scent that fills your kitchen. The vibrant green of the beans gleams in the jar, inviting you to reach in and grab a bite. The first crunch reveals a delightful balance of acidity and savoriness that makes these dilly beans an unforgettable treat.
Beyond their incredible taste, dilly beans come packed with numerous health benefits. Green beans are rich in Vitamin C, which bolsters your immune system and promotes skin health. They also provide essential fiber, aiding in digestion and helping you feel full longer. The addition of garlic not only enhances flavor but is known for its numerous health properties, including its ability to lower blood pressure and cholesterol levels. Furthermore, dill is a source of antioxidants and has been linked to improved digestion and anti-inflammatory effects. Did you know that dill was historically used to ward off evil spirits and protect against illness?
What sets this dilly bean recipe apart from others is its simplicity and speed. Unlike traditional pickling methods, which may take days or weeks, this recipe allows you to enjoy your dilly beans within 30 minutes. It’s a unique technique that emphasizes freshness while preserving the beans’ crunch. Moreover, this recipe works beautifully for beginners, families, and those looking for a quick snack or side dish for special occasions. Imagine serving these vibrant jars at your next gathering, impressing your guests with a homemade delicacy that you whipped up in no time!
In summary, this recipe requires just 20 minutes of prep time and 10 minutes of cooking, yielding two pint-sized jars of delightful dilly beans. It’s beginner-friendly, making it perfect for weeknight meals or a quick snack option. With these dilly beans at your disposal, you’ll always have a crisp and tangy treat ready to serve!
What are Dilly Beans
Dilly beans are pickled green beans infused with dill, garlic, and vinegar. They are typically canned and served as a snack, side dish, or addition to salads. The pickling process preserves the beans while providing a crunchy texture and zesty flavor that complements a variety of meals.
Why You Will Love This Recipe
- This recipe is quick and easy, taking only 30 minutes from start to finish.
- It provides a unique and flavorful way to enjoy fresh green beans.
- Dilly beans are versatile, fitting perfectly in salads, as a side dish, or even as a cocktail garnish.
- This recipe allows you to control the ingredients, making it possible to create a healthier, homemade alternative to store-bought options.
- They make excellent gifts in decorative jars, showcasing your culinary skills.
Ingredients You Need
- 1 pound fresh green beans: Provides crunch and nutrition.
- 2 cups water: Essential for the brine solution.
- 1 cup white vinegar: Offers acidity for pickling.
- 1 tablespoon kosher salt: Enhances flavor and aids preservation.
- 1 tablespoon dill seeds: Infuses the unique dill flavor.
- 4 cloves garlic: Adds depth and health benefits.
- 1 teaspoon red pepper flakes (optional): Introduces heat for those who enjoy a spicy kick.
- 1 teaspoon black peppercorns: Enhances overall flavor.
- 2 pint-sized canning jars with lids: Necessary for storing your dilly beans.
How to Make Dilly Beans Step by Step
- Start by sterilizing your jars and lids in boiling water for about 10 minutes. This will prevent contamination.
- Trim the ends of the green beans, ensuring they fit into the jars.
- In a saucepan, combine 2 cups of water, 1 cup of white vinegar, and 1 tablespoon of kosher salt. Bring this mixture to a boil.
- Once boiling, add the dill seeds, garlic, red pepper flakes, and black peppercorns. Stir well and let simmer for 2 minutes.
- Pack the green beans vertically into the sterilized jars, leaving about half an inch of headspace at the top.
- Carefully pour the hot brine over the green beans, making sure to cover them completely.
- Seal the jars with the lids while they are still hot. Allow the jars to cool to room temperature before refrigerating.
Pro Tip: Sterilizing jars is crucial to ensure your dilly beans last longer.
Pro Tip: Allow at least 24 hours for the flavors to meld before tasting.
Expert Tips for Best Results
- Choose fresh, firm green beans for the best texture.
- Experiment with different spices such as mustard seeds or coriander for unique flavors.
- For a touch of sweetness, consider adding a teaspoon of sugar to the brine.
- Always ensure that the jars are sealed properly to maintain freshness.
- Store the jars in a cool, dark place for optimal preservation.
- Use a funnel when pouring the brine to avoid spills and mess.
Variations and Substitutions
- For a spicy variation, increase the amount of red pepper flakes or add sliced jalapeños.
- Try using apple cider vinegar instead of white vinegar for a fruitier flavor.
- For a herbal twist, add fresh thyme or rosemary to the brine.
- Make a low-sodium version by reducing the amount of kosher salt in the recipe.
How to Serve and Store
Serve your dilly beans as a crunchy snack or as a side dish to accompany grilled meats and salads. They also make great additions to a charcuterie board. Store your jars in the refrigerator, where they will stay fresh for up to 2 months. Freezing is not recommended, as it affects the texture of the beans. When reheating, simply enjoy them cold straight from the jar or let them come to room temperature.
Frequently Asked Questions
Can I use other vegetables for pickling?
Yes, you can use carrots, cucumbers, or radishes for pickling.
How long do dilly beans last?
Properly stored in the fridge, dilly beans can last up to 2 months.
Can I adjust the spice level?
Absolutely! You can add more or less red pepper flakes to suit your taste.
Do I need to process the jars in a water bath?
This quick recipe does not require water bath processing, as they are refrigerated pickles.
Can I use fresh dill instead of dill seeds?
Yes, fresh dill can be used, but adjust the quantity since it’s less concentrated.
Are dilly beans gluten-free?
Yes, dilly beans are gluten-free as all the ingredients used are naturally gluten-free.
In conclusion, making dilly beans is a rewarding and straightforward process that brings numerous benefits. They offer a healthy, low-calorie snack packed with nutrients like Vitamin C and fiber. Try this recipe today and leave a comment below!
Print
Dilly Beans: 30-Minute Crisp and Tangy Pickled Delight
- Total Time: 30
- Yield: 2 pint jars 1x
- Diet: Vegetarian
Description
Crisp, tangy, and full of flavor, these dilly beans are the perfect pickled snack or addition to any meal.
Ingredients
- 1 pound fresh green beans, trimmed
- 2 cups water
- 1 cup white vinegar
- 1 tablespoon kosher salt
- 1 tablespoon dill seeds
- 4 cloves garlic, peeled and smashed
- 1 teaspoon red pepper flakes (optional)
- 1 teaspoon black peppercorns
- 2 pint-sized canning jars with lids
Instructions
- In a large pot, combine water, vinegar, and salt. Bring the mixture to a boil, stirring until the salt dissolves.
- Pack the trimmed green beans into the canning jars, standing them upright.
- In each jar, add dill seeds, smashed garlic cloves, red pepper flakes, and black peppercorns.
- Pour the hot vinegar mixture over the beans, ensuring they are fully submerged, leaving about 1/2 inch of headspace.
- Wipe the rims of the jars with a clean cloth and seal them with lids.
- Process the jars in a boiling water bath for 5-10 minutes to ensure they are sealed properly.
- Remove the jars from the water bath and let them cool completely on a clean towel.
- Store the jars in a cool, dark place for at least 1 week before enjoying to allow the flavors to develop.
Notes
- For a spicier version, increase the amount of red pepper flakes.
- Make sure to use fresh, crisp green beans for the best texture.
- These dilly beans can be stored for up to a year if sealed properly.
- Prep Time: 20
- Cook Time: 10
- Category: Pickling
- Cuisine: American
Nutrition
- Serving Size: 1/2 cup
- Calories: 30
- Sodium: 300
- Fat: 0
- Carbohydrates: 6
- Fiber: 2
- Protein: 1
Keywords: dilly beans, pickled green beans, canning recipe, homemade pickles, dill pickles