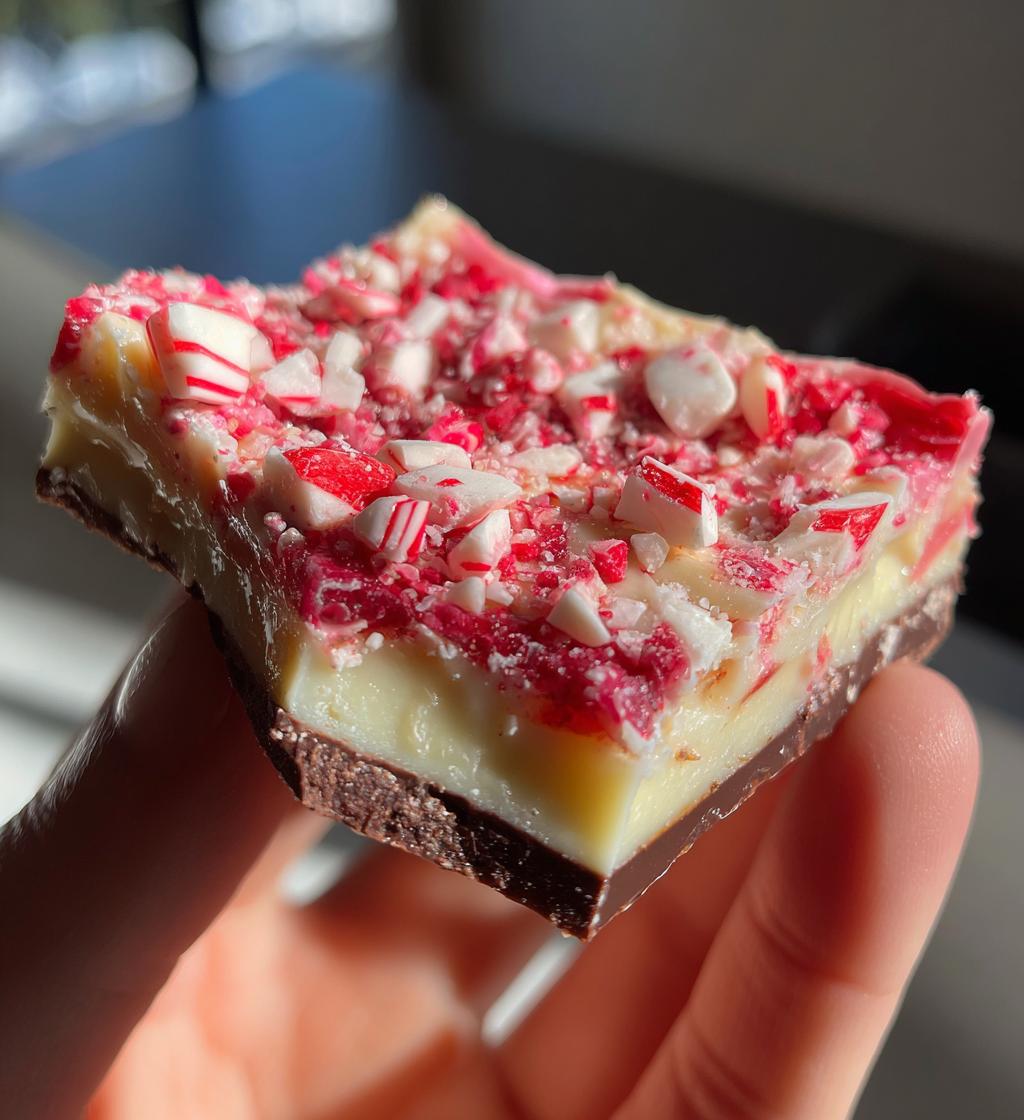
There’s something magical about peppermint bark that instantly puts me in the holiday spirit. Maybe it’s the way the crisp peppermint crunch plays against smooth chocolate, or how ridiculously easy it is to make. Every December, my kitchen turns into a peppermint bark factory – my kids and I make batch after batch for friends, teachers, and (let’s be honest) ourselves. The best part? Even when we’re covered in chocolate smudges and candy cane crumbs, we’re making memories. This simple treat has become our family’s edible holiday card – a sweet little package of Christmas cheer that always disappears way too fast.
Why You’ll Love This Peppermint Bark
Oh, where do I even start? This peppermint bark recipe is basically holiday magic in edible form. Here’s why it’s my go-to treat every December:
- So easy a kid could make it (mine do!) – just melt, layer, and chill
- The ultimate festive treat with that classic red-and-white holiday look
- Totally customizable – go heavier on the peppermint or add festive sprinkles
- Makes the sweetest homemade gifts that people actually get excited about
- That perfect crunch – the candy cane topping is pure holiday joy in every bite
Trust me, once you make your first batch, you’ll understand why my family’s been obsessed with this recipe for years!
Ingredients for Peppermint Bark
Gathering ingredients for peppermint bark is half the fun – I love lining everything up on my counter like a little holiday mise en place. Here’s exactly what you’ll need (and yes, those measurements matter!):
- 12 oz semi-sweet chocolate chips – I always use Ghirardelli for that perfect melt
- 12 oz white chocolate chips – the contrast makes it so pretty
- 1 tsp peppermint extract – this is where the magic happens!
- 1/2 cup crushed candy canes – measure after crushing, and save some extra for sprinkling
Pro tip from my many peppermint bark experiments: splurge on good chocolate. Those bargain chips might save you money but they won’t give you that smooth, snap-worthy texture we’re after!
How to Make Peppermint Bark
Okay, let’s get to the fun part – making this magical peppermint bark! I’ve made this so many times I could probably do it in my sleep, but I’ll walk you through each step carefully. The key is patience between layers – trust me, those chilling times make all the difference!
Step 1: Prepare the Baking Sheet
First things first – grab a standard baking sheet (I use a quarter sheet pan) and line it with parchment paper. Not wax paper, not foil – parchment! This little trick means your peppermint bark will pop right off when it’s set, no scraping or breaking required.
Step 2: Melt the Chocolate Layers
Now for the semi-sweet chocolate – you’ve got options here. My grandma swore by the double boiler method (a heatproof bowl over simmering water), but I often cheat with the microwave. Just zap in 30-second bursts, stirring between each, until it’s smooth as silk. Whatever you do, don’t overheat it or you’ll get grainy chocolate – and nobody wants that!
Step 3: Layer and Chill the Peppermint Bark
Pour that gorgeous melted chocolate onto your prepared pan and spread it evenly with an offset spatula (or the back of a spoon in a pinch). Here’s where patience comes in – pop it in the fridge for exactly 15 minutes. Not 10, not 20 – 15! This sets the base perfectly so your white chocolate layer stays distinct.
Step 4: Add the Finishing Touches
While the base chills, melt your white chocolate and stir in that glorious peppermint extract. Pour it over the set dark chocolate, sprinkle generously with crushed candy canes (I put mine in a ziplock and whack them with a rolling pin for perfect crumbs), then chill again for 30 minutes. The wait is torture, but so worth it!
Tips for Perfect Peppermint Bark
After years of peppermint bark disasters (oh, the horror of seized chocolate!), I’ve learned a few tricks that guarantee perfect results every time:
- Go slow with the peppermint – that extract is powerful! Start with 1/2 tsp and taste before adding more
- Keep your tools dry – even a drop of water can make chocolate seize up like concrete
- Room temp is your friend – let the bark sit out for 5 minutes before breaking it, or it’ll shatter
- Layer your candy cane dust – sprinkle some before the white chocolate sets for maximum stickage
And the golden rule? Always make extra – this stuff disappears faster than holiday cookies!
Peppermint Bark Variations
Oh, the fun we’ve had playing with this peppermint bark recipe over the years! Once you’ve mastered the classic version, try these tasty twists:
- Dark chocolate dream – swap semi-sweet for 70% dark chocolate for a richer bite
- Nutty holiday crunch – sprinkle toasted almonds or pecans between layers
- Mint chocolate chip – add mini chocolate chips to the white chocolate layer
- Festive sprinkle party – mix holiday sprinkles with the candy cane topping
My kids’ current favorite? We drizzle melted dark chocolate over the finished bark for a fancy swirled look. The possibilities with peppermint bark are endless – that’s why we make at least four different versions each Christmas!
Storing and Serving Peppermint Bark
Here’s the scoop on keeping your peppermint bark fresh and festive – because trust me, you’ll want it to last more than five minutes! I always store mine in an airtight container between layers of parchment paper (those beautiful layers deserve protection). Pop it in the fridge, and it’ll stay perfect for up to two weeks – if you can resist eating it all before then! For serving, let it sit at room temp for about 10 minutes before breaking into pieces. That slight warmth makes the chocolate snap just right when you bite into it.
Peppermint Bark Nutritional Information
Okay, let’s be real – we’re not eating peppermint bark for its health benefits! But for those curious, here’s the scoop per piece (based on my recipe): about 120 calories, 7g fat, and 12g sugar. Remember, nutritional values are estimates and vary by ingredients – especially if you go wild with extra candy canes like I sometimes do!
Frequently Asked Questions
Can I use mint extract instead of peppermint?
Oh, I get this one all the time! While you technically can, peppermint extract gives that classic holiday flavor we love. Mint extract often includes spearmint, which tastes more like gum than candy canes. If it’s all you have, start with half the amount and taste as you go!
How long does peppermint bark keep?
In an airtight container in the fridge, your peppermint bark will stay delicious for about two weeks. I’ve kept it for three weeks before, but honestly? It never lasts that long in my house! The layers might start to soften after a week, but it’s still totally edible.
Can I freeze peppermint bark?
Absolutely! Freezing is my secret for getting ahead on holiday gifts. Just layer it between parchment paper in an airtight container – it’ll keep for up to three months. Thaw in the fridge overnight to prevent condensation from messing up that beautiful chocolate snap.
Why did my chocolate get grainy?
Ugh, we’ve all been there! This usually means your chocolate got too hot or a drop of water got in. Always melt slowly and stir constantly. If it happens, sadly there’s no fix – but it still tastes great crumbled over ice cream!
Final Thoughts
There you have it – my family’s foolproof peppermint bark recipe that’s brought us years of holiday happiness. I’d love to see your creations! Tag me on Instagram when you make your batch (those candy cane sprinkles always make for the cutest photos). Now go forth and spread some peppermint joy – your kitchen is about to smell amazing!
Print
Irresistible Peppermint Bark Recipe in 15 Minutes Flat
- Total Time: 50 minutes (including chilling)
- Yield: 24 pieces 1x
- Diet: Vegetarian
Description
A simple yet delicious holiday treat made with layers of chocolate and peppermint.
Ingredients
- 12 oz semi-sweet chocolate chips
- 12 oz white chocolate chips
- 1 tsp peppermint extract
- 1/2 cup crushed candy canes or peppermint candies
Instructions
- Line a baking sheet with parchment paper.
- Melt the semi-sweet chocolate chips in a microwave or double boiler, stirring until smooth.
- Spread the melted chocolate evenly onto the prepared baking sheet.
- Refrigerate for 15 minutes or until set.
- Melt the white chocolate chips and stir in the peppermint extract.
- Pour the white chocolate mixture over the semi-sweet chocolate layer.
- Sprinkle crushed candy canes on top.
- Chill for another 30 minutes or until firm.
- Break into pieces and serve.
Notes
- Store in an airtight container in the refrigerator.
- Use high-quality chocolate for the best results.
- Adjust peppermint extract to taste.
- Prep Time: 10 minutes
- Cook Time: 5 minutes
- Category: Dessert
- Method: No-Bake
- Cuisine: American
Nutrition
- Serving Size: 1 piece
- Calories: 120
- Sugar: 12g
- Sodium: 10mg
- Fat: 7g
- Saturated Fat: 4g
- Unsaturated Fat: 2g
- Trans Fat: 0g
- Carbohydrates: 15g
- Fiber: 1g
- Protein: 1g
- Cholesterol: 5mg
Keywords: peppermint bark, holiday treat, chocolate, candy canes, easy dessert