Valentine’s Day is all about sharing love, and what better way to express it than through delicious desserts? There’s something magical about indulging in sweet treats with someone special, and it’s even more wonderful when those treats cater to everyone, including those with gluten sensitivities! That’s where my gluten free Valentine’s Day desserts come into play. They’re not just for the gluten intolerant; they’re for anyone who loves a good dessert. Trust me, you won’t even miss the gluten!
These recipes are crafted with care, using wholesome ingredients that create rich flavors and delightful textures. Imagine sinking your teeth into fudgy brownies made from almond flour, sweetened naturally with maple syrup, and just the right touch of cocoa. They’re perfect for sharing or savoring alone with a cup of tea. Plus, it’s all about inclusivity—everyone can enjoy these treats together, making them ideal for your Valentine’s celebration. So, let’s dive into the world of gluten free desserts that are sure to impress and satisfy your sweet tooth this Valentine’s Day!
Ingredients List
- 1 cup finely ground almond flour
- 1/2 cup unsweetened cocoa powder
- 1/2 cup pure maple syrup
- 1/4 cup melted coconut oil
- 2 large eggs
- 1 teaspoon vanilla extract
- 1/2 teaspoon baking soda
- 1/4 teaspoon salt
How to Prepare Gluten Free Valentine’s Day Desserts
Preheating the Oven
First things first, you’ll want to preheat your oven to 350°F (175°C). This step is crucial because it ensures that your desserts bake evenly and achieve that perfect fudgy texture. So, while you’re gathering your ingredients, let that oven start warming up—it makes a big difference!
Mixing the Dry Ingredients
Now, let’s get to the fun part! In a large mixing bowl, combine the almond flour, unsweetened cocoa powder, baking soda, and salt. Use a whisk or a fork to mix them well. You want to break up any clumps and ensure everything is evenly distributed. This step is super important because it helps your brownies rise beautifully and have that rich chocolate flavor throughout. Just picture that deep, dark color coming together!
Preparing the Wet Ingredients
In another bowl, it’s time to whisk together the eggs, pure maple syrup, melted coconut oil, and vanilla extract. I like to use a whisk here, but you could also use an electric mixer if you prefer. The mixture should become light and slightly frothy—this means you’re on the right track! The coconut oil adds a lovely richness that complements the sweetness of the maple syrup perfectly.
Combining Wet and Dry Ingredients
Now, it’s time to bring these two mixtures together. Pour the wet ingredients into the bowl of dry ingredients and gently fold them together using a spatula. You want to mix until just combined—don’t overdo it! The batter should be thick and glossy, with no dry flour visible. If you’ve done it right, you’ll have a beautiful, chocolatey batter that’s just begging to be baked!
Baking the Desserts
Pour the batter into a greased baking dish—make sure it’s evenly spread out. It’s time to let the magic happen in the oven! Bake for 25-30 minutes. To check for doneness, insert a toothpick into the center; it should come out with a few moist crumbs, not wet batter. If it’s clean, you’ve baked them too long! But don’t worry, we all learn through trial and error, right?
Cooling and Serving
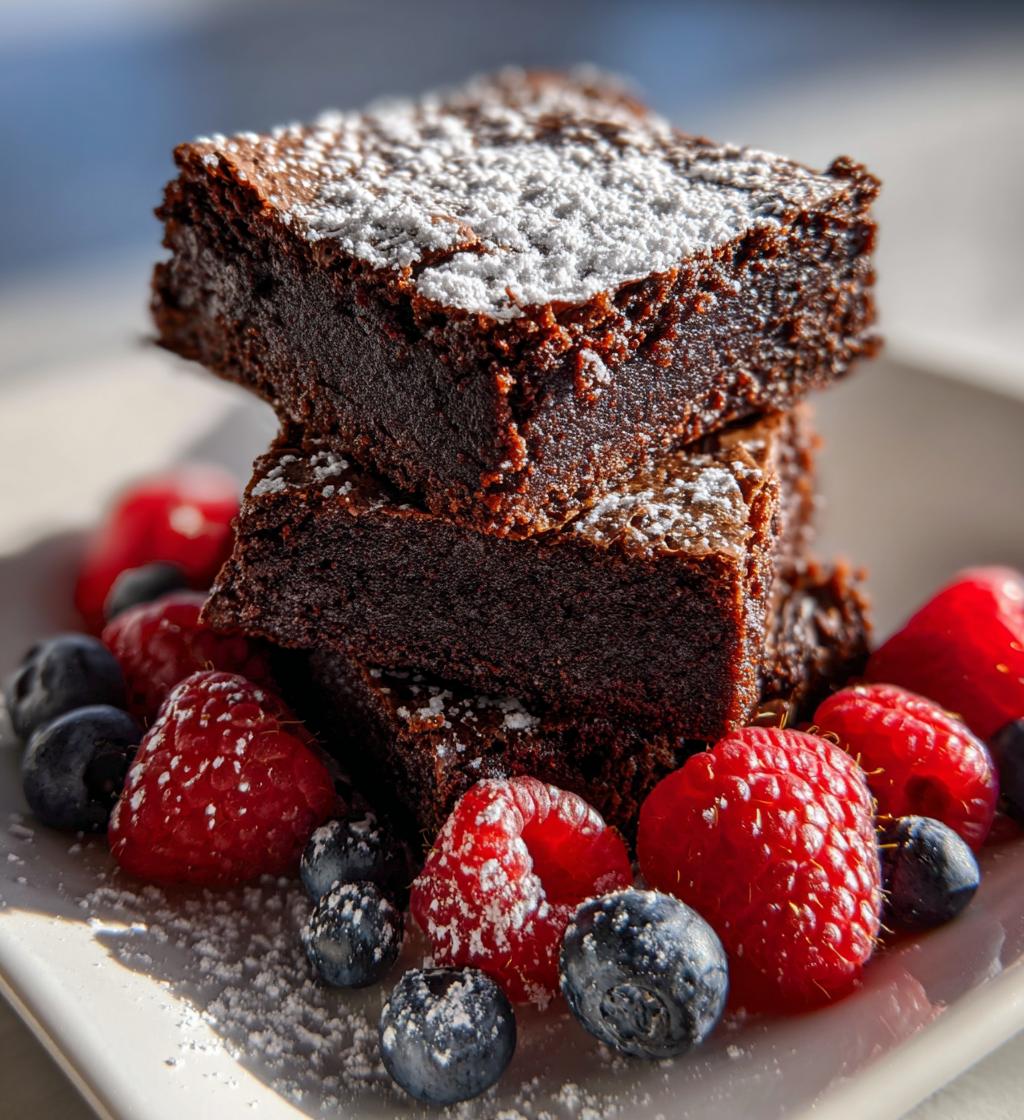
Once your brownies are out of the oven, allow them to cool in the pan for at least 10 minutes before transferring them to a wire rack. This cooling step is super important—it helps them set and makes them easier to cut. Trust me, the wait is worth it! When they’re ready to serve, I love pairing them with fresh berries for a pop of color and flavor. It adds a nice tartness that complements the sweetness of the brownies beautifully. Enjoy your delicious gluten free Valentine’s Day dessert!
Nutritional Information
When indulging in these delicious gluten free Valentine’s Day desserts, it’s good to know what you’re enjoying! Here’s an estimated breakdown of the nutritional values per serving, so you can savor every bite with a little peace of mind:
- Calories: 180
- Total Fat: 12g
- Saturated Fat: 5g
- Unsaturated Fat: 7g
- Trans Fat: 0g
- Cholesterol: 30mg
- Sodium: 50mg
- Total Carbohydrates: 15g
- Dietary Fiber: 3g
- Sugar: 5g
- Protein: 5g
Keep in mind that these values are estimates and can vary based on your specific ingredients and portion sizes. But really, who’s counting calories on Valentine’s Day? Just enjoy the love and sweetness that each bite brings!
Why You’ll Love This Recipe
- Quick Prep Time: With just 10 minutes of prep, you can whip up these decadent desserts in no time. Perfect for last-minute Valentine’s Day surprises!
- Delicious Flavor: The combination of rich cocoa and sweet maple syrup creates an irresistible taste that will have everyone asking for seconds. Trust me, they won’t believe they’re gluten free!
- Healthy Ingredients: Made with wholesome almond flour and natural sweeteners, these desserts are not only tasty but also nourishing. You can indulge without the guilt!
- Suitable for Gluten Intolerant Guests: Everyone deserves a sweet treat on Valentine’s Day, and these gluten free desserts ensure that no one is left out. They’re perfect for sharing with friends and loved ones, regardless of dietary needs.
Tips for Success
If you want to ensure your gluten free Valentine’s Day desserts turn out perfectly every time, I’ve got you covered with some of my tried-and-true tips! These little nuggets of wisdom will help you achieve that fudgy texture and rich flavor that makes these desserts so special.
Choose Quality Ingredients
Trust me, the quality of your ingredients matters! Opt for high-quality almond flour and cocoa powder. I love using brands that are finely ground, as they mix better and create a smoother batter. Also, go for pure maple syrup instead of imitation syrup—it really elevates the flavor!
Don’t Skimp on Mixing
When you whisk together the wet ingredients, take your time! You want to aerate the eggs and incorporate everything well for a light texture in your brownies. A good whisking will make all the difference, so don’t rush this step!
Adjust Sweetness to Your Liking
Everyone has different preferences when it comes to sweetness. If you want a dessert that’s a bit sweeter, feel free to add a little extra maple syrup. Just remember to adjust the other ingredients slightly if you choose to do so—maybe add a pinch more almond flour to keep the consistency right!
Watch the Baking Time
Ovens can vary wildly in temperature, so keep an eye on your brownies as they bake. If they’re looking good at the 25-minute mark, start checking for doneness. Remember, you want that toothpick to come out with a few moist crumbs, not completely clean. It’ll keep your brownies soft and fudgy!
Let Them Cool
Once baked, let those beauties cool in the pan for at least 10 minutes. I know it’s tempting to dig in right away, but this step is essential for them to set properly. If you don’t wait, you might end up with a gooey mess instead of perfectly cut brownies!
With these tips in your back pocket, you’re well on your way to creating delightful gluten free desserts that your loved ones will adore this Valentine’s Day. Happy baking!
Variations
The beauty of these gluten free Valentine’s Day desserts is that they’re incredibly versatile! You can easily customize them to suit your tastes or to impress your loved ones with something a little different. Here are some fun variations to consider:
Add Different Flavors
Why not take a trip to flavor town? You can infuse your brownies with different extracts! Try swapping out the vanilla extract for almond or peppermint extract for a delightful twist. Just remember, a little goes a long way with these strong flavors, so start with half the amount and adjust to your liking.
Mix in Nuts or Chocolate Chips
If you love a bit of crunch, consider adding some chopped nuts like walnuts or pecans into the batter. They add a lovely texture and taste that pairs beautifully with chocolate. You can also toss in some gluten free chocolate chips for an extra chocolatey treat—trust me, you can never have too much chocolate!
Top it Off with a Frosting
Feeling fancy? Whip up a simple frosting to spread on top of your cooled brownies! A cream cheese frosting or a dairy-free coconut whipped topping can elevate these treats to a whole new level. Just beat together some cream cheese with a bit of powdered sugar and vanilla until smooth, and spread it generously over the brownies. It’s a sweet surprise that will take them from good to wow!
Serve with Fun Toppings
Don’t forget about toppings! A dusting of powdered sugar or a drizzle of melted dark chocolate can make your dessert look and taste even more decadent. You could also sprinkle some sea salt on top for that sweet-and-salty combo that’s all the rage right now. Fresh berries, like raspberries or strawberries, make a delightful addition too, adding a pop of color and a fresh tartness!
Try Different Sweeteners
If you want to experiment with sweetness, consider using honey or agave syrup instead of maple syrup. Each sweetener will impart its own unique flavor, so feel free to play around and find what you love best. Just keep in mind that you may need to adjust the liquid content slightly to maintain the right batter consistency.
With these variations, you’ll create a personalized gluten free dessert that suits your taste and impresses your Valentine. Get creative and have fun—after all, that’s what baking is all about!
Storage & Reheating Instructions
Once you’ve made these delicious gluten free Valentine’s Day desserts, you’ll want to store any leftovers properly to keep them fresh and tasty! Here’s how to do it:
First, allow your brownies to cool completely in the baking dish. This step is key because it helps prevent moisture buildup, which can lead to soggy treats. Once they’re cool, transfer them to an airtight container. If you have a lot of brownies, you might want to layer them with parchment paper to keep them from sticking together. I usually put a little piece of parchment between each layer; it works like a charm!
Store your container in the fridge if you plan to keep them for more than a couple of days. They’ll last for about a week in the fridge, but trust me, they probably won’t last that long—they’re just too good!
If you want to keep them for an extended period, you can also freeze them. Just wrap individual brownies tightly in plastic wrap, then place them in a freezer-safe bag or container. They can last for up to three months in the freezer. When you’re ready to indulge again, simply take out a brownie and let it thaw at room temperature, or pop it in the microwave for about 10-15 seconds for a warm treat.
Reheating is super easy! If you prefer a warm, gooey brownie, just microwave it for a few seconds. But be careful—not too long, or you might end up with a chocolate lava situation! For a more evenly warmed brownie, you could also place them in a preheated oven at 350°F (175°C) for about 5-10 minutes. Just keep an eye on them so they don’t overbake. Enjoy those sweet moments again!
Leave a Comment
I absolutely love hearing from you, so don’t be shy! If you try out these gluten free Valentine’s Day desserts, please share your thoughts and experiences in the comments below. Did you make any fun variations? How did your loved ones react? I’m here for all the sweet stories!
Feel free to ask any questions you might have about the recipe or share your tips for making it even better. Together, we can make these desserts even more delightful. Your feedback means the world to me, and I can’t wait to connect with you over our shared love of baking. Happy Valentine’s Day, and happy baking!
Print
Gluten Free Valentine’s Day Desserts: 5 Sweet Delights
- Total Time: 40 minutes
- Yield: 8 servings 1x
- Diet: Gluten Free
Description
Delicious gluten free desserts perfect for Valentine’s Day.
Ingredients
- 1 cup almond flour
- 1/2 cup cocoa powder
- 1/2 cup maple syrup
- 1/4 cup coconut oil
- 2 eggs
- 1 tsp vanilla extract
- 1/2 tsp baking soda
- 1/4 tsp salt
Instructions
- Preheat your oven to 350°F (175°C).
- In a bowl, mix almond flour, cocoa powder, baking soda, and salt.
- In another bowl, whisk eggs, maple syrup, coconut oil, and vanilla extract.
- Combine the wet and dry ingredients.
- Pour the batter into a greased baking dish.
- Bake for 25-30 minutes.
- Allow to cool before serving.
Notes
- Store leftovers in an airtight container.
- Serve with fresh berries for added flavor.
- Adjust sweetness to your liking.
- Prep Time: 10 minutes
- Cook Time: 30 minutes
- Category: Dessert
- Method: Baking
- Cuisine: American
Nutrition
- Serving Size: 1 piece
- Calories: 180
- Sugar: 5g
- Sodium: 50mg
- Fat: 12g
- Saturated Fat: 5g
- Unsaturated Fat: 7g
- Trans Fat: 0g
- Carbohydrates: 15g
- Fiber: 3g
- Protein: 5g
- Cholesterol: 30mg
Keywords: gluten free valentines day desserts