There’s something magical about Japanese food, isn’t there? The moment you take that first bite of fresh sushi or slurp a spoonful of steaming miso soup, you’re instantly transported to a tiny Tokyo eatery. I still remember the first time I attempted homemade sushi—it was a messy, hilarious disaster with rice sticking to everything but the nori! But that’s the joy of Japanese recipe ideas: they’re approachable, bursting with clean flavors, and so much fun to make. Whether you’re craving crispy tempura, comforting ramen, or delicate sushi rolls, these dishes turn ordinary ingredients into little works of art. And trust me, once you get the hang of it, you’ll be rolling maki like a pro (with far less rice on your ceiling than my first try).
Why You’ll Love These Japanese Recipe Ideas
Let me tell you why these Japanese dishes will become your new kitchen favorites:
- Simpler than you think – With just a few fresh ingredients and basic techniques, you can create restaurant-quality flavors at home
- Endlessly adaptable – Swap fillings based on what’s in your fridge (that lone avocado and leftover cucumber? Perfect!)
- Quick to make – Most recipes come together in under 30 minutes once you get the hang of it
- Healthier choices – Packed with fresh veggies, lean proteins, and gut-friendly fermented ingredients
- Fun to share – There’s something magical about gathering friends around a platter of homemade sushi rolls
The best part? You don’t need fancy equipment – just your hands, some fresh ingredients, and a sense of adventure!
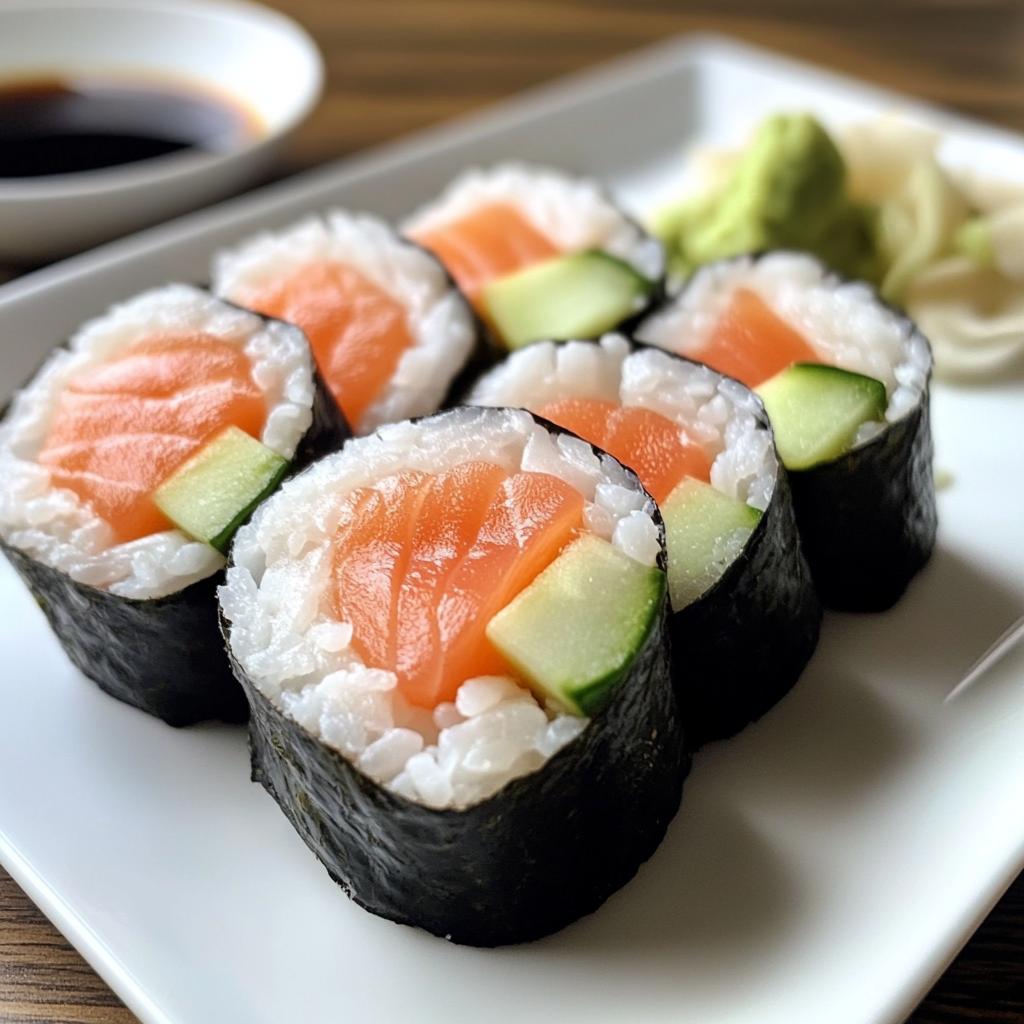
Ingredients for Homemade Sushi
Gathering the right ingredients is half the battle when making sushi at home. Here’s what you’ll need for those perfect rolls:
- 1 cup sushi rice – Rinse it until the water runs clear to remove excess starch
- 2 tbsp rice vinegar – The subtle tang that makes sushi rice taste authentic
- 1 tbsp sugar + 1/2 tsp salt – For seasoning the rice just right
- 4 sheets nori – Look for the crisp, dark green seaweed sheets
- 1/2 cucumber, julienned into matchsticks
- 1 ripe avocado, sliced thin – The creaminess balances everything perfectly
- 100g fresh salmon or tuna, sliced paper-thin – Ask your fishmonger for sushi-grade
- Soy sauce, wasabi, pickled ginger – The classic trio for serving
Pro tip: Keep everything prepped and within arm’s reach before you start rolling – sushi waits for no one!
How to Make Sushi: Step-by-Step Instructions
Okay, let’s roll up our sleeves (literally!) and make some sushi magic happen. I promise it’s easier than it looks once you get the rhythm down. Here’s exactly how I do it in my kitchen:
- Rinse that rice like your sushi depends on it (because it does!). Place 1 cup sushi rice in a fine-mesh strainer and rinse under cold running water until the water runs completely clear – this removes excess starch that makes rice gummy. Swirl it with your fingers like you’re panning for gold.
- Cook the rice according to package directions, but here’s my trick: use slightly less water than usual (about 1 1/4 cups) for firmer grains that hold their shape better when rolling.
- Season your rice while it’s hot. In a small bowl, mix 2 tbsp rice vinegar, 1 tbsp sugar, and 1/2 tsp salt until dissolved. Gently fold this into the cooked rice using a cutting motion with a wooden spatula – don’t smash the grains! Let it cool for about 10 minutes until it’s just warm.
- Prep your rolling station with a bamboo mat, bowl of water (for wetting fingers), and all fillings ready to go. Place a nori sheet shiny-side down on the mat, then spread about 3/4 cup rice evenly over the bottom two-thirds of the sheet, leaving a 1-inch border at the top.
- Add your fillings in a neat line across the center of the rice – I like alternating avocado, cucumber, and fish for color. Don’t overstuff or you’ll have a sushi burrito instead of neat rolls!
- Roll with confidence! Lift the edge of the mat closest to you, tuck over the fillings, then roll forward while applying gentle pressure. Moisten the nori’s bare edge with water to seal. Give it a firm but gentle squeeze along the length to shape.
- Slice carefully with a very sharp, wet knife. Wipe the blade between cuts for clean slices. Dip in soy sauce with a dab of wasabi – and take that first glorious bite!
See? Not so scary after all. The first roll might be a bit wonky (mine certainly was), but by the third one, you’ll be rolling like a Tokyo sushi chef!
Tips for Perfect Japanese Recipe Ideas
After countless sushi nights (and plenty of rice-stuck-to-everything mishaps), here are my hard-earned secrets for Japanese cooking success:
- Wet hands are happy hands – Keep a bowl of water nearby to moisten your fingers when handling sushi rice – it won’t stick like glue!
- Fish matters most – Splurge on sushi-grade fish from a trusted source; that grocery store salmon fillet won’t give you the same texture or flavor.
- Sharp knives only – A dull blade will smash your beautiful rolls instead of slicing cleanly through them.
- Rice temperature is key – Work with rice that’s just warm enough to handle comfortably – too hot and it’ll steam the nori soggy.
- Practice makes perfect – Your first rolls might look abstract, but by the third attempt, you’ll be amazed at the difference!
Remember – even imperfect homemade sushi tastes incredible when made with care!
Ingredient Substitutions & Variations
Don’t stress if you’re missing an ingredient – Japanese cooking is wonderfully flexible! Here are my favorite swaps that still deliver amazing flavor:
- Vegetarian? Skip the fish and use marinated tofu, sautéed mushrooms, or even tempura sweet potato for crunch.
- No sushi rice? Short-grain brown rice works in a pinch (just add extra vinegar seasoning).
- Out of nori? Try rolling inside-out with rice on the exterior – kids love this version!
- Fish alternatives: Cooked shrimp, smoked salmon, or even canned tuna mixed with mayo make great budget-friendly fillings.
- Spice lovers: Add sriracha mayo or thin jalapeño slices for an extra kick.
The beauty of these recipes? They adapt to whatever’s in your fridge while still tasting authentically delicious!
Serving Suggestions
Oh, presentation is half the fun with Japanese food! I love serving our homemade sushi on a beautiful platter with little dishes of soy sauce for dipping. A steaming bowl of miso soup makes the perfect starter – its savory depth balances the fresh sushi flavors. And don’t forget the green tea! I brew it extra strong to cleanse the palate between bites. For a real treat, add some edamame sprinkled with sea salt – those little salty beans are dangerously addictive while you’re rolling your next batch!
Storage & Reheating
Let’s be real – sushi is always best fresh, but if you must store it, here’s how: Wrap rolls tightly in plastic wrap and refrigerate for no more than 24 hours (the rice gets hard and the nori turns soggy). Never freeze sushi – the texture turns awful! Leftover rice? Make crispy rice cakes the next day instead. Pro tip: If your rolls seem dry, a quick spritz of water before serving helps revive them slightly – but honestly, I always say make just enough to enjoy immediately!
Nutritional Information
Now, let’s talk about what’s actually in these delicious rolls! Keep in mind these numbers are estimates – your exact counts will vary based on ingredient brands and how generously you stuff those rolls. Here’s the scoop per serving (about 1 roll):
- 250 calories – Light yet satisfying
- 8g protein from the fish and rice combo
- 6g fat (mostly the good kind from avocado and fish)
- 40g carbs – Hello, energizing sushi rice!
- 3g fiber thank to the veggies and rice
Not bad for something that tastes this indulgent, right? The sodium comes mostly from the soy sauce, so go easy on the dipping if you’re watching salt intake!
Frequently Asked Questions
I’ve gotten so many great questions about Japanese cooking over the years – here are the ones that pop up most often:
Can I use canned fish for sushi?
Technically yes, but honestly? The texture just isn’t the same. If you must, go for high-quality canned salmon or tuna packed in water (drained well), mixed with a bit of mayo and lemon juice. But fresh sushi-grade fish makes all the difference!
How do I prevent soggy nori?
Work quickly once the rice hits the nori, and don’t over-moisten the rice. Also, store unused nori sheets in an airtight container with a silica packet – humidity is the enemy!
What if my rolls keep falling apart?
You’re probably overstuffing them! Use less filling than you think you need, and really tuck that first roll tightly. A little practice solves most structural issues.
Can I make sushi ahead for parties?
Best served within 2 hours of making, but you can prep all components separately (keep rice covered with a damp cloth) and assemble last-minute.
Is sushi rice the same as regular rice?
Nope! Sushi rice is short-grain and starchier – it’s what gives that perfect sticky-but-separate texture. Regular long-grain rice just won’t hold together right.
Share Your Japanese Recipe Ideas
Did you try rolling your own sushi? I’d love to hear how it turned out! Drop a comment below with your favorite fillings or any brilliant hacks you discovered. And if you snapped a photo of your masterpiece, share it – even the “abstract” first attempts (we’ve all been there!). Your tips might just inspire someone else’s Japanese cooking adventure!
Print
5 Essential Japanese Recipe Ideas for Stunning Homemade Sushi
- Total Time: 35 mins
- Yield: 4 servings 1x
- Diet: Low Lactose
Description
Discover delicious Japanese recipe ideas to bring authentic flavors to your kitchen.
Ingredients
- 1 cup sushi rice
- 2 tbsp rice vinegar
- 1 tbsp sugar
- 1/2 tsp salt
- 4 sheets nori (seaweed)
- 1/2 cucumber, julienned
- 1 avocado, sliced
- 100g fresh salmon or tuna, sliced
- 1 tbsp soy sauce
- 1 tsp wasabi
- 1 tsp pickled ginger
Instructions
- Rinse the sushi rice under cold water until the water runs clear.
- Cook the rice according to package instructions.
- Mix rice vinegar, sugar, and salt in a small bowl, then fold into the cooked rice.
- Place a nori sheet on a bamboo mat, spread a thin layer of rice, and add fillings like cucumber, avocado, and fish.
- Roll tightly using the bamboo mat.
- Slice into bite-sized pieces and serve with soy sauce, wasabi, and pickled ginger.
Notes
- Use fresh fish for the best flavor.
- Keep your hands wet when handling sushi rice to prevent sticking.
- Serve immediately for the best texture.
- Prep Time: 20 mins
- Cook Time: 15 mins
- Category: Main Course
- Method: Rolling
- Cuisine: Japanese
Nutrition
- Serving Size: 1 roll
- Calories: 250
- Sugar: 3g
- Sodium: 400mg
- Fat: 6g
- Saturated Fat: 1g
- Unsaturated Fat: 4g
- Trans Fat: 0g
- Carbohydrates: 40g
- Fiber: 3g
- Protein: 8g
- Cholesterol: 15mg
Keywords: Japanese, sushi, homemade, easy recipe