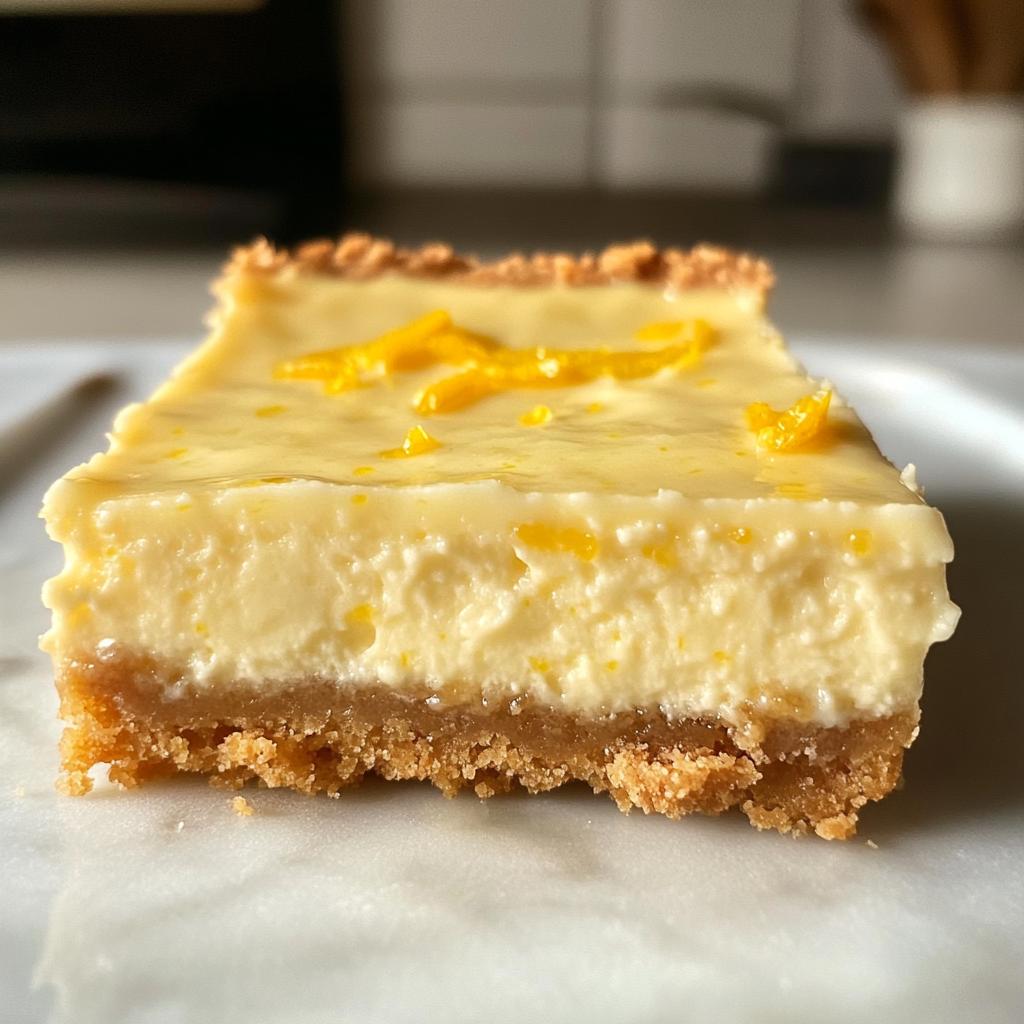
Oh, lemon cheesecake bars – just saying those words makes my mouth water! There’s something magical about that tangy lemon punch cutting through the rich creaminess of cheesecake. I first fell in love with these bars at my cousin’s baby shower years ago, and now they’re my go-to dessert for every summer BBQ and potluck. What I love most is how deceptively simple they are to make – just a handful of ingredients transforms into this elegant treat that always disappears fast. The graham cracker crust gives that perfect crunch against the velvety filling, while the bright lemon flavor keeps things refreshing. Trust me, once you try these lemon cheesecake bars, you’ll understand why my family begs me to make them all season long.
Why You’ll Love These Lemon Cheesecake Bars
Let me tell you exactly why these lemon cheesecake bars will become your new obsession:
- That perfect texture – creamy cheesecake meets buttery graham cracker crunch in every bite
- Bright lemon flavor – just tart enough to make your taste buds dance without being overpowering
- So easy to make – no water bath, no fancy techniques, just simple steps anyone can follow
- Crowd-pleasing magic – disappears faster than you can say “second helping” at parties
- Make-ahead dream – tastes even better after chilling, perfect for stress-free entertaining
Honestly? I’ve never met anyone who could resist them – and I’ve served these to some very picky eaters!
Ingredients for Lemon Cheesecake Bars
Here’s what you’ll need to make these dreamy lemon cheesecake bars – and trust me, every ingredient matters:
- 2 cups graham cracker crumbs – measure them packed tight for that perfect crust
- 1/2 cup unsalted butter, melted – gives the crust its signature richness
- 16 oz cream cheese, softened at room temperature – this is KEY for silky smooth filling
- 1/2 cup granulated sugar – just enough sweetness to balance the lemon
- 2 large eggs – room temp helps them incorporate smoothly
- 1/4 cup fresh lemon juice – squeeze it yourself for brightest flavor
- 1 tbsp lemon zest – the fragrant oils take the lemon flavor to the next level
- 1 tsp vanilla extract – our secret weapon that rounds out all the flavors
Pro tip from my kitchen disasters: Never use cold cream cheese straight from the fridge – you’ll end up with lumpy filling no matter how long you mix!
How to Make Lemon Cheesecake Bars
Alright, let’s dive into making these dreamy lemon cheesecake bars! I promise it’s easier than you think – just follow these steps carefully and you’ll be rewarded with the creamiest, tangiest treat. The key is taking your time with each step – no rushing allowed when it comes to perfect cheesecake bars!
Preparing the Graham Cracker Crust
First things first – that buttery graham cracker foundation! Mix your crumbs with melted butter until it looks like wet sand. Pour this into your parchment-lined pan and press it down firmly with your fingers or a flat-bottomed cup. Really pack it in – we want no crumbly disasters here! Pop it in the oven for 10 minutes at 350°F to set. Let it cool completely before adding filling – a warm crust makes for a soggy bottom, and nobody wants that.
Making the Lemon Cheesecake Filling
Now the fun part – the creamy filling! Beat your room-temperature cream cheese and sugar together until perfectly smooth (this is why temperature matters – cold cheese makes lumps!). Add eggs one at a time, mixing just until combined after each. Overbeating eggs leads to cracks, so go easy! Stir in the fresh lemon juice, zest, and vanilla last. Oh, that smell! The zest is where the magic happens – that citrusy perfume means your bars will taste amazing. Scrape the bowl often to avoid sneaky lumps hiding at the bottom.
Baking and Chilling Lemon Cheesecake Bars
Pour that glorious lemony filling over your cooled crust and smooth the top. Bake at 350°F for 25-30 minutes – you’ll know it’s done when the edges look set but the center still jiggles slightly. Let it cool completely on the counter (I know, the waiting is hard!), then refrigerate for at least 4 hours. This patience pays off – chilled bars cut cleanly into perfect squares. Trust me, digging in too early leads to cheesecake soup (delicious, but not what we’re going for!).
Tips for Perfect Lemon Cheesecake Bars
After making these lemon cheesecake bars more times than I can count, I’ve learned a few tricks to guarantee perfection every single time:
- Room temp is non-negotiable – cold cream cheese equals lumpy filling, no matter how long you mix
- Zest first, juice second – it’s way easier to zest a whole lemon than a juiced one
- Parchment paper is your friend – those overhang “handles” make removing the bars foolproof
- Chill like you mean it – 4 hours minimum, but overnight is even better for clean cuts
- No shortcuts with lemons – bottled juice just can’t match fresh lemon’s bright flavor
One last thing – resist the urge to peek while baking! Sudden temperature changes can cause cracks in your beautiful cheesecake bars.
Variations for Lemon Cheesecake Bars
Once you’ve mastered the basic recipe, try these fun twists to keep things interesting:
- Berry burst: Gently fold 1 cup fresh blueberries into the filling before baking – the tart berries pair perfectly with lemon
- Lime lovers: Swap lemon for lime juice and zest to create key lime cheesecake bars with a tropical twist
- White chocolate drizzle: Melt 1/4 cup white chocolate and zigzag it over chilled bars for elegant contrast
- Coconut dream: Add 1/2 cup toasted coconut to the crust for extra texture and flavor
My personal favorite? The blueberry-lemon combo – it’s like summer in every bite!
Serving and Storing Lemon Cheesecake Bars
Okay, here’s the best part – serving these beauties! Always serve your lemon cheesecake bars chilled – that’s when the flavors really shine. I love topping each square with a dollop of fresh whipped cream and a few raspberries or blueberries for a pop of color. As for storage, keep them in an airtight container in the fridge for up to 5 days (if they last that long!). You can also freeze them for a month – just wrap individual bars tightly in plastic before freezing. Thaw overnight in the fridge when those lemon cravings hit!
Nutritional Information for Lemon Cheesecake Bars
Now, let’s talk numbers – because we all want to know what we’re indulging in! A single lemon cheesecake bar (about 1/12th of the recipe) clocks in at around 280 calories. You’re looking at 20g of fat (11g saturated), 22g carbs, and 4g protein per serving. Of course, these numbers can vary slightly depending on your specific ingredients – especially the brands of cream cheese and butter you use. But here’s how I see it: every creamy, tangy bite is totally worth it! Just maybe don’t eat the whole pan yourself… though I won’t judge if you do.
Frequently Asked Questions About Lemon Cheesecake Bars
Got questions about making these lemon cheesecake bars? I’ve got answers! Here are the most common ones I hear from friends and family:
- Can I use bottled lemon juice? I don’t recommend it – fresh lemon juice gives that bright, tangy flavor bottled just can’t match. Trust me, it’s worth the extra squeeze!
- How do I prevent cracks? Avoid overmixing the eggs and let the bars cool gradually. Also, don’t overbake – the center should still jiggle slightly when you take it out.
- Can I double the recipe? Absolutely! Double everything and use a 9×13 inch pan. Just increase the baking time by 5-10 minutes.
- Can I make these gluten-free? Yes! Swap the graham crackers for gluten-free ones, and you’re good to go.
- Why chill for so long? It helps the bars set properly so they slice cleanly. Patience is key for perfect lemon cheesecake bars!
Share Your Lemon Cheesecake Bars Experience
I’d love to hear how your lemon cheesecake bars turned out! Leave a comment below with your thoughts, snap a photo of your masterpiece, or share any clever twists you tried. Happy baking, friends!
Print
Irresistible 2-Layer Lemon Cheesecake Bars Recipe
- Total Time: 4 hours 45 minutes
- Yield: 12 bars 1x
- Diet: Vegetarian
Description
Lemon cheesecake bars combine creamy cheesecake with tangy lemon flavor on a graham cracker crust. You get a refreshing dessert that is simple to prepare.
Ingredients
- 2 cups graham cracker crumbs
- 1/2 cup unsalted butter, melted
- 16 oz cream cheese, softened
- 1/2 cup granulated sugar
- 2 large eggs
- 1/4 cup fresh lemon juice
- 1 tbsp lemon zest
- 1 tsp vanilla extract
Instructions
- Preheat your oven to 350°F (175°C).
- Mix graham cracker crumbs with melted butter and press into a lined 8×8 inch pan.
- Bake the crust for 10 minutes then let it cool.
- Beat cream cheese and sugar until smooth. Add eggs one at a time.
- Mix in lemon juice, lemon zest, and vanilla extract.
- Pour the filling over the crust and spread evenly.
- Bake for 25-30 minutes until the edges are set.
- Cool completely at room temperature then refrigerate for 4 hours.
- Cut into bars and serve chilled.
Notes
- Use room temperature cream cheese for a smooth filling.
- Line your pan with parchment paper for easy removal.
- Chill the bars thoroughly before cutting for clean slices.
- Prep Time: 15 minutes
- Cook Time: 30 minutes
- Category: Dessert
- Method: Baking
- Cuisine: American
Nutrition
- Serving Size: 1 bar
- Calories: 280
- Sugar: 18g
- Sodium: 180mg
- Fat: 20g
- Saturated Fat: 11g
- Unsaturated Fat: 7g
- Trans Fat: 0g
- Carbohydrates: 22g
- Fiber: 0.5g
- Protein: 4g
- Cholesterol: 80mg
Keywords: lemon cheesecake bars, easy dessert, creamy lemon bars