Let me tell you about my absolute favorite dessert hack—this ridiculously easy No-Bake Chocolate Peanut Butter Pie that tastes like you spent all day in the kitchen. I stumbled upon this recipe during one of those sweltering summer days when turning on the oven felt like a crime against humanity. Four hours in the fridge is all it takes to transform basic pantry staples into pure magic.
The first time I made this, my skeptical husband took one bite and said, “Wait—you didn’t bake this?” That’s the beauty of it! Creamy peanut butter blends with fluffy whipped cream and just enough chocolate drizzle to make it feel fancy. It’s the dessert I bring to every potluck because it looks impressive but secretly requires about 20 minutes of actual work.
What makes this no-bake pie special isn’t just the convenience (though let’s be real—that’s a huge win). It’s how the flavors deepen as it chills, with the peanut butter filling becoming almost cheesecake-like in texture. Pro tip: hide a slice for yourself before serving, because this one disappears fast!
Ingredients for No-Bake Chocolate Peanut Butter Pie
Let’s talk about what makes this dreamy pie come together—the ingredients are simple, but each one plays a starring role. I’ve learned through trial and error that quality matters here, especially with the peanut butter and cream cheese. Trust me, it’s worth using the good stuff!
For the Crust (the foundation of greatness)
- 1 1/2 cups graham cracker crumbs – I crush mine fresh (about 10 full sheets) for the best texture, but store-bought works in a pinch
- 6 tablespoons melted butter – salted or unsalted both work, though I prefer salted to balance the sweetness
- 1/4 cup granulated sugar – this little bit helps the crust hold together beautifully
For the Peanut Butter Filling (the creamy heart of the pie)
- 1 cup creamy peanut butter – don’t use the natural kind that separates unless you want a less sweet flavor
- 8 oz cream cheese, softened – leave it out for at least 30 minutes before mixing (cold cream cheese = lumpy filling, and nobody wants that)
- 1 cup powdered sugar – sift it if you’re fancy, but I usually don’t bother
- 1 teaspoon vanilla extract – the real stuff makes a difference here
For the Whipped Cream Layer (the fluffy magic)
- 1 1/2 cups heavy whipping cream – chilled is crucial for perfect peaks
For the Chocolate Drizzle (because everything’s better with chocolate)
- 1/2 cup chocolate chips, melted – I use semi-sweet, but milk chocolate works if you want it sweeter
See? Nothing complicated—just good ingredients that come together like old friends at a picnic. The best part? You probably have most of these in your kitchen right now. (If not, they’re totally worth the grocery run—I promise!)
How to Make No-Bake Chocolate Peanut Butter Pie
Alright, let’s get to the fun part—actually making this heavenly pie! Don’t let the simplicity fool you; a few key tricks will take your dessert from good to “can I have the recipe?” status. I’ll walk you through each step just like I’m standing right there in the kitchen with you.
Preparing the Crust
First things first—that buttery, crumbly crust that holds all the magic together. In a medium bowl, mix your graham cracker crumbs, melted butter, and sugar until it looks like wet sand. Here’s my secret: I use my fingers to really work the butter into every crumb (wash those hands first!). Press this mixture firmly into your pie dish—I mean really press it down with the back of a measuring cup or your fingers. You want it compact so it doesn’t crumble when you slice the pie later.
Making the Peanut Butter Filling
Now for the star of the show! In a large bowl, beat the softened cream cheese until it’s smooth—no lumps allowed. Add the peanut butter, powdered sugar, and vanilla, and keep beating until it’s silky and well combined. This is when I usually sneak a taste (quality control, you know). If your mixture seems too thick, don’t panic—the whipped cream will lighten it up next.
Folding in the Whipped Cream
Here’s where the magic happens. In another bowl (or better yet, a chilled metal bowl if you have one), whip that heavy cream until stiff peaks form. Pro tip: If your kitchen is warm, chill the bowl and beaters first. Now gently fold the whipped cream into the peanut butter mixture in thirds—don’t stir aggressively or you’ll deflate all that fluffy goodness! The filling should be light but still hold its shape when you’re done.
Assembling and Chilling the Pie
Spread that gorgeous filling evenly over your crust. Melt the chocolate chips (I do 30-second bursts in the microwave, stirring between each) and drizzle it artfully over the top—or just go wild with a spoon if you’re feeling rustic. Now comes the hardest part: waiting. Pop that beauty in the fridge for at least 4 hours, though overnight is even better. I know it’s tempting to peek, but trust me—the chilling time is what gives this pie its perfect sliceable texture.
Tips for the Perfect No-Bake Chocolate Peanut Butter Pie
After making this pie more times than I can count (blame my family’s sweet tooth), I’ve picked up some tricks that take it from good to “hide-the-last-slice-from-your-kids” amazing. These little tweaks make all the difference!
Choosing your peanut butter wisely
Here’s the scoop—natural peanut butter gives you a deeper peanut flavor with less sweetness, which I love when I want a more grown-up dessert. But if you’re using the regular supermarket kind (like Jif or Skippy), you might want to reduce the powdered sugar by a tablespoon or two. The filling should taste slightly sweeter than you think it should before chilling—the flavors mellow as it sets.
The chilling game-changer
That 4-hour minimum chill time isn’t just a suggestion—it’s the secret to getting perfect slices. But if you can swing it? Let it go overnight. The texture transforms into something almost cheesecake-like, holding its shape beautifully when you cut it. I once had to serve it after just 3 hours in a pinch (mom emergencies happen), and while it still tasted delicious, we ate it with spoons instead of forks!
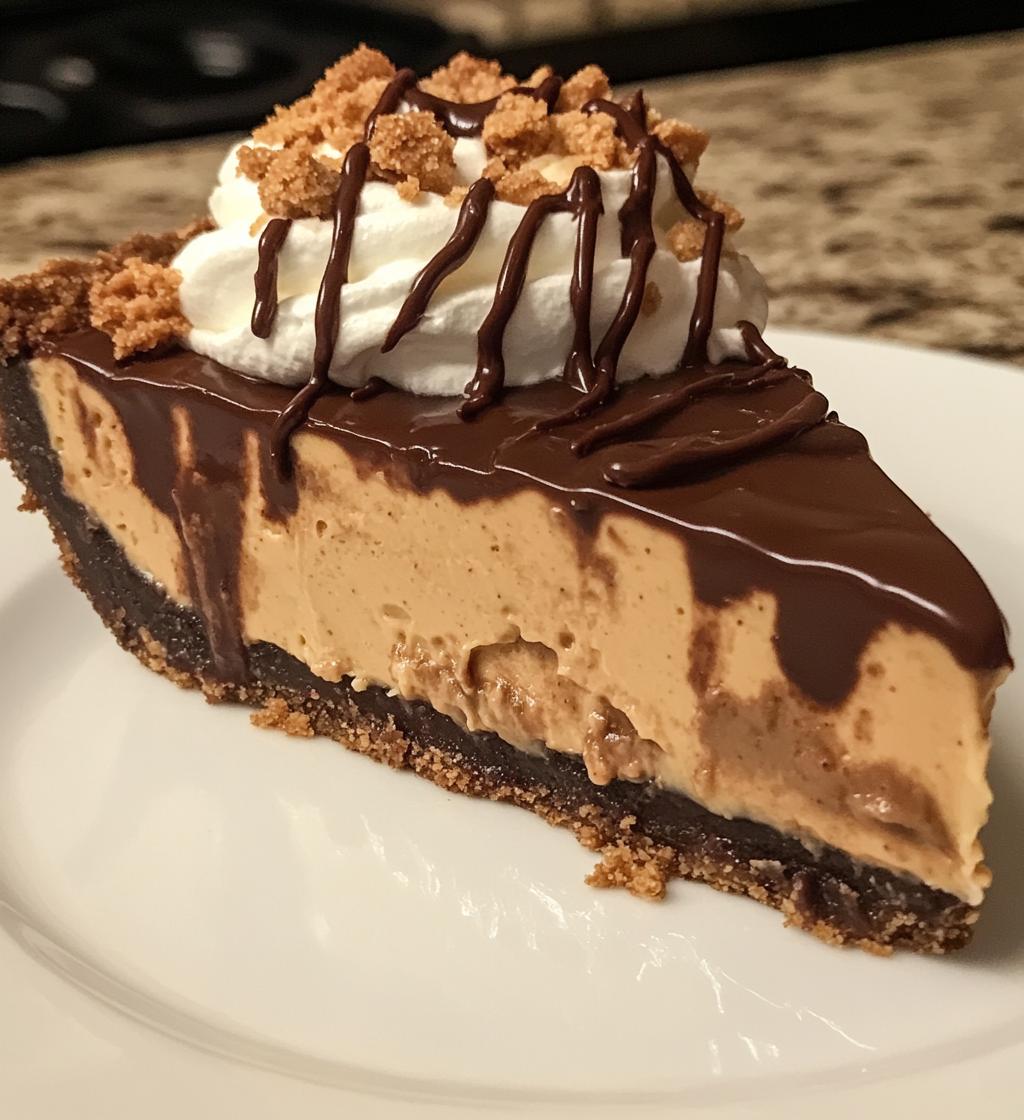
Garnishing like a pro
Want to make it extra special? Try these easy upgrades:
- A crown of whipped cream piped around the edges (I use a zip-top bag with the corner snipped off)
- A sprinkle of flaky sea salt on the chocolate drizzle—trust me, it’s magic
- Crushed honey-roasted peanuts for crunch and a pretty finish
- A dusting of cocoa powder for that bakery-worthy look
One last tip from my messy experiences—wait until right before serving to add any crunchy toppings if you want them to stay crisp. Nothing sadder than soggy peanuts on an otherwise perfect pie!
Ingredient Substitutions and Notes
Let’s face it—life happens, and sometimes you’re missing an ingredient or need to tweak this recipe for dietary reasons. The good news? This No-Bake Chocolate Peanut Butter Pie is super flexible! Here are my tried-and-true swaps and notes to keep in mind.
Peanut butter alternatives
If peanut butter isn’t your thing (or someone has an allergy), no worries! Almond butter works beautifully here—it’s a little less sweet but just as creamy. Sunflower seed butter is another great option, though it will give the filling a slightly greenish tint (totally normal, I promise!). Just make sure whatever you use is smooth and not the kind that separates, or your filling might get weird.
Gluten-free crust options
For a gluten-free version, swap the graham crackers for gluten-free graham crackers or even crushed gluten-free cookies. I’ve used gluten-free Oreo-style cookies before, and it was a hit—just reduce the sugar in the crust since the cookies are already sweet. You can also use crushed pretzels (gluten-free ones, of course) for a salty-sweet twist that’s downright addictive.
Dairy-free swaps
Need to go dairy-free? Use vegan cream cheese (the kind that comes in a tub, not the block-style) and coconut oil instead of butter in the crust. For the whipped cream, try coconut cream—just chill a can of full-fat coconut milk overnight, scoop out the solidified cream, and whip it just like heavy cream. It’s a little coconutty, but it works like a charm!
Chocolate options
Not a fan of semi-sweet chocolate chips? Go wild with dark chocolate for a richer flavor, or milk chocolate for extra sweetness. You can even use white chocolate for a fun twist—just melt it gently to avoid seizing. And if you’re feeling fancy, sprinkle some mini chocolate chips on top before chilling for extra chocolatey goodness.
Remember, baking (or in this case, no-baking) is all about making it work for you. Don’t stress if you have to make substitutions—this pie is forgiving and delicious no matter what!
Serving Suggestions for No-Bake Chocolate Peanut Butter Pie
Okay, let’s talk about the best part—eating this glorious pie! Sure, it’s amazing all on its own, but if you want to take it to the next level, I’ve got some foolproof serving ideas that’ll impress everyone at the table. (And yes, I’ve taste-tested every single one of these combos—tough job, but someone had to do it!)
The perfect beverage pairings
A cold glass of milk is the obvious choice, but hear me out—this pie and coffee are a match made in dessert heaven. The bitterness of a dark roast cuts through the sweetness so beautifully. For something fancier, try it with a caramel iced latte or even a drizzle of espresso over the top. My uncle swears by pairing it with bourbon, but that might just be his solution to everything!
Crunchy toppings for texture lovers
If you’re like me and live for that perfect mix of creamy and crunchy, here are my go-to add-ons:
- Chopped honey-roasted peanuts – They add the best sweet-salty crunch
- Toffee bits – Because everything’s better with toffee
- Crumbled pretzels – A salty contrast that’s downright addictive
- Chocolate shavings – For that bakery-worthy finish
Whipped cream dreams
I know the pie already has whipped cream in it, but a little extra never hurt anybody! Pipe some fluffy peaks around the edges or go wild with a cloud of it in the center. For a fun twist, whip a tablespoon of instant coffee or cocoa powder into the cream before piping—it’s like two desserts in one.
Special occasion upgrades
Hosting a dinner party or just feeling fancy? Try these showstoppers:
- Serve mini slices with a scoop of vanilla ice cream for a “peanut butter cup sundae” situation
- Drizzle with caramel sauce alongside the chocolate for a turtle pie vibe
- Top with fresh banana slices and a sprinkle of cinnamon for an Elvis-inspired treat
Honestly? The beauty of this pie is that it’s delicious no matter how you serve it—even straight from the pan with a fork at midnight. Not that I’d know anything about that…
Storing and Reheating Instructions
Now, let’s talk about keeping this beauty fresh—because let’s be real, there’s a 50/50 chance you’ll have leftovers (though in my house, that’s more like a 10/90 chance). Here’s everything you need to know about storing your No-Bake Chocolate Peanut Butter Pie so it stays as dreamy as the day you made it.
Refrigerator storage (your pie’s happy place)
This pie is perfectly happy chilling in your fridge for up to 3 days, but I’ll be shocked if it lasts that long! Just make sure to cover it tightly with plastic wrap or transfer it to an airtight container. Pro tip: If you’re using plastic wrap, press it directly onto the surface of the pie to prevent any skin from forming on the filling. I learned that the hard way after my second pie developed a slightly rubbery top layer—still tasty, but not ideal.
The freezing dilemma
I know it’s tempting to freeze half for later (future you would be so grateful), but trust me—this pie doesn’t freeze well. The whipped cream in the filling tends to separate and get grainy when thawed, and that perfect creamy texture turns… well, kind of sad. I tried it once during my “let’s freeze all the things” phase and ended up with something that looked more like a science experiment than dessert. Stick to refrigeration and enjoy it fresh!
Serving chilled leftovers
If your pie has been in the fridge overnight (or for a couple days), it might get a little too firm. No worries—just let it sit at room temperature for about 10 minutes before slicing. This softens it just enough for perfect, clean cuts. And if you’re like me and prefer your pie extra cold? Go ahead and eat it straight from the fridge—it’s your pie, your rules!
One last storage tip: If you’ve added any crunchy toppings (like those delicious honey-roasted peanuts I mentioned earlier), store them separately and sprinkle them on right before serving. That way they stay crisp instead of turning soggy in the fridge. Happy storing!
Nutritional Information for No-Bake Chocolate Peanut Butter Pie
Let’s be honest—we’re not eating this pie for its health benefits, but I always like to know what I’m indulging in! Here’s the scoop on the nutritional stats per slice (because knowledge is power, right?). Just remember—these numbers are estimates since ingredient brands can vary. My friend Karen swears her version has “fewer calories” because she uses organic peanut butter… but we all know pie math works differently!
What’s in a slice?
- Calories: About 520 per serving (and worth every single one!)
- Fat: 38g (18g saturated) – hey, that’s where all the creamy goodness comes from
- Sugar: 32g – the sweet spot between dessert and sugar coma
- Protein: 9g – peanuts count as protein, so basically this is health food
- Carbohydrates: 42g (with 2g fiber) – perfect for when you need that afternoon pick-me-up
Now for my standard disclaimer (because I’m not a nutritionist, just a pie enthusiast): These numbers can change based on whether you use natural vs. regular peanut butter, full-fat vs. reduced-fat cream cheese, or if you go wild with extra chocolate drizzle (no judgment here). I calculated using standard ingredients, but your mileage may vary. The important thing? It’s delicious, it’s easy, and life’s too short to stress over dessert calories!
Pro tip: If you’re watching sugar intake, you can reduce the powdered sugar by 1/4 cup and use dark chocolate for drizzle—it’ll still taste amazing, I promise. But sometimes? You just need that full-on, unapologetically sweet peanut butter chocolate experience. And that’s okay too!
Frequently Asked Questions
Q1. Can I use crunchy peanut butter instead of creamy?
Absolutely! I’ve done this when I wanted extra texture—just know the filling won’t be quite as smooth. The peanut bits add a nice surprise in each bite. If you go this route, I’d recommend chopping the peanuts in the crunchy peanut butter a bit finer before mixing to prevent any giant chunks that might make slicing tricky.
Q2. How long can this pie sit out at room temperature?
Because of the dairy in the filling, I wouldn’t leave it out more than 2 hours (and even then, only if your kitchen isn’t too warm). The whipped cream can start to weep if it gets too warm. That said, I’ve served it at outdoor parties where it disappeared within an hour—no leftovers means no worries!
Q3. Can I make this pie ahead of time?
You bet! In fact, I think it tastes even better after chilling overnight. Just hold off on any crunchy toppings until right before serving. The flavors have more time to meld, and the texture becomes perfectly sliceable. It keeps beautifully in the fridge for up to 3 days (if it lasts that long).
Q4. My filling seems too runny—what did I do wrong?
Don’t panic! This usually happens if the cream cheese wasn’t fully softened or the whipped cream wasn’t stiff enough. Pop the whole pie in the freezer for about 30 minutes to help it set faster. Next time, make sure your cream is chilled and whip it until it holds stiff peaks—when you lift the beaters, the peaks should stand straight up without drooping.
Q5. Can I make individual mini pies instead of one large pie?
What a fun idea! Yes—use muffin tins lined with cupcake liners for easy individual servings. Press the crust mixture into each cup, then divide the filling evenly. They’ll need less chilling time too—about 2 hours should do it. Perfect for parties or when you want portion control (or at least the illusion of it!).

No-Bake Chocolate Peanut Butter Pie: 4-Hour Blissful Treat
- Total Time: 4 hours 20 mins
- Yield: 8 servings 1x
- Diet: Vegetarian
Description
A rich and creamy no-bake chocolate peanut butter pie that requires minimal effort and no oven time.
Ingredients
- 1 1/2 cups graham cracker crumbs
- 6 tbsp melted butter
- 1/4 cup granulated sugar
- 1 cup creamy peanut butter
- 8 oz cream cheese, softened
- 1 cup powdered sugar
- 1 tsp vanilla extract
- 1 1/2 cups heavy whipping cream
- 1/2 cup chocolate chips, melted
Instructions
- Mix graham cracker crumbs, melted butter, and sugar. Press into a pie dish.
- Beat peanut butter, cream cheese, powdered sugar, and vanilla until smooth.
- Whip heavy cream until stiff peaks form, then fold into peanut butter mixture.
- Spread filling into crust and drizzle with melted chocolate.
- Chill for at least 4 hours before serving.
Notes
- Use natural peanut butter for a less sweet taste.
- For a firmer pie, chill overnight.
- Garnish with whipped cream and crushed peanuts if desired.
- Prep Time: 20 mins
- Cook Time: 0 mins
- Category: Dessert
- Method: No-Bake
- Cuisine: American
Nutrition
- Serving Size: 1 slice
- Calories: 520
- Sugar: 32g
- Sodium: 280mg
- Fat: 38g
- Saturated Fat: 18g
- Unsaturated Fat: 15g
- Trans Fat: 0g
- Carbohydrates: 42g
- Fiber: 2g
- Protein: 9g
- Cholesterol: 75mg
Keywords: no-bake pie, chocolate peanut butter, easy dessert