
Let me tell you about my absolute favorite treat: the shadow milk cookie! These delightful cookies are like a warm hug in cookie form, with a heavenly combination of rich cocoa and a hint of espresso that just takes them over the top. The first time I baked these, I remember the aroma filling my kitchen and practically pulling my family in like a magnetic force. Seriously, you could smell the chocolate and coffee mingling in the air, and it was impossible to resist sneaking a bite before they cooled!
What I love most about shadow milk cookies is their perfect soft and chewy texture, which is just so satisfying. They’re not overly sweet, allowing the deep flavors of cocoa and espresso to shine through beautifully. Trust me, once you take a bite, you’ll understand why these cookies have become a staple in my baking rotation. Whether I’m whipping them up for a cozy night in or bringing them to a gathering, they always steal the show. Ready to dive into the recipe? Let’s get started!
Ingredients for Shadow Milk Cookie
To create these delightful shadow milk cookies, you’ll need a handful of simple ingredients that work together to bring out that deliciously rich flavor. Here’s what you’ll need:
- 1 cup all-purpose flour: This is the base of your cookie, providing structure. Make sure to spoon it into your measuring cup, then level it off for accuracy.
- 1/2 cup cocoa powder: This gives the cookies their deep chocolate flavor. I recommend using unsweetened cocoa for the best results.
- 1/2 cup sugar: Granulated sugar adds sweetness and a touch of crispiness to the edges.
- 1/2 cup brown sugar: The molasses in brown sugar contributes to the chewy texture and a hint of caramel flavor.
- 1/2 cup unsalted butter, softened: Butter is essential for richness and flavor. Let it sit at room temperature until soft.
- 1 egg: This binds everything together, creating that perfect chewy texture.
- 1 teaspoon vanilla extract: A splash of vanilla enhances the overall flavor of the cookies.
- 1/2 teaspoon baking soda: This helps the cookies rise, giving them that nice, soft bite.
- 1/4 teaspoon salt: Just a pinch to balance the sweetness and enhance the flavors.
- 1/4 cup chocolate chips: Because who can resist a little extra chocolate in every bite?
Gather these ingredients, and you’re well on your way to baking up a batch of shadow milk cookies that will wow everyone!
How to Prepare Shadow Milk Cookie
Now that you’ve gathered all your ingredients, let’s get down to the fun part: baking those scrumptious shadow milk cookies! Follow these simple steps, and I promise you’ll end up with a batch that will have everyone asking for seconds. Ready? Here we go!
- Preheat your oven: Start by preheating your oven to 350°F (175°C). This is a crucial step, as it ensures your cookies bake evenly. While the oven warms up, you can get everything else ready!
- Cream the butter and sugars: In a large mixing bowl, add the softened butter, granulated sugar, and brown sugar. Using a hand mixer or a sturdy wooden spoon, cream them together until the mixture is light and fluffy – about 2-3 minutes. This step is vital for getting that lovely texture!
- Add the egg and vanilla: Beat in the egg and vanilla extract. Mix until everything is well combined. You’ll want a smooth batter, so take your time here. The egg helps bind everything, making your cookies chewy and delicious!
- Combine dry ingredients: In a separate bowl, sift together the all-purpose flour, cocoa powder, baking soda, and salt. Sifting helps to break up any clumps, ensuring your cookies turn out perfectly.
- Mix it all together: Gradually add the dry mixture to the wet ingredients, stirring gently until just combined. Be careful not to overmix – a few flour streaks are okay! This is where the magic happens, and you’ll start to see that rich, chocolatey dough come together.
- Fold in the chocolate chips: Gently fold in the chocolate chips with a spatula, ensuring they’re evenly distributed throughout the dough. The more chocolate, the better, right?
- Form the cookies: Use a tablespoon or cookie scoop to drop spoonfuls of dough onto a lined baking sheet, leaving some space between each one, as they will spread while baking. I like to give them a little press down, but you can keep them mounded for a thicker cookie!
- Bake! Pop the baking sheet into your preheated oven and bake for 10-12 minutes. Keep an eye on them; you want the edges to be set, but the centers should still look slightly underbaked. They’ll continue to firm up as they cool!
- Cool and enjoy: Once they’re out of the oven, let the cookies cool on the baking sheet for a few minutes before transferring them to a wire rack. This waiting time helps them maintain that delightful chewy texture!
And there you have it! Those delicious shadow milk cookies are ready to be devoured. Just try not to eat them all in one sitting – though I totally understand if you do. Enjoy every bite!
Why You’ll Love This Recipe
- Quick preparation: These shadow milk cookies come together in just about 15 minutes of prep time, perfect for spontaneous cravings!
- Delicious taste: The combination of cocoa and espresso creates a rich, indulgent flavor that’s simply irresistible.
- Perfect for any occasion: Whether it’s a cozy night at home, a potluck, or a bake sale, these cookies are sure to impress everyone.
- Soft and chewy: The texture is perfectly soft and chewy, making each bite a delightful experience.
- Customizable: You can easily add your favorite mix-ins like nuts or different types of chocolate to make them your own!
Tips for Success with Shadow Milk Cookie
To make sure your shadow milk cookies turn out perfectly every time, here are some handy tips that I’ve picked up along the way:
- Adjusting baking time: If you like your cookies extra soft and chewy, aim for the lower end of the baking time, around 10 minutes. For a firmer cookie, leave them in for the full 12 minutes. Just remember, they’ll continue to set a bit after coming out of the oven!
- Storage: Keep your cookies fresh by storing them in an airtight container at room temperature. They’ll stay delicious for about a week. If you want them to last longer, you can freeze the dough in balls and bake them straight from the freezer – just add a couple of extra minutes to the baking time.
- Mix-in options: Don’t hesitate to experiment! Try adding chopped nuts, different chocolate varieties, or even a sprinkle of sea salt on top before baking for an extra flavor boost.
With these tips, you’ll be a shadow milk cookie pro in no time! Enjoy the baking adventure!
Variations on Shadow Milk Cookie
If you’re feeling adventurous and want to mix things up with your shadow milk cookies, there are so many fun variations to try! Here are a few of my favorites:
- Nutty Delight: Add 1/2 cup of chopped walnuts or pecans for a satisfying crunch. They pair beautifully with the rich chocolate and espresso flavors!
- Chocolate Lovers: Swap out the chocolate chips for white chocolate or even dark chocolate for a different flavor profile. You could also use a mix of all three for an indulgent treat!
- Spiced Up: Want to add a little warmth? Incorporate 1/2 teaspoon of cinnamon or a pinch of cayenne pepper for a surprising kick that complements the cocoa perfectly.
- Minty Fresh: For a refreshing twist, add a few drops of peppermint extract to the dough. You’ll get a delightful mint-chocolate experience that’s perfect for the holidays!
These variations keep things exciting and let you personalize your shadow milk cookies to suit your taste. Have fun experimenting!
Frequently Asked Questions about Shadow Milk Cookie
Got questions about shadow milk cookies? Don’t worry, I’ve got you covered! Here are some common queries I often hear, along with my answers to help you on your baking journey.
- Can I use milk chocolate chips instead of semi-sweet? Absolutely! Feel free to swap out the chocolate chips for milk chocolate if you prefer a sweeter taste. Just remember, it might make the cookies a bit sweeter overall.
- What’s the best way to store leftover cookies? Keep those delicious shadow milk cookies in an airtight container at room temperature. They’ll stay fresh for about a week. If you want them to last longer, freezing the dough for later baking is a great option!
- Can I make these cookies gluten-free? Yes! You can use a gluten-free all-purpose flour blend instead of regular all-purpose flour. Just ensure it has xanthan gum included for the best texture.
- How do I know when my cookies are done baking? Look for the edges to be set and the centers to look slightly underbaked. They’ll firm up as they cool, giving you that perfect soft and chewy texture!
- Can I add espresso powder for a stronger coffee flavor? Definitely! If you want to amp up that espresso flavor, adding 1-2 teaspoons of espresso powder will do the trick without changing the cookie’s texture.
These tips should help clear up any confusion you might have about baking shadow milk cookies. Happy baking!
Nutritional Information for Shadow Milk Cookie
When you’re indulging in a shadow milk cookie, it’s always good to know what you’re enjoying! Each cookie is a delightful treat packed with flavor. Here’s the estimated nutritional breakdown per cookie:
- Calories: 120
- Fat: 6g
- Saturated Fat: 4g
- Unsaturated Fat: 2g
- Trans Fat: 0g
- Cholesterol: 20mg
- Sodium: 50mg
- Carbohydrates: 14g
- Fiber: 1g
- Protein: 2g
- Sugar: 10g
Keep in mind that these values are estimates and can vary based on the specific ingredients you use. Enjoy these cookies as a delightful treat, and remember, moderation is key!
Storage & Reheating Instructions for Shadow Milk Cookie
To keep your shadow milk cookies fresh and delicious, store them in an airtight container at room temperature. They’ll stay tasty for about a week, but trust me, they probably won’t last that long! If you’re like me and love to bake in batches, you can freeze the cookies once they’ve cooled completely. Just pop them in a freezer-safe bag or container, and they’ll be good for up to three months.
When you’re ready to enjoy a cookie, simply take out however many you want and let them thaw at room temperature for about 15 minutes. For an extra touch of warmth, you can pop them in the microwave for about 10-15 seconds. This will bring back that soft, chewy texture, making them taste like they just came out of the oven!
Call to Action
I’d love to hear your thoughts on these shadow milk cookies! After you’ve whipped up a batch, come back and share your experience in the comments. Did you add any unique twists or variations? Maybe you’ve got your own secret ingredient! Don’t forget to rate the recipe too – your feedback helps others discover this delicious treat. Baking is all about sharing joy, so let’s keep the conversation going. I can’t wait to hear your delicious stories!
Print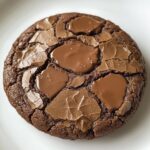
Shadow Milk Cookie: 7 Irresistible Secrets to Delight You
- Total Time: 27 minutes
- Yield: 24 cookies 1x
- Diet: Vegetarian
Description
A deliciously soft and chewy cookie infused with cocoa and a hint of espresso.
Ingredients
- 1 cup all-purpose flour
- 1/2 cup cocoa powder
- 1/2 cup sugar
- 1/2 cup brown sugar
- 1/2 cup unsalted butter, softened
- 1 egg
- 1 teaspoon vanilla extract
- 1/2 teaspoon baking soda
- 1/4 teaspoon salt
- 1/4 cup chocolate chips
Instructions
- Preheat the oven to 350°F (175°C).
- In a bowl, cream together butter, sugar, and brown sugar.
- Add egg and vanilla extract, mix well.
- In another bowl, combine flour, cocoa powder, baking soda, and salt.
- Gradually add dry ingredients to the wet mixture, stir until combined.
- Fold in chocolate chips.
- Drop spoonfuls of dough onto a baking sheet.
- Bake for 10-12 minutes.
- Let cool before serving.
Notes
- Store cookies in an airtight container.
- Adjust baking time for desired softness.
- Prep Time: 15 minutes
- Cook Time: 12 minutes
- Category: Dessert
- Method: Baking
- Cuisine: American
Nutrition
- Serving Size: 1 cookie
- Calories: 120
- Sugar: 10g
- Sodium: 50mg
- Fat: 6g
- Saturated Fat: 4g
- Unsaturated Fat: 2g
- Trans Fat: 0g
- Carbohydrates: 14g
- Fiber: 1g
- Protein: 2g
- Cholesterol: 20mg
Keywords: shadow milk cookie