Spring is that glorious time of year when everything feels fresh and alive, and what better way to celebrate than with a delightful spring cake? This recipe is a standout, perfect for those sunny afternoons when friends and family gather to soak in the warmth of the season. I still remember the first time I made this cake for a spring picnic. The sun was shining, flowers were blooming, and the moment I took that first bite, I could taste the joy of spring! It’s light, fluffy, and bursting with flavor, making it a crowd-pleaser at any gathering.
The beauty of this spring cake lies in its simplicity and versatility. With just a handful of ingredients, you can whip up a dessert that feels special and celebratory. Plus, it’s so easy to adapt with your favorite seasonal fruits on top! Trust me, when you bake this cake, your kitchen will fill with the most heavenly aroma, calling everyone to the table. So grab your mixing bowl and let’s dive into this delightful recipe that captures the essence of spring like no other!
Ingredients List
Before you embark on this delightful spring cake journey, let’s gather our ingredients. You’ll want everything fresh and ready to go for the best results!
- 2 cups all-purpose flour
- 1 cup sugar
- 1/2 cup butter, softened (make sure it’s at room temperature for easy creaming!)
- 1 cup milk (whole milk works best for richness)
- 3 large eggs (room temperature is ideal)
- 2 teaspoons baking powder (don’t skip this for that perfect rise!)
- 1 teaspoon vanilla extract (pure vanilla is always my go-to for flavor)
- 1/4 teaspoon salt (just a pinch to balance the sweetness)
- Fresh fruit for topping (I love strawberries, blueberries, or a mix of seasonal delights!)
Gather these ingredients, and you’ll be well on your way to a scrumptious cake that celebrates the joys of spring! Let’s get baking!
How to Prepare Instructions
Now that we’ve got our ingredients all lined up, it’s time to bring this spring cake to life! Follow these simple steps, and you’ll be enjoying a slice of sunshine in no time.
- Preheat your oven: Start by preheating your oven to 350°F (175°C). This ensures your cake bakes evenly and rises beautifully.
- Prepare your cake pan: Grease and flour a 9-inch round cake pan. I like to use a little butter to grease the pan, then dust it with flour to prevent sticking. You could also use parchment paper on the bottom for extra assurance!
- Cream the butter and sugar: In a large mixing bowl, cream together the softened butter and sugar until the mixture is light and fluffy. This usually takes about 3-5 minutes with a hand mixer. You want it to look pale and airy!
- Add the eggs: Crack the eggs in one at a time, mixing well after each addition. This helps to incorporate air into the batter, giving your cake that light texture we all love.
- Stir in the vanilla: Once your eggs are mixed in, add the vanilla extract and stir until combined. The smell of vanilla just makes everything better, doesn’t it?
- Mix the dry ingredients: In a separate bowl, whisk together the all-purpose flour, baking powder, and salt. This step helps distribute the baking powder evenly throughout the flour, which is key for a nice rise.
- Combine wet and dry ingredients: Gradually add the dry mixture to the wet ingredients, alternating with the milk. Start with about a third of the flour mixture, then pour in half the milk, and continue this pattern. Mix until just combined—don’t overdo it! A few lumps are okay.
- Pour the batter: Once everything is combined, pour the batter into your prepared cake pan. Use a spatula to smooth the top if you like—it makes for a pretty finish!
- Bake: Pop the pan into the preheated oven and bake for 30-35 minutes. You’ll know it’s ready when a toothpick inserted into the center comes out clean. Keep an eye on it after the 30-minute mark, as ovens can vary!
- Cool down: After baking, let your cake cool in the pan for about 10 minutes. Then, carefully turn it out onto a wire rack to cool completely. Don’t rush this step—letting it cool properly ensures it holds its shape beautifully!
And there you have it! A perfectly baked spring cake, ready for that vibrant topping of fresh fruits. Your kitchen will smell divine, and I promise this cake will bring smiles all around. Now let’s get ready to top it off!
Why You’ll Love This Recipe
This spring cake is more than just a dessert; it’s a celebration of the season! Here’s why you’ll fall in love with this delightful recipe:
- Light and Airy: The fluffy texture makes it feel like a cloud of sweetness on your palate.
- Simple to Make: With just a few easy steps, you’ll have a gorgeous cake ready to impress without any fuss!
- Flavorful: The combination of vanilla and fresh fruits brings a burst of flavor that screams spring!
- Perfect for Gatherings: Whether it’s a picnic, brunch, or family get-together, this cake is always a hit and brings everyone together.
- Customizable: You can switch up the fruits or add a hint of lemon zest to make it uniquely yours!
Trust me, once you try this spring cake, it’ll find a permanent spot in your recipe collection!
Tips for Success
To ensure your spring cake turns out absolutely fabulous, I’ve got some tried-and-true tips that I swear by. Trust me, these little tweaks can make a world of difference!
- Use Quality Ingredients: The better the ingredients, the better your cake will taste! Opt for real butter instead of margarine for that rich flavor, and make sure your eggs are fresh. It’s the little things that count!
- Room Temperature Matters: Remember to bring your butter and eggs to room temperature before starting. This helps them blend seamlessly into the batter, giving you that light and fluffy texture we’re after.
- Don’t Overmix: When combining your wet and dry ingredients, mix until just combined. Overmixing can develop gluten and lead to a denser cake, which we definitely want to avoid!
- Cool Properly: Allow your cake to cool in the pan for about 10 minutes before transferring it to a wire rack. This step prevents it from breaking and helps maintain its shape.
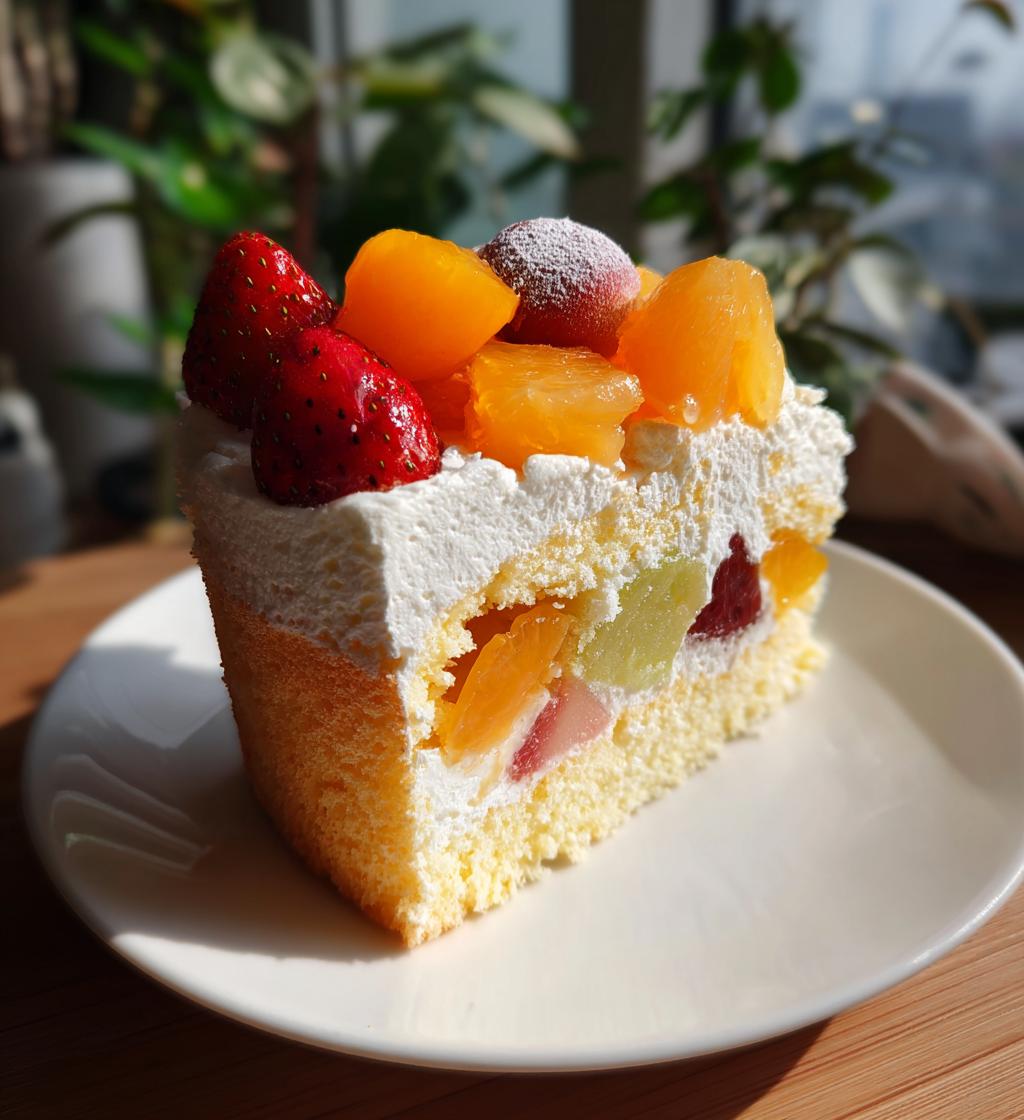
- Presentation is Key: Once your cake is cool, top it with fresh fruit and a dusting of powdered sugar for a beautiful finish. It makes for a stunning centerpiece at any gathering!
With these tips, you’ll be well on your way to baking the perfect spring cake that everyone will rave about. Happy baking!
Variations
One of the best things about this spring cake is how easy it is to customize! Here are some fun ideas to inspire your creativity in the kitchen:
- Citrus Twist: Add a tablespoon of lemon or orange zest to the batter for a bright, zesty flavor that pairs perfectly with fresh fruits.
- Berry Delight: Instead of just topping with fruit, consider folding in some berries like raspberries or diced strawberries directly into the batter before baking. It adds a delightful burst of flavor and color!
- Nutty Crunch: Toss in some chopped nuts, like almonds or walnuts, for a satisfying crunch. They add a lovely texture contrast to the soft cake.
- Flavored Glaze: Drizzle a simple glaze made from powdered sugar and lemon juice over the top for an extra touch of sweetness.
Feel free to mix and match these ideas to create a spring cake that’s uniquely yours. The possibilities are endless, and that’s what makes baking so much fun!
Serving Suggestions
Now that your delightful spring cake is ready, let’s talk about how to make it even more special! This cake pairs wonderfully with a variety of beverages and desserts that enhance its light, fruity flavors.
For a refreshing drink, I highly recommend serving it alongside a chilled glass of lemonade or a fruity iced tea. The tartness of the lemonade complements the sweetness of the cake beautifully. If you’re feeling a bit fancy, a sparkling wine or a light prosecco can elevate your gathering to a whole new level.
If you want to add a little something extra, consider serving a dollop of whipped cream or a scoop of vanilla ice cream on the side. You can even drizzle some berry sauce or chocolate ganache over the top for an indulgent touch. Trust me, your guests will be coming back for seconds!
Storage & Reheating Instructions
Storing your spring cake properly is essential to keep it fresh and delicious! Once the cake has cooled completely, wrap it tightly in plastic wrap or place it in an airtight container. This will help keep it moist and prevent it from absorbing any unwanted odors from your fridge. You can store it at room temperature for up to three days. If you want to keep it longer, pop it in the freezer! Just make sure to wrap it well in foil or freezer-safe wrap, and it should last for up to three months.
When you’re ready to enjoy your cake again, simply take it out of the freezer and let it thaw in the fridge overnight. If you prefer to eat it warm, you can pop individual slices in the microwave for about 10-15 seconds. Just be careful not to overheat it, or it might dry out! Enjoy your cake any time you need a little taste of spring!
Nutritional Information Section
As with any homemade recipe, the nutritional values of this spring cake can vary based on the specific ingredients and brands you use. While I can’t provide exact numbers, here’s a general idea of what to expect per serving: around 250 calories, with 15g of sugar and 4g of protein. Remember, if you swap ingredients or add toppings, these values will change. Always feel free to adjust according to your dietary needs or preferences!
FAQ Section
Got questions about making the perfect spring cakes? Don’t worry, I’ve got you covered! Here are some common queries and my answers to help you out:
- Can I use whole wheat flour instead of all-purpose flour? Absolutely! Whole wheat flour adds a nutty flavor and makes the cake a bit heartier. Just keep in mind that it may change the texture slightly, making it denser.
- What fruits work best for topping? Fresh seasonal fruits are the star of the show! I love using strawberries, blueberries, or even sliced peaches. Feel free to mix and match based on what’s available and in season!
- How can I make this cake gluten-free? You can substitute the all-purpose flour with a 1-to-1 gluten-free baking mix. Just make sure it contains xanthan gum, which helps mimic the texture of regular flour.
- Can I make this cake ahead of time? Yes! This spring cake actually tastes even better the next day. Just store it properly, and it’ll be ready to impress your guests or enjoy at your leisure!
- What’s the best way to decorate my spring cake? Top it with freshly whipped cream and a colorful assortment of fruits for a stunning presentation. A light dusting of powdered sugar adds an elegant touch too!
If you have any other questions, feel free to reach out! I’m always here to help you bake the best spring cakes!
Print
Spring Cakes that Delight: 7 Tips for a Perfect Bake
- Total Time: 50 minutes
- Yield: 8 servings 1x
- Diet: Vegetarian
Description
A delightful and light cake perfect for spring gatherings.
Ingredients
- 2 cups all-purpose flour
- 1 cup sugar
- 1/2 cup butter, softened
- 1 cup milk
- 3 eggs
- 2 teaspoons baking powder
- 1 teaspoon vanilla extract
- 1/4 teaspoon salt
- Fresh fruit for topping
Instructions
- Preheat your oven to 350°F (175°C).
- Grease and flour a cake pan.
- In a mixing bowl, cream the butter and sugar together.
- Add eggs one at a time, mixing well after each.
- Stir in the vanilla extract.
- In another bowl, combine flour, baking powder, and salt.
- Gradually add the dry ingredients to the wet mixture, alternating with milk.
- Pour the batter into the prepared cake pan.
- Bake for 30-35 minutes or until a toothpick comes out clean.
- Let the cake cool before topping with fresh fruit.
Notes
- For added flavor, consider adding lemon zest.
- You can use any seasonal fruit for topping.
- Store in an airtight container for up to three days.
- Prep Time: 15 minutes
- Cook Time: 35 minutes
- Category: Dessert
- Method: Baking
- Cuisine: American
Nutrition
- Serving Size: 1 slice
- Calories: 250
- Sugar: 15g
- Sodium: 150mg
- Fat: 10g
- Saturated Fat: 6g
- Unsaturated Fat: 3g
- Trans Fat: 0g
- Carbohydrates: 35g
- Fiber: 1g
- Protein: 4g
- Cholesterol: 70mg
Keywords: spring cakes, light cake, dessert, seasonal