Ah, St. Patrick’s Day! A time for shamrocks, leprechauns, and all things green. This festive occasion always brings a smile to my face, and what’s better than creating something colorful to celebrate? Enter my delightful *St. Patrick’s Day marshmallows*! These fluffy, sweet treats are not only fun to make but also add a cheerful pop of color to any holiday spread. Imagine a platter filled with vibrant green, white, and even a touch of gold marshmallows, all ready to enchant your guests. They’re perfect for snacking, decorating cupcakes, or even tossing into hot chocolate for a cozy twist! Trust me, there’s something magical about making your own marshmallows from scratch, and it’s even more special when you can share them with family and friends during this cheerful celebration. So, let’s dive into the fun of whipping up these charming little bites of joy!
Ingredients for St Patrick’s Day Marshmallows
To whip up these delightful *St. Patrick’s Day marshmallows*, you’ll want to gather your ingredients. Trust me, it’s worth it! Here’s what you’ll need:
- 1 cup granulated sugar: This forms the base of your marshmallows, adding that sweet, comforting flavor we all love.
- 1 cup light corn syrup: This helps achieve that perfect gooey texture. It’s the secret behind marshmallow magic!
- 1/2 cup cold water: This will be mixed with the sugar and corn syrup to create a syrup that will soon transform into fluffy goodness.
- 2 tablespoons unflavored gelatin: This is what gives your marshmallows that wonderful bouncy texture. Don’t skip this!
- 1 teaspoon vanilla extract: For a hint of warmth and flavor, vanilla is a must! It elevates the entire treat.
- Green food coloring: You’ll want to use this to bring that festive St. Patrick’s Day spirit to life! A few drops will do.
- Powdered sugar (for dusting): This will keep your marshmallows from sticking together and give them that classic sugary finish.
Gather these ingredients, and you’re one step closer to crafting something truly special for your St. Patrick’s Day celebrations!
How to Prepare St Patrick’s Day Marshmallows
Now that we have our ingredients ready, let’s dive into the magical process of making *St. Patrick’s Day marshmallows*! Follow these steps, and you’ll be on your way to creating fluffy, colorful treats that will make your celebration even more special.
Step 1: Prepare Your Workspace
First things first, let’s set up your workspace! You’ll need a clean countertop, a large mixing bowl, and a saucepan. Don’t forget a candy thermometer – it’s super helpful for ensuring your syrup reaches the right temperature. You’ll also want a whisk or an electric mixer for fluffing up those marshmallows later. Grab a baking dish (about 9×13 inches) and line it with parchment paper, leaving some overhang on the sides to make removing the marshmallows easier later on. Trust me, this little detail makes a world of difference!
Step 2: Mix Ingredients
In a medium saucepan, combine the granulated sugar, corn syrup, and cold water. Stir it gently until everything is well mixed. Now, here’s the fun part! Place your saucepan over medium heat and let it cook without stirring. You want to bring this mixture to a boil until it reaches 240°F (115°C) on your candy thermometer. This is the magic temperature where the syrup transforms! Keep an eye on it, because it can bubble and splatter a bit, so be careful!
Step 3: Whip and Set
While your syrup is bubbling away, let’s prepare the gelatin mixture. In a separate bowl, combine the unflavored gelatin with 1/2 cup of cold water and let it sit for about 5 minutes to bloom. Once your syrup hits that magical temperature, carefully pour it into the bloomed gelatin while whisking continuously. It’s important to do this slowly to avoid any splashes! Now, whip this mixture on high speed using your electric mixer until it becomes thick and fluffy, about 10 minutes. You’ll know it’s ready when it holds stiff peaks and looks glossy. Add in the vanilla extract and a few drops of green food coloring, mixing just until combined.
Step 4: Cut and Decorate
Now for the final touch! Pour the fluffy marshmallow mixture into your prepared baking dish, spreading it out evenly. Let it set at room temperature for at least 4 hours or overnight for the best results. Once it’s firm, dust your work surface with powdered sugar and turn the marshmallows out onto it. Use a sharp knife or pizza cutter to cut them into squares or any festive shapes you like! You can also dip the edges in more powdered sugar to keep them from sticking together. For a playful St. Patrick’s Day vibe, feel free to sprinkle some edible glitter or green sprinkles on top. They’re so fun and festive!
Tips for Perfect St Patrick’s Day Marshmallows
Alright, now that you’re all set to make those fabulous *St. Patrick’s Day marshmallows*, let’s talk about some tips to ensure they turn out absolutely perfect! Trust me, these little nuggets of advice can make all the difference!
Use Fresh Gelatin
First things first, always check the expiration date on your gelatin. Old gelatin can lose its gelling power, leaving you with a marshmallow mixture that just won’t set properly. Fresh gelatin guarantees that delightful bouncy texture we’re after!
Control the Temperature
Temperature is *key* when making marshmallows! Use a reliable candy thermometer to track the syrup’s temperature closely. If it doesn’t reach 240°F (115°C), your marshmallows may end up too soft. If it goes too high, they can become too firm. So, keep an eye on that thermometer!
Mixing Time Matters
When whipping the gelatin and syrup mixture, don’t skimp on the time. You want that mixture to become thick, fluffy, and glossy, which typically takes about 10 minutes. It’s tempting to rush this step, but patience will reward you with light and airy marshmallows!
Experiment with Flavors
While vanilla is a classic, don’t hesitate to get creative! You can incorporate different extracts like almond, mint, or even a splash of Irish cream flavoring for a festive twist. Just remember to keep the quantities small so they don’t overpower the marshmallow’s sweetness.
Dusting is Key
When cutting your marshmallows, a generous dusting of powdered sugar is your best friend. This prevents them from sticking together and gives them that lovely, sugary finish. Don’t be shy with it – a light toss in powdered sugar before serving adds a delightful touch!
Follow these tips, and you’ll be well on your way to mastering the art of *St. Patrick’s Day marshmallows*! They’re bound to be the star of your celebration, bringing smiles and sweetness to everyone around!
Nutritional Information Disclaimer
When it comes to *St. Patrick’s Day marshmallows*, it’s important to remember that nutritional values can vary based on the specific ingredients and brands you choose. While I’ve done my best to provide a general overview, precise data is not guaranteed. Factors like the type of sugar used, the brand of gelatin, and even the amount of food coloring can influence the final nutritional content.
So, if you’re keeping a close eye on your dietary needs, I recommend checking the labels of your ingredients for the most accurate information. Enjoy these delightful treats in moderation and share them with friends and family – after all, it’s all about celebrating together!
FAQ Section
Q1: Can I use flavored gelatin instead of unflavored for my St. Patrick’s Day marshmallows?
While you can experiment with flavored gelatin, I recommend sticking to unflavored for that classic marshmallow texture. The unflavored gelatin is essential for achieving that perfect fluffiness. If you want to add flavor, try incorporating extracts like mint or almond instead!
Q2: How can I store leftover marshmallows?
To keep your *St. Patrick’s Day marshmallows* fresh, store them in an airtight container at room temperature. They should last for about a week. If you want to keep them longer, you can also freeze them! Just make sure to dust them with powdered sugar before freezing to prevent sticking.
Q3: What if my marshmallows don’t set properly?
If your marshmallows aren’t setting, it could be due to the syrup not reaching the right temperature or using old gelatin. Make sure to use a candy thermometer for accurate readings and check the expiration date on your gelatin. Don’t worry! If they’re still gooey, you can try re-whipping them and adding a bit more gelatin to help them firm up.
Q4: Can I make these marshmallows vegan?
Absolutely! You can substitute the unflavored gelatin with agar-agar for a vegan version. Just follow the package instructions for the correct amount, as it behaves a bit differently than gelatin. Your marshmallows will still be fabulous and festive!
Q5: How do I make the marshmallows more colorful?
If you want your *St. Patrick’s Day marshmallows* to be even more vibrant, feel free to add more drops of green food coloring! You can also create a two-tone effect by swirling in different colors before pouring the mixture into the baking dish. Just remember to keep it festive!
Serving Suggestions for St Patrick’s Day Marshmallows
Now that you’ve whipped up these delightful *St. Patrick’s Day marshmallows*, let’s chat about how to serve and enjoy them! These colorful treats are not just delicious; they’re also perfect for bringing a festive flair to any gathering. Here are some fun ideas:
Marshmallow Skewers
Transform your marshmallows into playful skewers! Simply thread them onto wooden sticks, alternating with pieces of fresh fruit like strawberries or kiwi for a burst of color. They make for a fun and easy snack that’s perfect for kids and adults alike!
Gourmet Hot Chocolate
Imagine cozying up with a warm cup of hot chocolate topped with your homemade marshmallows. Just float a few on top, and watch them melt into the rich chocolate! For an extra touch, sprinkle some crushed peppermint or even a dash of Irish cream flavoring on top. It’s a sweet treat that’ll warm your heart!
Decoration for Desserts
Get creative with dessert presentations! Chop the marshmallows into smaller pieces and sprinkle them over cupcakes, cakes, or even brownies. They not only add a festive touch but also a delightful texture. You can also use them to decorate a St. Patrick’s Day-themed cake, bringing that cheerful spirit to life.
Festive Treat Bags
For a charming party favor, package your marshmallows in clear bags tied with green ribbons. They make adorable gifts for guests to take home and enjoy. You can even add a little tag that says “May your day be sweet!” to keep the festive spirit alive!
Creative S’mores
Why not elevate your s’mores game? Use your *St. Patrick’s Day marshmallows* instead of regular ones! Assemble them with graham crackers and chocolate, and then toast them over a fire or in the oven. The flavor and look will be a delightful surprise for everyone!
Whichever way you choose to serve your marshmallows, they’re sure to bring smiles and sweetness to your St. Patrick’s Day celebrations. Enjoy every colorful bite!
Storage & Reheating Instructions
Once you’ve enjoyed your delightful *St. Patrick’s Day marshmallows*, you might be wondering how to store any leftovers. Don’t worry, keeping them fresh is easy! Just follow these simple steps to ensure they stay fluffy and yummy.
First, place your marshmallows in an airtight container. This is crucial! Exposure to air can cause them to dry out, and we definitely want to avoid that. If you have a lot, you can layer them between sheets of parchment paper to prevent sticking.
Store the container at room temperature, away from direct sunlight and heat sources. Your marshmallows should last about a week this way, although they’re so delicious, they might not last that long! If you want to keep them for a longer period, you can freeze them. Just remember to dust them with powdered sugar before freezing to prevent them from sticking together.
When you’re ready to enjoy them again, there’s no need to thaw them out unless you prefer them that way. Simply toss a few into your hot chocolate or enjoy them straight from the container. They’ll still taste great! If you choose to reheat them, pop them in the microwave for a few seconds to get that soft, gooey texture back. Just be careful not to heat them too long, or they might get overly melty.
With these storage and reheating tips, you’ll always have your festive *St. Patrick’s Day marshmallows* ready to bring a smile whenever you need a sweet treat! Enjoy every last fluffy bite!
Print
St Patrick’s Day Marshmallows: 5 Sweet Reasons to Make Them
- Total Time: 40 minutes
- Yield: 4 servings 1x
- Diet: Low Fat
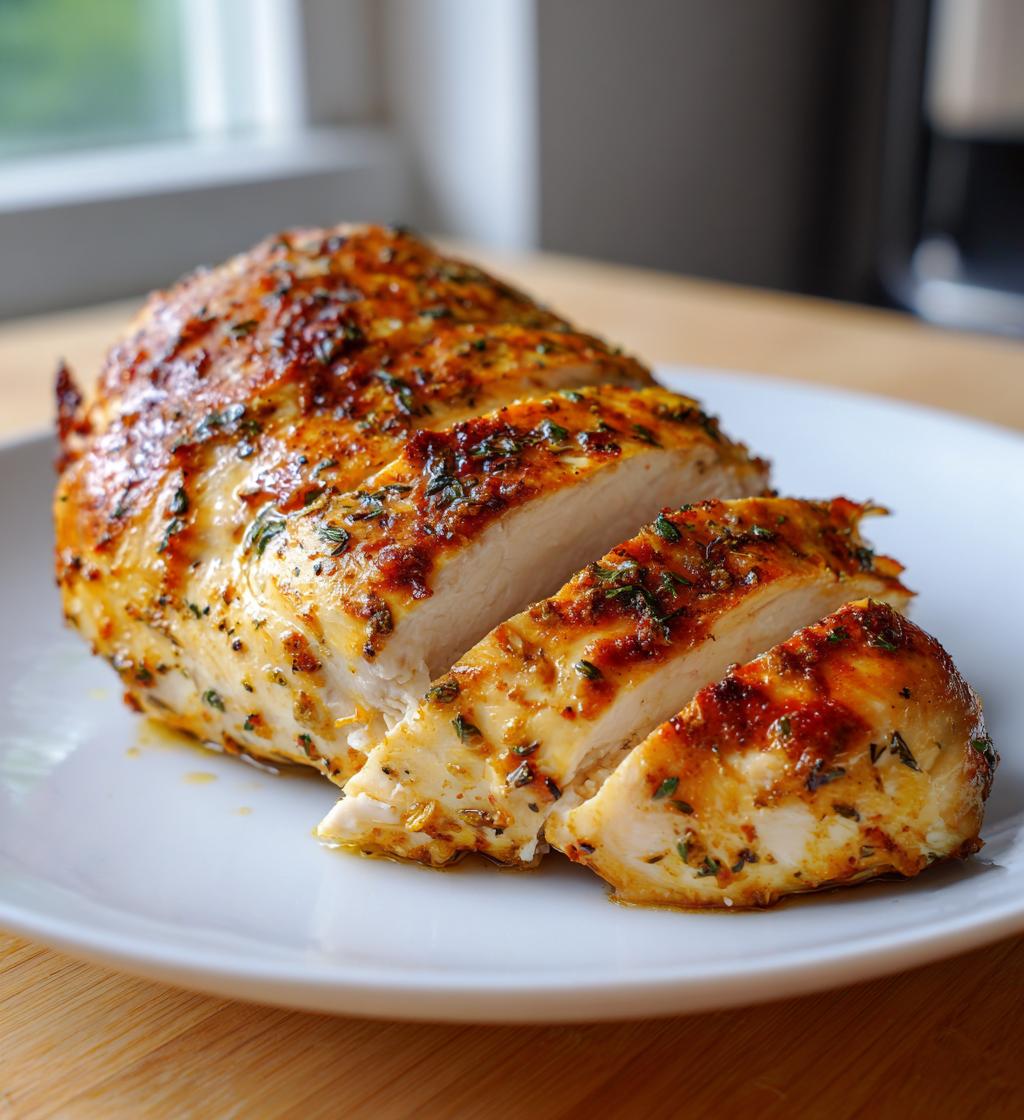
Description
Baked chicken breast is a simple and healthy dish perfect for any meal.
Ingredients
- 4 chicken breasts
- 2 tablespoons olive oil
- 1 teaspoon garlic powder
- 1 teaspoon onion powder
- 1 teaspoon paprika
- Salt to taste
- Pepper to taste
Instructions
- Preheat your oven to 375°F (190°C).
- Pat the chicken breasts dry with paper towels.
- Rub olive oil on both sides of the chicken.
- Season with garlic powder, onion powder, paprika, salt, and pepper.
- Place the chicken in a baking dish.
- Bake for 25-30 minutes or until the internal temperature reaches 165°F (75°C).
- Let rest for 5 minutes before slicing.
Notes
- For extra flavor, marinate the chicken for a few hours.
- Serve with your choice of vegetables or grains.
- Store leftovers in an airtight container in the fridge.
- Prep Time: 10 minutes
- Cook Time: 30 minutes
- Category: Main Course
- Method: Baking
- Cuisine: American
Nutrition
- Serving Size: 1 chicken breast
- Calories: 165
- Sugar: 0g
- Sodium: 70mg
- Fat: 3.6g
- Saturated Fat: 1g
- Unsaturated Fat: 2.6g
- Trans Fat: 0g
- Carbohydrates: 0g
- Fiber: 0g
- Protein: 31g
- Cholesterol: 75mg
Keywords: baked chicken breast, healthy chicken recipe, easy chicken dinner