
There’s something truly magical about baking traditional Christmas cookies that fills the air with warmth and nostalgia. As soon as the oven timer dings, and that sweet aroma wafts through the house, it’s like a hug from the holidays! These cookies aren’t just treats; they’re the heart of family gatherings, the centerpiece of festive celebrations, and the perfect way to share love during this special season.
Every time I roll out the dough, I can’t help but think of the laughter and joy that comes from decorating them with my kids. Sprinkles flying everywhere, icing getting more on our fingers than the cookies – it’s all part of the fun! Trust me, when you take that first bite of a warm, buttery cookie, it transports you back to those cherished moments around the table with loved ones. So grab your apron, and let’s dive into the world of traditional Christmas cookies – a recipe that’s bound to bring your family together, just like it has for mine!
Ingredients List
Gathering the right ingredients is key to making the best traditional Christmas cookies, and I’m here to guide you through them! Here’s what you’ll need:
- 2 cups all-purpose flour – Make sure it’s sifted for that light texture we all love!
- 1 cup granulated sugar – This is what gives our cookies that sweet kick!
- 1/2 cup unsalted butter, softened – Let it sit out for a bit before you start; it should be just soft enough to leave an indent when you poke it.
- 1 large egg – Room temperature eggs blend better, so take it out of the fridge ahead of time.
- 1 teaspoon vanilla extract – This is the magic ingredient that adds that wonderful, warm flavor!
- 1 teaspoon baking powder – Essential for that perfect rise and fluffiness.
- 1/2 teaspoon salt – Just a pinch to balance the sweetness.
- 1/2 cup icing sugar for decoration – This will give your cookies that festive touch – feel free to sprinkle generously!
With these ingredients ready, you’re all set to embark on your cookie-baking adventure! Each one plays a vital role in creating that nostalgic taste of the holidays. Let’s keep the spirit alive and make some delicious memories together!
How to Prepare Traditional Christmas Cookies
Now that we have our ingredients ready, let’s dive into the fun part – making those delightful traditional Christmas cookies! Follow these step-by-step instructions, and you’ll be on your way to filling your home with the sweetest holiday scents.
Preheat the Oven
First things first – let’s get that oven preheated! Set it to 350°F (175°C). Preheating is super important because it ensures that your cookies bake evenly from the moment they hit the oven. Trust me, you don’t want to skip this step and end up with half-baked treats!
Creaming the Butter and Sugar
Next up, let’s cream the butter and sugar together. In a mixing bowl, add your softened unsalted butter and granulated sugar. Using a hand mixer or a wooden spoon, beat them together until the mixture is light and fluffy. You’re looking for a pale yellow color and a texture that feels creamy – almost like whipped clouds! This step is crucial because it creates those air pockets that help our cookies rise beautifully.
Mixing in the Egg and Vanilla
Now, crack in that large egg and pour in the vanilla extract. Mix everything together until it’s well combined. You should see a smooth consistency that’s just begging to be turned into cookies. This is where that lovely vanilla aroma starts to fill the air – it’s one of my favorite parts!
Combining Dry Ingredients
Grab another bowl for the dry ingredients. Combine your all-purpose flour, baking powder, and salt in there. Give it a good whisk to mix everything together. This step ensures that the leavening agent is evenly distributed throughout the flour, which makes for perfectly risen cookies.
Forming the Cookie Dough
Time to bring it all together! Gradually add the dry ingredients to the wet mixture, stirring gently until just combined. Don’t overmix – we want to keep that light texture! Once your dough is ready, roll it into small balls, about an inch in diameter. Place them on a baking sheet lined with parchment paper, leaving some space between each ball because they will spread a bit while baking.
Baking the Cookies
Pop those trays into the preheated oven and set a timer for 10-12 minutes. You’ll know they’re done when the edges are lightly golden and the tops look set. But here’s a little tip: if they look a touch underbaked, that’s okay! They’ll continue to cook a bit as they cool, and we want them to stay soft and chewy.
Cooling and Decorating
Once your cookies come out of the oven, let them cool on the baking sheet for a few minutes before transferring them to a wire rack. This helps them firm up a little. After they’ve cooled completely, it’s time for the fun part – decorating! Dust them generously with icing sugar for that festive touch. Feel free to get creative with sprinkles or other toppings; every cookie can be a little festive masterpiece!
Tips for Success
Now that you’ve got the basics down, let’s talk about some pro tips for perfecting those traditional Christmas cookies! With a few little tricks up your sleeve, you can elevate your cookie game and ensure every batch turns out just right.
Chill the Dough
This is a tip I swear by: chill your dough for about 30 minutes before rolling it into balls. Trust me, it makes a world of difference! Chilling helps to firm up the butter, which prevents the cookies from spreading too much while baking. You’ll end up with perfectly shaped cookies that hold their beautiful form instead of melting into flat discs!
Watch the Baking Time
Keep a close eye on your cookies during baking. Ovens can vary, and what works for one may not work for another. If it’s your first time baking these cookies, set a timer for the minimum time of 10 minutes and check them. They should be lightly golden around the edges but still soft in the middle. Remember, they’ll continue to firm up as they cool!
Rotate Your Baking Sheets
If you’re baking multiple trays at once, don’t forget to rotate them halfway through baking. This helps ensure even baking, especially if your oven has hot spots. Just give them a gentle turn and switch the trays from top to bottom for consistently baked cookies across the board!
Use Parchment Paper
Always line your baking sheets with parchment paper or a silicone baking mat. This not only prevents sticking but also helps promote even baking. No one wants a cookie disaster, right? Plus, cleanup is a breeze!
Customize with Confidence
Feel free to get creative with your traditional Christmas cookies! You can add in mini chocolate chips, chopped nuts, or even dried fruit for a little twist. Just remember to adjust the measurements slightly to keep the dough’s balance. The beauty of these cookies is in their versatility!
With these tips, you’ll be well on your way to baking up a storm this holiday season. Happy baking, and enjoy every delicious bite of your traditional Christmas cookies! They’re sure to spread joy and cheer to everyone who gets to enjoy them.
Nutritional Information Disclaimer
Before we dive into baking, I want to share a quick note about the nutritional information for these traditional Christmas cookies. Keep in mind that the values can vary based on the specific ingredients and brands you use, so this isn’t a precise measurement. Generally, one cookie contains approximately:
- Calories: 100
- Sugar: 8g
- Fat: 4g
- Saturated Fat: 2g
- Trans Fat: 0g
- Cholesterol: 15mg
- Sodium: 50mg
- Carbohydrates: 14g
- Protein: 1g
- Fiber: 0g
These values are just a ballpark, so if you’re keeping a close eye on your nutrition, I recommend calculating based on your specific ingredients. But hey, it’s the holidays! Enjoy those cookies and the sweet moments they bring!
FAQ Section
How to Store Traditional Christmas Cookies?
Storing your traditional Christmas cookies properly is key to keeping them fresh and delicious! Once they’ve cooled completely, place them in an airtight container. This helps maintain their moisture and prevents them from getting stale. I like to separate different types of cookies with sheets of wax paper to keep them from sticking together. If you’ve gone a little sprinkle-crazy, this is a must! That way, they stay lovely and presentable for when you want to share them with family and friends.
Can I Customize the Recipe?
Absolutely! This recipe is a great base for all sorts of fun variations. Want to switch things up? You can add mini chocolate chips, chopped nuts, or even dried fruit like cranberries or cherries to the dough for a little twist. Just be sure to adjust the measurements slightly to keep the dough balanced. If you’re feeling adventurous, try swapping out some of the all-purpose flour for almond flour for a nutty flavor! The beauty of traditional Christmas cookies is that they can easily be tailored to fit your taste.
How Long Do These Cookies Last?
When stored properly in an airtight container, your traditional Christmas cookies will typically last about 1 week at room temperature. If you want to keep them for longer, you can freeze them for up to 3 months. Just make sure to wrap them well in plastic wrap or use a freezer-safe container to prevent freezer burn. When you’re ready to enjoy them, just let them thaw at room temperature for a bit, and they’ll be just as delightful as the day you baked them!
Why You’ll Love This Recipe
Let me tell you why making these traditional Christmas cookies is an absolute must during the holiday season! First off, they’re so quick and easy to whip up. With just a handful of ingredients and simple steps, you’ll have a batch of warm, delicious cookies ready to enjoy in no time. Seriously, you can have them baked and cooling on the rack in under 30 minutes!
But it’s not just about the speed; it’s the joy that comes with baking them. This recipe is perfect for families to come together in the kitchen. Picture this: kids rolling dough into little balls, laughter echoing as sprinkles go flying, and the satisfaction of decorating each cookie uniquely. It’s moments like these that create lasting memories and deepen family bonds during the holidays.
Plus, these cookies are versatile! You can keep them classic or get creative with different toppings or mix-ins. They’re the perfect canvas for festive flair, and everyone can personalize their own batch. Whether you’re hosting a holiday party, gifting to friends, or just treating your family, these traditional Christmas cookies are sure to bring smiles to everyone’s faces.
So, roll up those sleeves and get ready to create some magic in your kitchen. You’ll love the warmth, the laughter, and the sweet aroma that fills your home. Trust me, once you start baking these cookies, you’ll want to make it a cherished holiday tradition!
Print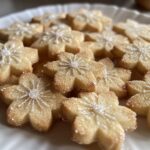
Traditional Christmas Cookies That Spark Joy in 30 Minutes
- Total Time: 27 minutes
- Yield: 24 cookies 1x
- Diet: Vegetarian
Description
A classic recipe for traditional Christmas cookies that brings festive cheer.
Ingredients
- 2 cups all-purpose flour
- 1 cup granulated sugar
- 1/2 cup unsalted butter, softened
- 1 large egg
- 1 teaspoon vanilla extract
- 1 teaspoon baking powder
- 1/2 teaspoon salt
- 1/2 cup icing sugar for decoration
Instructions
- Preheat your oven to 350°F (175°C).
- In a bowl, cream the butter and sugar together.
- Add the egg and vanilla extract, mixing well.
- In another bowl, combine flour, baking powder, and salt.
- Gradually add the dry ingredients to the wet mixture.
- Roll the dough into small balls and place them on a baking sheet.
- Bake for 10-12 minutes until lightly golden.
- Allow cookies to cool and then decorate with icing sugar.
Notes
- Store cookies in an airtight container.
- These cookies can be customized with sprinkles.
- Chill dough for 30 minutes for easier handling.
- Prep Time: 15 minutes
- Cook Time: 12 minutes
- Category: Dessert
- Method: Baking
- Cuisine: American
Nutrition
- Serving Size: 1 cookie
- Calories: 100
- Sugar: 8g
- Sodium: 50mg
- Fat: 4g
- Saturated Fat: 2g
- Unsaturated Fat: 1g
- Trans Fat: 0g
- Carbohydrates: 14g
- Fiber: 0g
- Protein: 1g
- Cholesterol: 15mg
Keywords: traditional christmas cookies, holiday cookies, festive baking