Valentine’s Day is that magical time of year when love is in the air, and the celebration of romance invites us to indulge in delightful treats. There’s something so special about crafting a dish that brings joy and warmth to the ones we cherish. When I think of *valentines recipes*, I envision cozy evenings filled with sweet aromas and shared smiles. It’s not just about the food; it’s about the love that goes into making it. I remember the first time I baked a special dessert for my partner. I was nervous but excited, pouring my heart into every step. The kitchen was filled with the rich scent of melting chocolate and sweet butter, and the moment we took that first bite, I knew I had created something memorable. Recipes like these don’t just fill bellies; they create connections and lasting memories. So, whether you’re cooking for a significant other, friends, or even treating yourself, these *valentines recipes* are sure to add a sprinkle of love to your celebration!
Ingredients List
Gather these simple yet essential ingredients to create a deliciously romantic dessert that will surely impress your loved ones:
- 2 cups all-purpose flour, sifted
- 1 cup granulated sugar
- 1/2 cup unsalted butter, softened
- 2 large eggs
- 1 teaspoon pure vanilla extract
- 1/2 cup whole milk
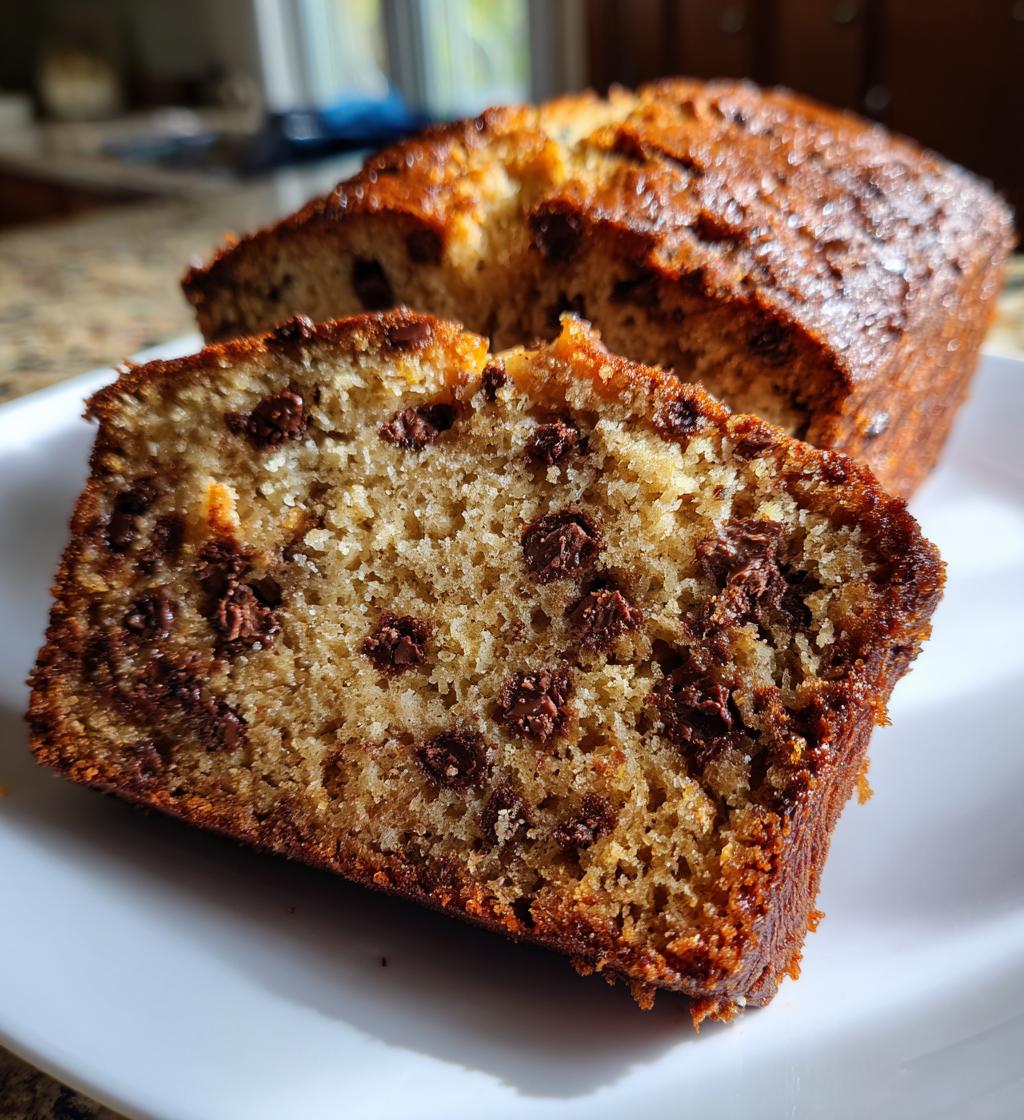
- 1 cup semi-sweet chocolate chips
Each of these ingredients plays a vital role in crafting a sweet treat that’s perfect for Valentine’s Day. The combination of butter and sugar creates a rich base, while the chocolate chips provide that irresistible indulgence that makes every bite a delight. Trust me; you’re going to love how they come together!
How to Prepare Instructions
Now, let’s dive into the fun part—making this delicious dessert! Follow these steps, and you’ll have a lovely treat ready in no time. Trust me, it’s easier than it looks!
Preheat the Oven
First things first, you’ll want to preheat your oven to 350°F (175°C). Preheating is super important because it ensures that your dessert bakes evenly from the moment you put it in the oven. If you skip this step, you might end up with a cake that’s undercooked in some spots and overdone in others. So, let that oven warm up while you prepare the batter!
Cream Butter and Sugar
Next, grab a mixing bowl and add your softened butter and granulated sugar. Using a hand mixer or a sturdy wooden spoon, cream them together until the mixture is light and fluffy. This step is key because it creates tiny air pockets that help give your dessert that delightful, airy texture. You’ll know it’s ready when it looks pale and fluffy, almost like whipped cream!
Adding Eggs
Now it’s time to add the eggs—one at a time! Crack an egg into the mixture and beat it in until fully incorporated before adding the second. This gradual addition helps maintain the structure of the batter and ensures that everything blends nicely. You want to see a smooth mixture before moving on. It’s like giving each egg its moment to shine!
Incorporate Vanilla and Dry Ingredients
Once your eggs are mixed in, it’s time to stir in the vanilla extract. This will add a warm, fragrant flavor that’s simply irresistible. Now, we’ll incorporate the dry ingredients. Alternate adding the flour and milk to the mixture, starting with a bit of flour, then milk, and repeating until everything is combined. This method helps prevent your batter from becoming too dense and keeps it lovely and light. Just be careful not to overmix—gently fold until you see no more flour streaks!
Fold in Chocolate Chips
Now for the best part! Gently fold in those semi-sweet chocolate chips. Use a spatula to lift and turn the batter over itself, being careful not to deflate it. This step is crucial because we want to keep that airy texture while making sure every bite is packed with chocolatey goodness. Yum!
Baking the Batter
Finally, pour your lovely batter into a greased pan. Spread it evenly with a spatula to create a smooth surface. Pop it into your preheated oven and bake for 25-30 minutes. You’ll know it’s done when the edges start to pull away from the sides of the pan and a toothpick inserted into the center comes out clean or with a few moist crumbs. Let it cool in the pan for about 10 minutes before transferring it to a wire rack. This cooling time is essential, as it allows the flavors to settle and the cake to firm up a bit. Trust me, the wait will be worth it!
Nutritional Information Section
Now, let’s talk about the nutritional goodness of this delightful treat! Please keep in mind that nutrition can vary based on the specific ingredients and brands you choose, so these values are just a general guide.
Here’s what you can typically expect per serving (1 slice):
- Calories: 200
- Fat: 8g
- Saturated Fat: 5g
- Unsaturated Fat: 2g
- Cholesterol: 30mg
- Sodium: 150mg
- Carbohydrates: 30g
- Fiber: 1g
- Sugar: 15g
- Protein: 3g
These numbers give you a nice idea of what you’re indulging in, but remember, the love and joy you’ll bring to your celebration is truly immeasurable! Enjoy every bite, guilt-free!
Why You’ll Love This Recipe
- Quick and Easy: This recipe comes together in just 15 minutes of prep time, making it perfect for when you want to whip up something special without spending hours in the kitchen.
- Deliciously Indulgent: With the rich combination of butter, sugar, and chocolate chips, every bite is an explosion of flavor that will satisfy your sweet tooth.
- Perfect for Sharing: This recipe yields 12 servings, so it’s ideal for sharing with your loved one or bringing to a gathering. Everyone will appreciate the sweet treat!
- Adds a Romantic Touch: The warm, inviting aroma of baking is sure to set the mood for a cozy night in with your partner. Plus, who can resist a dessert made with love?
- Customizable: Feel free to add your twist! Whether it’s incorporating different chocolate chips or adding a sprinkle of sea salt, you can make this recipe uniquely yours!
Tips for Success
To ensure your dessert turns out perfectly every time, here are some handy tips I swear by. Trust me, these little tricks can make a big difference!
- Use Room Temperature Ingredients: Make sure your butter and eggs are at room temperature before you start. This helps them blend more easily and creates a smoother batter. Just take them out of the fridge about 30 minutes before you start baking.
- Check Your Oven Temperature: Ovens can sometimes be misleading. I always recommend using an oven thermometer to double-check that your oven is at the right temperature. If it’s too hot or too cold, it can affect your baking time and the final result.
- Don’t Overmix: When you’re mixing in the flour and milk, be gentle! Overmixing can lead to a dense dessert instead of the airy texture we want. Stir just until the ingredients are combined, and you’ll be golden!
- Let It Cool: Patience is key! After baking, let your dessert cool in the pan for about 10 minutes before transferring it to a wire rack. This helps set the texture and makes it easier to slice.
- Use Quality Ingredients: Whenever possible, opt for high-quality chocolate chips and real vanilla extract. The better the ingredients, the better your dessert will taste. It’s worth it for those special moments!
By following these simple tips, you’ll be well on your way to creating a delightful treat that’s sure to impress. Happy baking!
Variations
One of the best things about this dessert is how versatile it can be! If you’re looking to switch things up or simply want to add your personal touch, here are some delicious variations to consider:
- Different Chocolate Chips: While semi-sweet chocolate chips are a classic, why not experiment? Try using dark chocolate chips for a richer flavor or milk chocolate chips for a sweeter touch. You could even mix in some white chocolate chips for a beautiful contrast!
- Fruit Additions: Adding fruit can elevate the flavor and add a fresh twist. Consider folding in some chopped strawberries, raspberries, or even mashed bananas. These fruits can bring a delightful burst of flavor and moisture to your dessert.
- Nuts for Crunch: If you love a bit of crunch, adding nuts is a fantastic idea! Chopped walnuts, pecans, or even hazelnuts can add a wonderful texture. Just be sure to toast them lightly first to enhance their flavor before folding them into the batter.
- Flavor Extracts: Beyond vanilla, you can get creative with flavor extracts. A splash of almond extract or a hint of coconut extract can add a unique twist that will surprise your taste buds. Just remember to use them sparingly, as they can be quite potent!
- Swirls of Peanut Butter or Nutella: For an indulgent treat, consider swirling in some peanut butter or Nutella before baking. Just drop spoonfuls of your chosen spread into the batter and use a knife to create beautiful swirls. It adds a decadent touch that’s sure to impress!
These variations allow you to customize your dessert to match your mood or the occasion. I love experimenting with different combinations, and each time I do, it feels like a brand new treat! So go ahead, get creative, and enjoy making this recipe truly your own!
Storage & Reheating Instructions
Storing your leftover dessert properly is key to keeping it fresh and delicious for days to come. Here’s how I like to do it:
- Cool Completely: First, let your dessert cool completely at room temperature. This step prevents condensation from forming in the container, which can make your cake soggy.
- Airtight Container: Once cooled, slice the dessert into pieces and place them in an airtight container. I love using a cake keeper or a simple plastic container with a tight-fitting lid. This keeps the dessert moist and prevents it from absorbing any unwanted odors from the fridge.
- Refrigeration: Store your container in the refrigerator for up to a week. If you know you won’t finish it within that time, you might want to consider freezing some portions!
- Freezing for Later: To freeze, wrap individual slices in plastic wrap and then place them in a freezer-safe bag or container. This way, you can grab a slice whenever the craving hits! Just make sure to label the bag with the date so you don’t forget what’s inside.
When you’re ready to enjoy your delicious treat again, reheating is super simple:
- Microwave: For a quick fix, pop a slice in the microwave for about 10-15 seconds. Just be careful not to overheat it, or it could get tough!
- Oven: If you prefer a crispy outer layer, preheat your oven to 350°F (175°C) and place the slice on a baking sheet. Heat it for about 5-10 minutes until warmed through. This method really brings back that freshly-baked goodness!
By following these storage and reheating tips, you can savor your lovingly made dessert even after Valentine’s Day has come and gone. Enjoy every bite, my friend!
Serving Suggestions
Now that you’ve baked this scrumptious dessert, let’s talk about how to serve it up in style! Presentation can elevate your dish from delightful to dazzling, and there are plenty of ways to complement those sweet flavors. Here are some of my favorite serving suggestions:
- Whipped Cream: A dollop of freshly whipped cream on top adds a light, airy touch that perfectly balances the richness of the dessert. You can even sweeten it with a hint of vanilla or a sprinkle of cocoa powder for a little extra flair!
- Fresh Berries: Serve your dessert with a side of fresh strawberries, raspberries, or blueberries. Not only do they add a pop of color, but their natural sweetness and slight tartness create a beautiful contrast to the rich chocolate flavor.
- Scoop of Ice Cream: For a truly indulgent experience, pair your dessert with a scoop of vanilla, chocolate, or even strawberry ice cream. The creaminess of the ice cream melting into the warm dessert is simply divine!
- Chocolate Drizzle: Drizzling some melted chocolate over the top can give your dessert that extra wow factor. Use semi-sweet or dark chocolate for a rich finish that’s sure to impress!
- Glass of Milk: You can’t go wrong with a classic! A tall glass of cold milk is the perfect accompaniment to balance the sweetness of the dessert. It’s a nostalgic touch that brings back memories of childhood treats!
- Coffee or Espresso: If you’re looking for a cozy touch, serve your dessert alongside a warm cup of coffee or a shot of espresso. The deep flavors of the coffee enhance the chocolate while providing a lovely contrast.
Whichever option you choose, these serving suggestions will take your delightful dessert to the next level and make your Valentine’s celebration even more special. Trust me, your loved ones will appreciate the effort you put into every detail!
Personal Touch
One of my fondest memories of preparing *valentines recipes* was the year I decided to surprise my partner with a romantic dinner at home. I wanted everything to be perfect, so I planned a beautiful evening filled with their favorite dishes, but I knew the dessert had to be something truly special. That’s when I turned to this delightful chocolate treat!
As I gathered my ingredients, I felt a rush of excitement and a hint of nerves. I was a little worried about how it would turn out, but I poured all my love into every step of the process. The kitchen filled with the amazing aroma of melting chocolate and sweet butter, and I could already picture the smile on my partner’s face when they took that first bite. It was like the kitchen was alive with anticipation!
When the dessert finally came out of the oven, it looked divine and smelled heavenly. I let it cool while setting the table with candles and soft music playing in the background. The moment we sat down together, I served that rich, warm slice of chocolate goodness, topped with a dollop of whipped cream and fresh strawberries. Watching their eyes light up made all the effort worthwhile.
That night, we shared not just a meal, but an experience filled with laughter and love. It was a simple dessert, but it held a big piece of my heart. Every time I make this recipe now, I’m reminded of that beautiful evening and how a little effort in the kitchen can create unforgettable moments. It’s these personal touches and shared memories that truly make *valentines recipes* so special!
Print
valentines recipes: Create 5 Heartfelt Treats to Savor
- Total Time: 45 minutes
- Yield: 12 servings 1x
- Diet: Vegetarian
Description
Delicious and romantic recipes for Valentine’s Day.
Ingredients
- 2 cups of flour
- 1 cup of sugar
- 1/2 cup of butter
- 2 eggs
- 1 teaspoon of vanilla extract
- 1/2 cup of milk
- 1 cup of chocolate chips
Instructions
- Preheat the oven to 350°F (175°C).
- In a bowl, cream together the butter and sugar.
- Add eggs one at a time, mixing well.
- Stir in the vanilla extract.
- Mix in the flour and milk alternately.
- Fold in the chocolate chips.
- Pour the batter into a greased pan.
- Bake for 25-30 minutes.
- Let cool before serving.
Notes
- Use dark chocolate chips for a richer flavor.
- Decorate with strawberries for a romantic touch.
- Store leftovers in an airtight container.
- Prep Time: 15 minutes
- Cook Time: 30 minutes
- Category: Dessert
- Method: Baking
- Cuisine: American
Nutrition
- Serving Size: 1 slice
- Calories: 200
- Sugar: 15g
- Sodium: 150mg
- Fat: 8g
- Saturated Fat: 5g
- Unsaturated Fat: 2g
- Trans Fat: 0g
- Carbohydrates: 30g
- Fiber: 1g
- Protein: 3g
- Cholesterol: 30mg
Keywords: valentines recipes