There’s something magical about pulling a homemade pizza from the oven—crispy on the bottom, chewy in the middle, and dotted with those perfect, bubbly pockets that make you feel like a true pizzaiolo. I’ve spent years tweaking this artisan pizza dough recipe, and let me tell you, it’s a game-changer. No fancy equipment, no hard-to-find ingredients—just flour, water, yeast, and a little patience. The best part? It’s shockingly easy to make at home, and the results rival (or even beat!) your favorite wood-fired pizza joint. Trust me, once you taste that first slice with its golden, blistered crust, you’ll never go back to store-bought dough again.
Why You’ll Love This Artisan Pizza Dough
- Restaurant-quality texture
- Simple ingredients
- Customizable
- Fun to make
Ingredients for Artisan Pizza Dough
Let me tell you a secret – the magic of this dough comes down to just five simple ingredients. But here’s the catch: you’ve got to use the right ones. I learned this the hard way after several failed attempts using all-purpose flour (trust me, it makes all the difference!). Here’s exactly what you’ll need:
- 500g bread flour (not all-purpose – the higher protein content gives that perfect chew)
- 2 tsp fine sea salt (table salt works in a pinch, but sea salt adds better flavor)
- 1 tsp instant yeast (not active dry – it dissolves right in without proofing)
- 350ml warm water (about 110°F – think warm bath temperature)
- 1 tbsp olive oil (plus extra for greasing the bowl – I always use my good extra virgin)
A quick note about the water temperature – I used to guess and ended up with dough that either didn’t rise or rose too fast. Now I always check with my finger (if it feels pleasantly warm but not hot, you’re golden). And don’t skip that extra olive oil for greasing – it gives the dough that beautiful golden color as it rises!
Equipment You’ll Need
Okay, let’s talk gear! The beautiful thing about this artisan pizza dough is that you really don’t need anything too fancy – I promise. Most of this stuff you probably already have hiding in your kitchen cabinets. Here’s what I use every single time:
- A large mixing bowl – big enough to let your dough double in size without making a mess on your counter
- A wooden spoon – for that initial mixing (though honestly, clean hands work just as well and are way more fun!)
- A kitchen scale – this is my secret weapon! Measuring flour by weight instead of cups makes all the difference for that perfect crispy-chewy texture
- A pizza stone – this is what gives you that incredible blistered, restaurant-quality crust. It gets crazy hot and mimics a real pizza oven
Now, if you don’t have a pizza stone (I didn’t for years!), don’t sweat it. Just flip a heavy baking sheet upside down and preheat it in your oven – it won’t be quite the same, but it’ll still give you a much crispier bottom than a regular pan. And about that rolling pin? Honestly, I almost never use mine for pizza dough. Stretching it by hand gives you those beautiful irregular bubbles and a much more interesting texture. But if you’re nervous about tearing it, a rolling pin works in a pinch!
How to Make Artisan Pizza Dough with a Crispy, Chewy, Bubbly Crust
Now comes the fun part – let’s turn those simple ingredients into pizza magic! I’ve broken this down into easy steps so you can nail that perfect crust on your first try. Just follow along, and before you know it, you’ll be pulling a bubbling masterpiece from your oven.
Step 1: Mixing the Dough
First things first – grab that big bowl and whisk together your bread flour, salt, and instant yeast. Here’s my pro tip: take an extra second to really whisk those dry ingredients well. You want that yeast and salt evenly distributed – no clumps allowed!
Now, make a little well in the center and pour in your warm water and olive oil. This next part is crucial – mix just until everything comes together into a shaggy mass. Don’t go crazy trying to make it smooth yet! I like to use a wooden spoon at first, then switch to my hands when it gets too sticky. The dough should look rough and uneven at this point – that’s perfect. Over-mixing now will make your crust tough, and we want that beautiful chew instead.
Step 2: Kneading and First Rise
Flour your clean countertop (not too much – about a tablespoon should do) and turn out that shaggy dough. Here’s where the magic starts! Knead for a full 10 minutes – I set a timer because it’s longer than you think. You’re looking for that moment when the dough transforms from sticky mess to smooth, elastic perfection.
My kneading technique? Push the dough away with the heel of your hand, fold it back over itself, give it a quarter turn, and repeat. When it stops sticking to your hands and springs back when poked, you’re there. Now, lightly grease your bowl with olive oil, plop the dough in, and cover it with a damp towel. Find a cozy spot (I use my oven with just the light on) and let it rise until doubled – about 1 to 2 hours depending on your kitchen’s temperature. Patience here pays off in flavor and texture!
Step 3: Shaping and Final Prep
Okay, your dough should be beautifully puffed up now. Gently punch it down (so satisfying!) and turn it out onto a lightly floured surface. Here’s where many people reach for a rolling pin – resist the urge! Instead, use your fingertips to press out from the center, letting gravity help stretch the dough as you turn it.
Want those perfect bubbles? Handle the edges gently – that’s where most of your air pockets live. If the dough fights you, let it rest for 5 minutes and try again. Meanwhile, crank your oven as high as it goes (at least 500°F) with your pizza stone or inverted baking sheet inside. The hotter, the better for that signature crispy-chewy crust!
Step 4: Baking for Perfect Bubbles
Now the exciting part! Carefully transfer your shaped dough onto a floured pizza peel or the back of a baking sheet. Add your toppings quickly (less is more for the best crust) and slide it onto your screaming-hot stone. Within minutes, you’ll see magic happen – the edges will puff up, bubbles will form, and your kitchen will smell like an Italian trattoria.
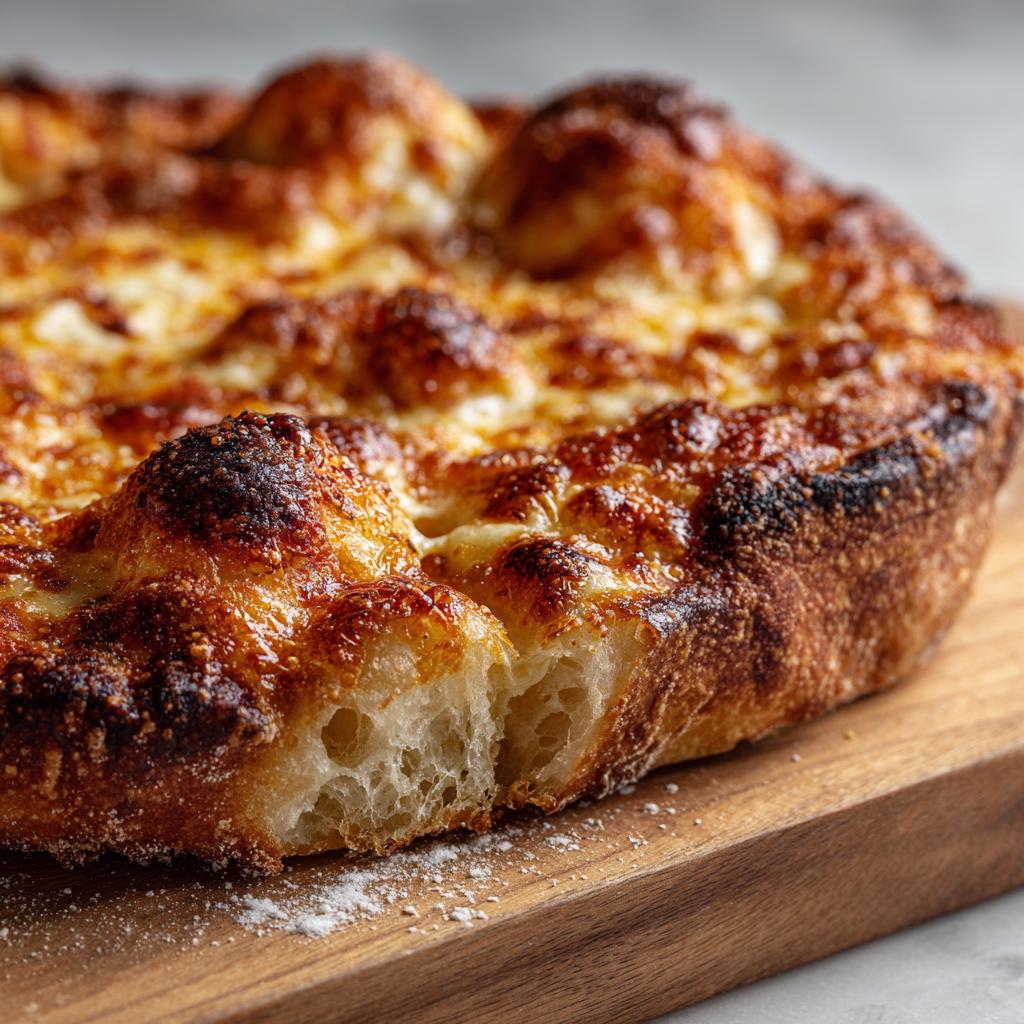
Bake for 10-12 minutes until the crust is golden with darker blistered spots. Watch closely near the end – that perfect balance between crispy and chewy can happen fast! Let it cool just a minute before slicing (I know, the hardest part) to let the crust set. Then dig in and enjoy your homemade artisan masterpiece!
Pro Tips for the Best Artisan Pizza Dough
After making hundreds (maybe thousands?) of these artisan pizza doughs, I’ve picked up some game-changing tricks that’ll take your crust from good to unbelievable. These are the little things that make all the difference between a decent homemade pizza and one that’ll have your friends begging for the recipe!
Weigh your flour, don’t measure it – This is my number one tip, and I can’t stress it enough. Flour compacts in measuring cups, so 500g might be 4 cups one day and 4½ the next depending on how you scoop. A $10 kitchen scale changed my pizza game forever—now my dough comes out perfect every single time.
When in doubt, let it rest – Is your dough fighting you when you try to shape it? Just walk away for 5 minutes! The gluten relaxes as it rests, making stretching way easier. I used to force it and end up with torn dough and frustration. Now I know patience = perfect thin crust without the tears (literally).
Flour your hands, not the dough – Sticky dough got you stressing? Lightly flour your hands instead of dumping flour on the dough itself. This gives you control without adding too much extra flour that can make your crust dense. My trick? Keep a little bowl of flour nearby to dip my fingertips in as I work.
The windowpane test never fails – Not sure if you’ve kneaded enough? Pinch off a small piece and gently stretch it. If you can see light through it without tearing (like a windowpane), you’re golden! This little test saved me from under-kneaded dough disasters more times than I can count.
Artisan Pizza Dough Variations
Once you’ve mastered the basic recipe, it’s so much fun to play around with different flavors and textures! Here are my favorite ways to mix things up when I’m feeling adventurous:
Whole wheat twist: Swap out 100g of the bread flour for whole wheat flour. It adds a lovely nutty flavor and extra fiber. Just know it’ll make your crust a bit denser, so I like to add an extra tablespoon of water to compensate.
Herb-infused goodness: Instead of plain olive oil, use garlic or herb-infused oil in the dough. I love rosemary or basil-infused oil – it makes the whole kitchen smell amazing and gives the crust this subtle, aromatic flavor that pairs perfectly with tomato sauce.
Sourdough version: For that tangy depth of flavor, replace the yeast with 100g of active sourdough starter and reduce the water to 300ml. The fermentation takes longer (overnight is best), but oh my – the complex flavor is worth the wait! Just be sure to adjust the flour if the dough feels too sticky.
The beauty of this dough is how adaptable it is. Once you get comfortable, don’t be afraid to experiment – some of my best creations came from happy accidents!
Storing and Reheating Artisan Pizza Dough
Okay, confession time – I almost never make just one pizza worth of dough anymore. Why? Because this stuff stores like a dream! Whether you want to plan ahead or salvage leftovers (though let’s be real – leftovers rarely happen with pizza this good), here’s exactly how to keep that dough perfect.
Fridge storage (your 3-day secret weapon): After the first rise, just pop the whole dough ball into a lightly oiled container with a tight-fitting lid. The cold slows down fermentation beautifully, developing even more flavor. I actually prefer dough that’s been refrigerated overnight – it’s easier to handle and has deeper flavor notes. When you’re ready to use it, let it sit at room temp for about an hour to take the chill off before shaping.
Freezer magic (hello, emergency pizza!): For longer storage, portion the dough into individual pizza sizes (about 250g each works great for me), wrap each tightly in plastic wrap, then slip into freezer bags. They’ll keep beautifully for about a month. Thaw overnight in the fridge, then let them come to room temperature before using. Pro tip: write the date on the bag – frozen dough is a lifesaver on busy nights!
Reheating leftover pizza (because miracles happen): If by some miracle you have leftover slices, never ever microwave them! Instead, heat a skillet over medium heat, add the slice, and cover with a lid for 2-3 minutes. The bottom gets crispy again while the cheese melts perfectly. For whole pizzas, pop them back on your pizza stone in a 400°F oven for about 5 minutes. Trust me, it’s almost as good as fresh!
One last storage tip – if your dough develops a slightly boozy smell in the fridge, don’t panic! That’s just the yeast doing its thing. It’s completely normal and actually means your dough will have fantastic flavor. Just punch it down well before using.
Artisan Pizza Dough FAQs
Over the years, I’ve gotten so many questions about this dough – and trust me, I’ve asked them all myself at some point too! Here are the answers to the most common head-scratchers that’ll help you avoid the mistakes I made when I was starting out.
Can I use all-purpose flour instead of bread flour?
Oh, I wish I could say yes, but here’s the truth – bread flour’s higher protein content (about 12-14% vs all-purpose’s 10-12%) is what gives you that signature chewy texture. You can use all-purpose in a pinch, but your crust won’t have quite the same satisfying bite. If it’s all you have, try adding 1 tbsp of vital wheat gluten per cup of flour to boost the protein.
Why didn’t my dough rise properly?
Oh buddy, I’ve been there! First, check your yeast’s expiration date – old yeast is often the culprit. If it’s fresh, your water might’ve been too hot (over 120°F kills yeast) or your kitchen too cold. My trick? The float test – sprinkle yeast in warm water with a pinch of sugar; if it bubbles within 10 minutes, you’re good to go!
How thin should I stretch the dough?
Aim for about 1/4-inch thickness for that perfect crispy-chewy balance. But here’s my little secret – leave the edges slightly thicker (about 1/2-inch) for those beautiful puffy crust bubbles. If you can see light through the center when you hold it up, you’ve nailed it!
Can I make this dough ahead?
Absolutely! In fact, I often do. After the first rise, you can refrigerate it for up to 3 days (the flavor actually improves!) or freeze it for a month. Just let it come to room temperature before shaping – cold dough tears easily. The long, slow rise in the fridge develops amazing flavor.
Why is my dough so sticky?
Don’t panic – sticky dough is normal, especially with high-hydration artisan recipes like this! Resist the urge to add more flour. Instead, wet your hands lightly when handling it, or let it rest for 10 minutes. The gluten will relax and become more manageable. Trust the process – that stickiness turns into amazing chew in the oven!
Nutritional Information
Let’s talk numbers—because who doesn’t want to know what’s going into that delicious slice of pizza? Just a quick heads-up: these values are estimates and can vary depending on the exact ingredients you use. But here’s the breakdown per slice (based on 8 slices per pizza):
- Calories: 200
- Carbohydrates: 35g
- Protein: 6g
- Fat: 3g
Not too shabby for a slice of homemade artisan pizza, right? The beauty of making your own dough is that you control what goes into it—no hidden preservatives or mystery ingredients. Plus, with that perfect crispy-chewy crust, you’re getting a treat that’s as satisfying as it is delicious. Just don’t blame me if you end up eating more than one slice—it’s that good!
Share Your Artisan Pizza Creations
Nothing makes me happier than seeing your pizza masterpieces come to life! There’s something so special about how everyone puts their own spin on this dough – whether it’s wild topping combinations, creative shapes, or that perfect golden crust you worked so hard to achieve. I want to see it all!
Snap a photo of your bubbling creation fresh from the oven (extra points if you capture those beautiful air pockets!) and tag me on Instagram @[yourhandle] – I’ll be your biggest cheerleader. Some of my favorite reader pizzas have inspired new variations in my own kitchen! And if you run into any questions along the way, my DMs are always open. This is how we pizza lovers learn from each other.
Pro tip: Natural light works wonders for food photos – try shooting near a window before everyone digs in. Can’t wait to see what you create with this dough – your pizza journey is just beginning!
Print
Perfect Artisan Pizza Dough: 5-Ingredient Crispy Bliss
- Total Time: 2 hours 27 minutes
- Yield: 1 large pizza 1x
- Diet: Vegetarian
Description
Make your own artisan pizza dough at home with this simple recipe. Achieve a crispy, chewy, and bubbly crust that rivals your favorite pizzeria.
Ingredients
- 500g bread flour
- 2 tsp salt
- 1 tsp instant yeast
- 350ml warm water
- 1 tbsp olive oil
Instructions
- Mix flour, salt, and yeast in a large bowl.
- Add warm water and olive oil, then stir until a dough forms.
- Knead the dough on a floured surface for 10 minutes until smooth.
- Place the dough in a greased bowl, cover, and let it rise for 1-2 hours.
- Preheat your oven to its highest setting with a pizza stone inside.
- Shape the dough into a pizza base, add toppings, and bake for 10-12 minutes until golden and bubbly.
Notes
- Use a pizza stone for the best crust texture.
- Let the dough rise in a warm place for optimal results.
- Experiment with toppings to suit your taste.
- Prep Time: 15 minutes
- Cook Time: 12 minutes
- Category: Baking
- Method: Oven-baked
- Cuisine: Italian
Nutrition
- Serving Size: 1 slice
- Calories: 200
- Sugar: 1g
- Sodium: 300mg
- Fat: 3g
- Saturated Fat: 0.5g
- Unsaturated Fat: 2g
- Trans Fat: 0g
- Carbohydrates: 35g
- Fiber: 2g
- Protein: 6g
- Cholesterol: 0mg
Keywords: artisan pizza dough, crispy, chewy, bubbly crust, homemade pizza