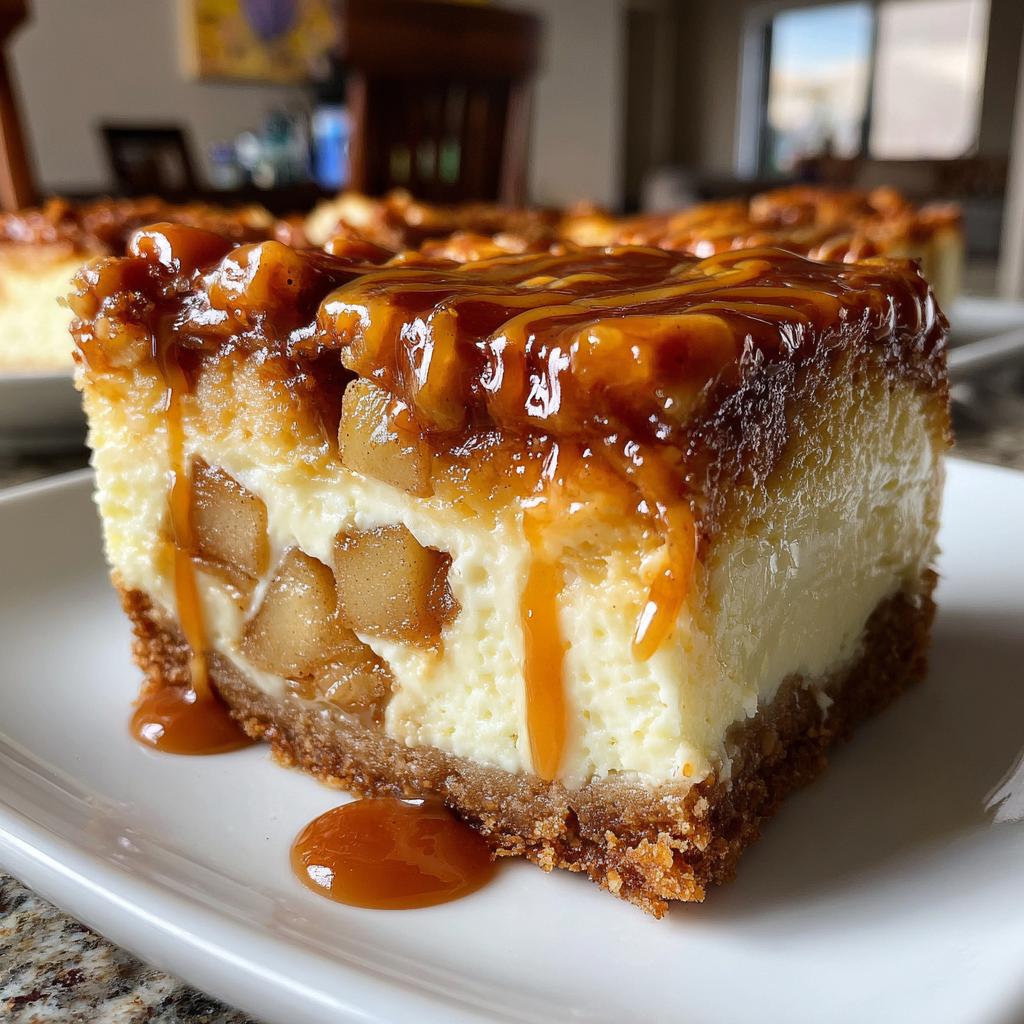
Oh my goodness, let me tell you about these caramel apple cheesecake bars – they’re like autumn in dessert form! Imagine biting into creamy cheesecake layered with sweet-tart apples and drizzled with rich caramel sauce. Every fall when apple season hits, I make these bars nonstop because they disappear faster than pumpkin spice lattes at my house. The best part? That magical balance where the tangy cheesecake cuts through the sweetness of caramel, while cinnamon-kissed apples add the perfect crunch. These bars combine all my favorite dessert elements into one irresistible treat that’s easier to make than a whole cheesecake. Trust me, once you try them, you’ll understand why my family begs me to make these caramel apple cheesecake bars year-round!
Ingredients for Caramel Apple Cheesecake Bars
Okay, let’s gather our goodies – I promise this is one of those magical recipes where every ingredient plays an important role. Here’s what you’ll need for these heavenly bars (and yes, I’ve learned the hard way that substitutions can change the texture, so I’ll share my must-haves):
- 2 cups graham cracker crumbs – I like to measure after crushing (about 12 full sheets), packed lightly
- ½ cup melted butter – the good, real stuff – salted works great here
- 2 packages (8 oz each) cream cheese – must be at room temperature! Take it out 2 hours before
- ½ cup granulated sugar – I sometimes use ¼ cup white + ¼ cup brown sugar for extra depth
- 2 large eggs – also at room temp – cold eggs make the filling lumpy
- 1 teaspoon vanilla extract – the real stuff makes all the difference
- 2 medium apples – peeled and diced small (Granny Smith are my favorite for their tartness)
- ¼ cup caramel sauce – homemade or good quality store-bought (plus extra for drizzling!)
- ½ teaspoon cinnamon – gives that warm autumn spice without overpowering
Pro tip from my many trials: Measure the apples after dicing – you’ll want about 1½ cups. And don’t skip peeling them – those skins get weirdly chewy when baked. Now let’s make some magic!
How to Make Caramel Apple Cheesecake Bars
Alright, let’s get baking! These caramel apple cheesecake bars come together in simple steps, but I’ll walk you through each one to ensure perfection. I’ve made this recipe dozens of times (okay, maybe hundreds), and these are all my little tricks for getting those perfect layers every time.
Prepare the Graham Cracker Crust
First things first – preheat that oven to 350°F (175°C). While it’s heating, grab your 9×13 inch baking pan and line it with parchment paper, leaving some overhang on the sides. Trust me, this makes removing the bars SO much easier later!
Now, mix your graham cracker crumbs with melted butter until it resembles wet sand. Pour it into your prepared pan and press it down firmly with the bottom of a measuring cup or glass. I go around the edges first, then work my way to the center – you want it packed tight so your crust doesn’t crumble when you slice. Pop it in the oven for 8 minutes to set, then let it cool slightly while you make the filling.
Make the Cheesecake Filling
Here’s where the magic happens! In a large bowl, beat your room temperature cream cheese until it’s completely smooth – no lumps allowed! This is why that 2-hour warm-up time is crucial. Then add the sugar and beat until fluffy, about 2 minutes. Add eggs one at a time, mixing just until combined after each (overmixing = cracks), then stir in the vanilla.
Pour this creamy dream over your slightly cooled crust and smooth it out with a spatula. Now for the fun part – take those diced apples you’ve tossed with cinnamon and sprinkle them evenly over the top. Don’t press them in – let them float on that cheesecake sea!
Layer Apples and Bake
Slide your pan into the oven and bake for 30 minutes. You’re looking for the edges to be set but the center to still have a slight jiggle – like Jell-O that’s almost set. The bars will continue cooking as they cool, and this prevents that dreaded cheesecake canyon in the middle.
When the timer dings, turn off the oven and crack the door open with a wooden spoon. Let the bars chill out in there for about 10 minutes – this gradual cooling helps prevent cracks. Then move them to a wire rack to cool completely, about 1 hour.
Add Caramel and Chill
Now for the grand finale! Drizzle that glorious caramel sauce over the top – I like to warm mine slightly so it flows beautifully. Use as much or as little as your sweet tooth desires. Then comes the hardest part – patience! Pop the pan in the fridge for at least 2 hours, preferably overnight. I know, I know – waiting is torture, but this sets everything perfectly so you get clean slices.
When you’re ready to serve, use the parchment paper to lift the whole slab out. Slice with a sharp knife dipped in hot water (wipes clean between cuts!), and watch everyone’s eyes light up when they taste these caramel apple cheesecake bars!
Why You’ll Love These Caramel Apple Cheesecake Bars
Okay, let me count the ways these bars will become your new obsession – I’ve got proof from all my taste-testers (aka friends who keep begging me to make more)!
- Easy as pie (but better!) – No water bath, no fancy techniques. Just layer, bake, and drizzle – even my teenager can make these!
- That perfect texture trio – Crunchy crust, creamy filling, tender apples – every bite is a party in your mouth.
- Crowd-pleaser magic – I’ve brought these to potlucks where people literally fought over the last piece (true story).
- Make-ahead dream – They taste even better the next day, so you can bake them when you have time and look like a hero later.
- Customizable sweetness – Use more or less caramel, swap apple varieties – make it exactly how your taste buds like it!
- Portable perfection – Unlike wobbly cheesecakes, these bars travel like champs to picnics, parties, or your neighbor’s house.
Honestly? The hardest part about this recipe is sharing them. Good luck with that!
Tips for Perfect Caramel Apple Cheesecake Bars
After making these bars more times than I can count (and eating even more than that!), I’ve picked up some game-changing tricks to make sure your caramel apple cheesecake bars turn out flawless every single time. Listen up – these little secrets make all the difference!
Choose your apples wisely
Granny Smith apples are my go-to for a reason – their tartness cuts through the sweet cheesecake and caramel beautifully. But if you prefer sweeter bars, Honeycrisp or Pink Lady work too. Just promise me one thing – always peel them! Those skins turn weirdly tough when baked, and nobody wants leathery bits in their dessert.
The temperature tango
Room temperature ingredients are non-negotiable here. Cold cream cheese = lumpy filling. Cold eggs = dense texture. I take everything out 2 hours before baking (sometimes I cheat and microwave the cream cheese for 10 seconds if I forgot). And that melted butter for the crust? Let it cool slightly so it doesn’t make your crumbs soggy.
Baking know-how
That “slight jiggle” test is everything! Pull the bars when the edges look set but the center still moves like Jell-O – about 30 minutes in my oven. They’ll finish cooking as they cool. And that trick with leaving them in the cracked oven? Lifesaver for preventing cracks in your cheesecake layer.
Slicing secrets
Want those picture-perfect clean cuts? First, chill completely – I’m talking at least 2 hours, overnight is even better. Then run your sharpest knife under hot water, wipe it dry, and slice in one smooth motion. Rewarm and wipe between each cut. Pro tip: For extra clean edges, freeze the whole pan for 15 minutes before slicing!
Caramel control
Warm your caramel slightly before drizzling – it’ll flow like silk. And here’s my sneaky trick: drizzle most of it on before slicing, then add pretty swirls on each piece after cutting. Double the caramel, double the happiness! If it’s too thick, microwave for 5-second bursts until pourable.
Remember – the first time you make these might not be perfect, and that’s okay! My early attempts were… let’s call them “rustic.” But follow these tips, and soon you’ll be making caramel apple cheesecake bars that look (and taste) like they came from a bakery!
Ingredient Substitutions & Notes
Okay, let’s talk swaps and solutions – because I know we don’t always have every ingredient on hand, and dietary needs vary! Here are all my tested substitutions and notes for these caramel apple cheesecake bars. I’ve tried nearly every variation imaginable (sometimes accidentally!), so you can trust these tweaks.
Graham cracker crust alternatives
Out of graham crackers? No problem! You can use:
- Gluten-free graham crackers – Works exactly the same (just check they’re the crispy kind)
- Digestive biscuits – My British friend’s favorite swap – gives a nice malty flavor
- Vanilla wafers – Makes a sweeter, more delicate crust
- Oreos (without filling) – For a chocolate twist (reduce sugar slightly in filling)
Just keep the 2:1 crumb-to-butter ratio. And whatever you do, don’t skip the pre-bake – cold crusts get soggy!
Cream cheese conundrums
Listen, I get it – sometimes that block of cream cheese is still rock-hard when inspiration strikes. Here’s what works:
- Neufchâtel cheese – Nearly identical texture, just slightly less fat
- Dairy-free cream cheese – Look for the firmer varieties meant for baking
- No microwave for softening? Cut into cubes and let sit in a warm spot (like near the oven)
But fair warning – whipped cream cheese in tubs won’t set properly. Learned that the lumpy way!
Apple options and caramel swaps
The apples and caramel are where you can really get creative:
- Apple varieties – Use what you have! Granny Smith (tart), Honeycrisp (sweet), or even pears in a pinch
- No fresh apples? 1 cup of unsweetened applesauce works (just pat it dry first)
- Homemade caramel – My easy version: melt 1 cup sugar + 6 tbsp butter, then stir in ½ cup heavy cream
- Dulce de leche – Thicker but delicious alternative to caramel sauce
- Salt lovers – Use salted caramel for that sweet-salty kick
Common questions answered
These are the things people always ask me about these bars:
- “Can I freeze them?” – Absolutely! Freeze before adding caramel, then drizzle after thawing
- “Why did my filling crack?” – Usually from overmixing eggs or cooling too fast
- “Can I use lemon juice on apples?” – Skip it! The cinnamon prevents browning just fine
- “Egg substitute?” – ¼ cup Greek yogurt per egg works, but texture will be denser
The beauty of this recipe is how forgiving it is. Even my “oops” versions have been delicious – just maybe not as pretty! So don’t stress about perfection. As my grandma always said, “It’ll taste good even if it looks like the dog made it.” (And she was usually right!)
Storing and Serving Suggestions
Now let’s talk about keeping these caramel apple cheesecake bars at their absolute best – because I know you’ll want to savor every last crumb (and maybe hide a few pieces from your family!). After years of making these, I’ve nailed down the perfect storage tricks and serving ideas.
Keeping them fresh
These bars are happiest in the fridge – cover the pan tightly with plastic wrap or transfer slices to an airtight container. They’ll stay perfect for up to 5 days, though in my house they never last that long! The cheesecake actually gets more flavorful after a day or two as all those delicious flavors mingle.
Freezing like a pro
Yes, you can freeze them! Here’s my method: Freeze the whole slab uncovered for 1 hour until firm, then wrap tightly in plastic and foil. They’ll keep for 2 months this way. Thaw overnight in the fridge (not on the counter – condensation is the enemy!) and add fresh caramel drizzle before serving. The crust stays surprisingly crisp!
Serving ideas that wow
These bars are fantastic solo, but here’s how I like to dress them up:
- Warm them slightly – 10 seconds in the microwave makes the caramel ooze beautifully
- A la mode! Vanilla ice cream melts into the warm bars for the ultimate dessert experience
- Coffee pairing The caramel and cinnamon flavors sing with a cup of dark roast
- Dessert board Cut into small squares and arrange with chocolate shavings and candied nuts
- Holiday twist Top with whipped cream and a sprinkle of pumpkin pie spice
One last tip – if you’re taking these to a party, transport them chilled and assemble on-site. The caramel stays prettier that way. Now go enjoy your masterpiece – you’ve earned it!
Caramel Apple Cheesecake Bars FAQ
Over the years, I’ve gotten so many questions about these addictive little bars – here are the ones that pop up most often (along with all my hard-earned answers from countless batches)!
“Can I use store-bought caramel sauce?”
Absolutely! I won’t judge – I use the good quality stuff from the grocery store about half the time myself. Look for caramel sauce in the ice cream topping aisle (not the candy section – that’s too thick). My favorite shortcut? Those little caramel bits meant for melting – just add a splash of cream and microwave until pourable. Though I will say, homemade caramel does take these bars to the next level when you’ve got 10 extra minutes.
“How long will these bars last in the fridge?”
They’ll stay fresh for up to 5 days when stored properly in an airtight container. The crust might soften slightly after day 3, but that’s never stopped me from devouring every last crumb! Pro tip: If you want to keep them longer, freeze individual portions – they’ll last 2 months and thaw beautifully overnight in the fridge.
“Can I make these without apples?”
You sure can! I’ve made “plain” caramel cheesecake bars when I was out of apples – just skip the cinnamon-tossed apples and increase the caramel drizzle. They’re still delicious, though I do miss that fruity crunch. For variation, try swapping in pears, or even a layer of strawberry jam swirled into the cheesecake filling before baking.
“Why did my cheesecake layer crack?”
Oh honey, we’ve all been there! Usually it’s one of three things: overmixing the eggs (beat just until combined), cooling too quickly (that oven-crack trick is golden), or baking too long (remember – jiggly center means done!). But here’s the good news – that luscious caramel drizzle covers a multitude of sins! My first cracked batch still tasted amazing.
“Can I double this recipe?”
Yes! Just use a larger pan (like a 10×15 inch jelly roll pan) and increase baking time by 5-10 minutes. I do this all the time for potlucks – they disappear twice as fast! Another option is making two batches in separate pans if you want thicker bars. Just be sure your oven racks are positioned so both pans bake evenly (I switch their positions halfway through).
Got more questions? I’m happy to help – just drop them in the comments below. No caramel apple cheesecake bar problem is too big or small – I’ve probably faced it (and eaten the evidence) myself!
Nutritional Information
Now, I’m no nutritionist (I just play one in my kitchen!), but I know some folks like to keep track of what they’re eating. Here’s the approximate breakdown per bar – just remember, these are estimates based on the exact ingredients I use. Your numbers might vary slightly depending on brands or if you go heavy-handed with that caramel drizzle (no judgment here!).
- Serving Size: 1 bar (1/12 of recipe)
- Calories: 280
- Total Fat: 18g (23% DV)
- Saturated Fat: 10g (50% DV)
- Cholesterol: 80mg (27% DV)
- Sodium: 220mg (10% DV)
- Total Carbohydrates: 26g (9% DV)
- Dietary Fiber: 1g (4% DV)
- Sugars: 18g
- Protein: 4g
A little disclaimer from my home kitchen to yours: These numbers don’t account for any extra caramel you might add (and let’s be real – who stops at just a drizzle?). If you’re watching specific nutrients, you can tweak the recipe with lower-fat cream cheese or sugar substitutes – though I can’t promise they’ll taste exactly the same. Personally? I say life’s too short not to enjoy dessert in all its buttery, caramel-y glory – everything in moderation, right?
Alright, my fellow dessert lovers, it’s time to roll up those sleeves and make some caramel apple cheesecake bar magic! Trust me, once you taste that first bite of creamy cheesecake with cinnamon apples and gooey caramel, you’ll understand why this recipe has become my go-to for every occasion. Whether it’s a cozy fall gathering, a potluck where you want to impress, or just a Tuesday night treat (because why not?), these bars never disappoint. I can’t wait to hear how yours turn out! Snap a pic of your creation and tag me – I love seeing your kitchen triumphs. Now go forth and bake – your taste buds will thank you!
Print
15-Minute Caramel Apple Cheesecake Bars Recipe Perfection (54 characters)
- Total Time: 2 hours 50 minutes
- Yield: 12 bars 1x
- Diet: Vegetarian
Description
Delicious caramel apple cheesecake bars combine creamy cheesecake with sweet apples and rich caramel.
Ingredients
- 2 cups graham cracker crumbs
- 1/2 cup melted butter
- 2 packages cream cheese (8 oz each), softened
- 1/2 cup sugar
- 2 eggs
- 1 tsp vanilla extract
- 2 medium apples, peeled and diced
- 1/4 cup caramel sauce
- 1/2 tsp cinnamon
Instructions
- Preheat oven to 350°F.
- Mix graham cracker crumbs with melted butter and press into a lined baking pan.
- Beat cream cheese, sugar, eggs, and vanilla until smooth.
- Spread mixture over the crust.
- Toss apples with cinnamon and sprinkle over the cheesecake layer.
- Bake for 30 minutes or until set.
- Drizzle caramel sauce over the top after cooling.
- Chill for at least 2 hours before serving.
Notes
- Use tart apples like Granny Smith for best results.
- Let cheesecake cool completely before slicing.
- Store leftovers in the refrigerator.
- Prep Time: 20 minutes
- Cook Time: 30 minutes
- Category: Dessert
- Method: Baking
- Cuisine: American
Nutrition
- Serving Size: 1 bar
- Calories: 280
- Sugar: 18g
- Sodium: 220mg
- Fat: 18g
- Saturated Fat: 10g
- Unsaturated Fat: 6g
- Trans Fat: 0g
- Carbohydrates: 26g
- Fiber: 1g
- Protein: 4g
- Cholesterol: 80mg
Keywords: caramel apple cheesecake bars, dessert recipe, easy cheesecake bars