
Oh, let me tell you about chicken katsu! This savory Japanese dish has completely won my heart. Picture this: tender, juicy chicken cutlets, perfectly breaded and fried to that irresistible golden brown. The first time I tried it was at a cozy little Japanese restaurant tucked away in my neighborhood. The aroma of frying chicken filled the air, and I was instantly hooked! I remember taking my first bite and being enveloped in that crunch, followed by the succulent chicken inside. It was love at first taste!
Now, chicken katsu isn’t just a meal for me; it’s a comforting experience. I’ve made it countless times since then, and it never fails to impress friends and family. It’s surprisingly simple to whip up, and the flavors are just out of this world. Plus, it’s gluten-free, so it caters to so many diets! Trust me, once you try making it at home, you’ll find yourself craving it all the time. It’s the kind of dish that brings everyone together around the table, and I can’t wait to share my secrets with you!
Ingredients for Chicken Katsu
Getting the right ingredients is key to making the most delicious chicken katsu! Here’s what you’ll need:
- 2 boneless chicken breasts: These should be of medium thickness for even cooking. If they’re too thick, you may want to butterfly them or flatten them later for that perfect crunch.
- 1 cup panko breadcrumbs: This is where the magic happens! Panko gives chicken katsu its signature light and crispy texture. Don’t skimp on this; it makes all the difference!
- 1/2 cup all-purpose flour: This is essential for the first layer of the breading, helping the egg stick to the chicken.
- 2 large eggs: You’ll need these for the egg wash. Make sure they’re beaten well; this creates a beautiful coating!
- Salt and pepper to taste: Simple seasoning is crucial here. Don’t be shy—season both sides of the chicken to enhance that flavor!
- Oil for frying: Use a neutral oil with a high smoke point like vegetable or canola oil. This will help achieve that crispy finish without burning.
With these ingredients on hand, you’re well on your way to creating a delightful chicken katsu that’s sure to impress!
How to Prepare Chicken Katsu
Now that you’ve got your ingredients ready, let’s dive into the exciting part—making that mouthwatering chicken katsu! Follow these simple steps, and you’ll be well on your way to crispy, savory perfection.
Step 1: Flatten the Chicken
First things first, we need to ensure even cooking. Grab your boneless chicken breasts and place them in a zip-top bag or between two sheets of plastic wrap. Using a meat mallet, gently pound the chicken to about half an inch thickness. This helps the chicken cook evenly and ensures it stays juicy while achieving that perfect crunch. Don’t go overboard—just enough to flatten them nicely!
Step 2: Season the Chicken
Next up, it’s time to season! Take the flattened chicken breasts and sprinkle salt and pepper generously on both sides. This step is crucial because it’s where you’ll infuse flavor into the chicken itself. Don’t be shy—seasoning helps elevate the dish, making it delicious with every bite!
Step 3: Set Up the Breading Station
Now, let’s set up our breading station, which is super simple! You’ll need three shallow dishes: one with all-purpose flour, one with your beaten eggs, and one with panko breadcrumbs. This assembly line is essential for creating the crispy coating we all love. I like to arrange them in that order—flour first, then egg, and finally panko—so we can easily coat the chicken without any mess.
Step 4: Breading the Chicken
Time to coat those chicken cutlets! Start by dredging a chicken breast in the flour, making sure it’s fully covered. Shake off any excess flour, then dip it into the beaten eggs, allowing any extra egg to drip off. Finally, roll it in the panko breadcrumbs, pressing gently to ensure a good coating. Repeat this process for the other chicken breast. Trust me, the texture from that panko is what makes this dish truly special!
Step 5: Frying the Chicken
Heat a good amount of oil in a large skillet over medium heat. You’ll want about a half-inch of oil for frying—enough to submerge the chicken halfway. Once the oil is hot (test it by dropping in a few breadcrumbs; they should sizzle), carefully lay the breaded chicken in the pan. Fry for about 4-5 minutes on each side, or until they’re golden brown and crispy. Keep an eye on them, as cooking times might vary depending on the thickness of your chicken!
Step 6: Draining and Serving
Once your chicken is beautifully golden, remove it from the skillet and place it on a plate lined with paper towels to drain off any excess oil. This step is important for keeping that crispy texture! Slice your chicken katsu into strips and serve it up with a generous drizzle of tonkatsu sauce. Pair it with some shredded cabbage and rice for a complete meal that’s sure to impress!
Nutritional Information
When indulging in chicken katsu, it’s always good to know what you’re getting! Here’s the estimated nutritional breakdown for one piece of this delicious dish:
- Calories: 400
- Fat: 20g
- Saturated Fat: 3g
- Trans Fat: 0g
- Unsaturated Fat: 15g
- Carbohydrates: 30g
- Fiber: 1g
- Sugar: 1g
- Protein: 25g
- Sodium: 600mg
- Cholesterol: 75mg
Keep in mind, these values are estimates and can vary based on cooking methods and portion sizes. But what I love most is that you’re getting a balance of protein and carbs, making this a fulfilling meal that’s perfect for any occasion!
Why You’ll Love This Recipe
Chicken katsu isn’t just a dish; it’s an experience you’ll keep coming back to! Here are a few reasons why this recipe will become a staple in your kitchen:
- Quick Preparation: With just 25 minutes from start to finish, you can whip up a delicious meal even on busy weeknights!
- Delicious Flavor: The combination of crispy panko and juicy chicken, paired with savory tonkatsu sauce, creates a flavor explosion that’s simply irresistible.
- Gluten-Free Option: Using gluten-free panko breadcrumbs makes it accessible for those with dietary restrictions, letting everyone enjoy this tasty treat!
- Customizable: You can easily tweak the recipe to suit your taste, whether it’s adding spices to the panko or serving with different sides.
- Perfect for Sharing: This dish is a crowd-pleaser, making it great for family dinners or gatherings with friends. Everyone will be asking for seconds!
Trust me, once you try chicken katsu, you’ll understand why it holds a special place in my heart and on my dinner table!
Tips for Success
To ensure your chicken katsu turns out perfectly every time, here are some pro tips that I absolutely swear by:
- Use a thermometer: If you want to get the oil temperature just right, aim for around 350°F (175°C). This ensures that the chicken cooks evenly without burning the breadcrumbs.
- Don’t overcrowd the pan: Frying too many pieces at once can drop the oil temperature and lead to soggy, greasy chicken. Fry in batches if necessary!
- Let it rest: After frying, allow the chicken to rest on paper towels for a minute before slicing. This helps maintain its crispiness.
- Experiment with flavors: Try adding spices like garlic powder or paprika to your panko for a flavor twist! It’s an easy way to make it your own.
- Pair with the right sides: Serve with a side of rice and shredded cabbage for the perfect balance of flavors and textures. They complement the katsu beautifully!
With these tips in your back pocket, you’ll be well on your way to making chicken katsu that’s not just good, but truly unforgettable!
Variations of Chicken Katsu
One of the best things about chicken katsu is how versatile it can be! If you’re feeling adventurous, there are so many fun variations to try:
- Different Proteins: Swap out the chicken for pork or even tofu for a delicious vegetarian option! Pork katsu, known as tonkatsu, is equally delightful and has its own unique flavor.
- Spiced Breadcrumbs: Want to kick up the flavor? Try mixing some garlic powder, paprika, or even a pinch of cayenne pepper into your panko breadcrumbs. It adds a nice warmth that complements the dish beautifully!
- Herb-Infused Flour: Experiment by adding dried herbs like thyme or oregano to your all-purpose flour for a subtle twist that brings extra flavor to the breading.
- Asian-Inspired Sauces: Instead of traditional tonkatsu sauce, you can serve it with a sweet chili sauce or a spicy mayo for a different taste experience that still feels familiar.
These variations keep chicken katsu exciting and allow you to customize it to your taste, so don’t hesitate to get creative!
Serving Suggestions
Now that you’ve got your chicken katsu ready to go, let’s talk about the best sides to serve with it! A classic pairing is steamed white rice, which perfectly complements the rich flavors of the katsu and absorbs that delicious tonkatsu sauce. Trust me, it’s a match made in heaven!
Another fantastic option is a simple salad of shredded cabbage, lightly dressed with a tangy vinaigrette. The crunchiness of the cabbage adds a refreshing contrast to the crispy chicken, making every bite even more enjoyable. You can even toss in some carrots for a pop of color!
If you’re feeling adventurous, consider adding a side of pickled vegetables. Their tangy flavor balances the richness of the katsu beautifully and brings a delightful crunch to the meal. With these sides, your chicken katsu dinner will be both satisfying and delicious!
Storage & Reheating Instructions
After enjoying your delicious chicken katsu, you might have some leftovers (if you’re lucky!). To store them, let the chicken cool completely before placing it in an airtight container. I recommend using parchment paper between the layers to help maintain that crispy coating. You can keep it in the refrigerator for up to three days.
When it’s time to reheat, the best method is to use an oven or air fryer to keep that signature crunch. Preheat your oven to 375°F (190°C) and place the katsu on a baking sheet. Heat for about 10-15 minutes, flipping halfway through to ensure even warming. If you’re using an air fryer, just pop it in for about 5-7 minutes at the same temperature. Trust me, this way, you’ll have chicken katsu that tastes almost as good as fresh out of the skillet!
Print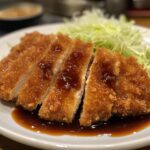
Chicken Katsu: 5 Steps to Irresistible Crispy Delight
- Total Time: 25 minutes
- Yield: 2 servings 1x
- Diet: Gluten Free
Description
Chicken katsu is a Japanese dish consisting of breaded and deep-fried chicken cutlets served with a savory sauce.
Ingredients
- 2 boneless chicken breasts
- 1 cup panko breadcrumbs
- 1/2 cup all-purpose flour
- 2 large eggs
- Salt to taste
- Pepper to taste
- Oil for frying
Instructions
- Flatten the chicken breasts using a meat mallet.
- Season with salt and pepper.
- Set up a breading station with flour, eggs, and panko.
- Coat each chicken breast in flour, dip in eggs, and then cover with panko.
- Heat oil in a pan over medium heat.
- Fry the chicken until golden brown, about 4-5 minutes per side.
- Drain on paper towels.
- Slice and serve with tonkatsu sauce.
Notes
- Serve with shredded cabbage.
- Pair with rice for a complete meal.
- Adjust frying time based on chicken thickness.
- Prep Time: 15 minutes
- Cook Time: 10 minutes
- Category: Main Dish
- Method: Frying
- Cuisine: Japanese
Nutrition
- Serving Size: 1 piece
- Calories: 400
- Sugar: 1g
- Sodium: 600mg
- Fat: 20g
- Saturated Fat: 3g
- Unsaturated Fat: 15g
- Trans Fat: 0g
- Carbohydrates: 30g
- Fiber: 1g
- Protein: 25g
- Cholesterol: 75mg
Keywords: chicken katsu