
There’s something magical about biting into a perfect classic chicken sandwich – that satisfying crunch giving way to juicy chicken, all hugged by a soft bun and fresh veggies. It’s been my go-to lunch since I was a kid, when my mom would make it after school using leftover chicken. The smell of golden breadcrumbs sizzling in the pan still takes me back to those afternoons at our kitchen table, ketchup smudges on my homework papers.
What makes this classic chicken sandwich special isn’t just nostalgia though – it’s how simple yet amazing it turns out every time. In about 20 minutes, humble ingredients transform into something that beats any fast food version. The contrast of textures (oh, that crispy coating!), the creamy-tangy sauce, the fresh veggies – it’s lunchtime perfection that never gets old. Whether I’m short on time or just craving comfort food, this sandwich never lets me down.
Why You’ll Love This Classic Chicken Sandwich
This isn’t just another sandwich – it’s the kind of meal that makes you pause between bites to appreciate how good it is. Here’s why it’s been my lunchtime hero for years:
Quick and Satisfying Meal
When hunger strikes at noon and you’re staring into the fridge, this classic chicken sandwich saves the day. Twenty minutes is all you need to go from “what’s for lunch?” to happily munching. No fancy techniques, no weird ingredients – just pure, crispy satisfaction that fills you up without weighing you down.
Customizable to Your Taste
The beauty? It’s your sandwich, your rules. Swap mayo for spicy aioli, add pickles for tang, or pile on avocado if you’re feeling fancy. My sister insists on adding a slice of cheddar, while I’m team extra-crispy lettuce. However you tweak it, the classic chicken sandwich happily adapts.
Perfect Texture Combination
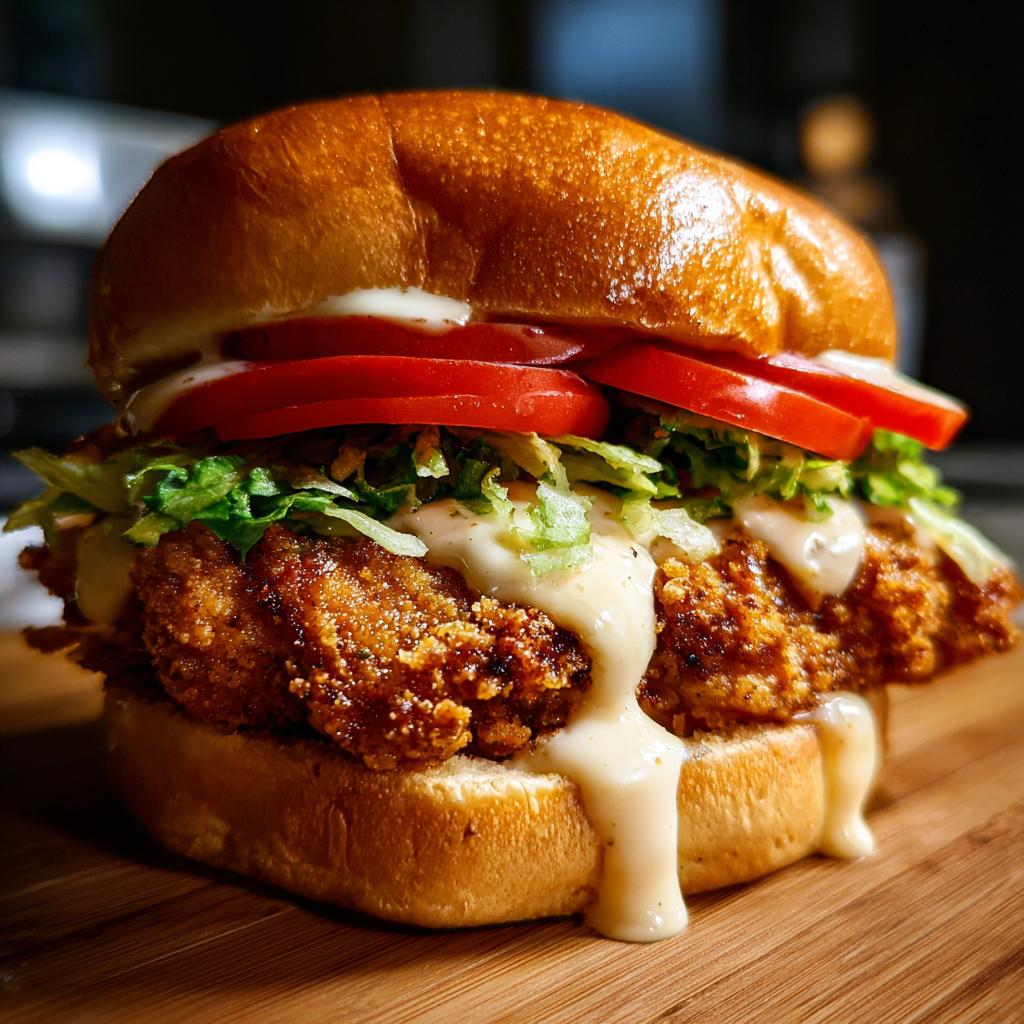
That first bite where the golden crust cracks under your teeth, revealing tender chicken that’s still juicy? Pure magic. The soft bun catches all the juices and sauce, while crisp lettuce and tomato add freshness. It’s like a symphony of textures in every mouthful.
Ingredients for Classic Chicken Sandwich
Listen, I know some recipes say “just eyeball it,” but trust me – precise measurements make all the difference with this sandwich! Here’s exactly what you’ll need:
Sauce Components
The creamy-tangy magic happens with 1 tbsp mayonnaise mixed with 1 tsp yellow mustard. This golden ratio gives just enough zip without overpowering the chicken. Want it tangier? Add an extra half teaspoon of mustard!
Veggie Prep Notes
For tomatoes, aim for 1/4-inch thick slices – too thin and they disappear, too thick and they slide out. Use crisp iceberg or butter lettuce leaves – they hold up better than floppy greens against the warm chicken.
Main ingredients:
- 1 boneless, skinless chicken breast (about 6-8 oz)
- 1/4 cup all-purpose flour
- 1 large egg, beaten with 1 tbsp water
- 1/4 cup panko breadcrumbs (regular works too, but panko’s extra crispy)
- 1 tbsp vegetable oil for frying
- 1 hamburger bun (brioche is dreamy here)
- Kosher salt & freshly ground pepper – none of that pre-ground dust!
Equipment You’ll Need
Gather these trusty kitchen tools before you start – having everything ready makes the cooking process smoother than my grandma’s mashed potatoes!
- 10-inch skillet (cast iron works great for even heating)
- Tongs for flipping that chicken safely
- 3 shallow bowls (I use pie plates for dredging)
- Meat mallet or heavy pan to pound chicken evenly
- Paper towels for draining cooked chicken
- Cutting board and sharp knife for veggie prep
- Pastry brush (optional for sauce spreading)
That’s it! No fancy gadgets needed – just basic tools most kitchens already have.
How to Make Classic Chicken Sandwich
Alright, let’s get cooking! Making this classic chicken sandwich is easier than you think, but I’ve got some tricks to make sure yours turns out perfect every single time.
Preparing the Chicken
First, take your chicken breast and place it between two pieces of plastic wrap. Pound it gently to about 1/2-inch thickness – this makes it cook evenly and gives you that perfect sandwich size. Season both sides generously with salt and pepper (trust me, this step makes all the difference!). Now for the fun part: set up your dredging station with flour in one bowl, beaten egg in another, and breadcrumbs in the third. Coat the chicken in flour, dip in egg (let excess drip off!), then press firmly into breadcrumbs. Place it on a plate while you heat the oil.
Dredging Technique Tips
Here’s my secret: use one hand for dry ingredients and the other for wet to avoid clumpy fingers. And press those breadcrumbs on firmly – you want every inch coated for maximum crunch!
Cooking to Golden Perfection
Heat oil in your skillet over medium-high heat until it shimmers (about 350°F if you’re using a thermometer). Carefully add the chicken – it should sizzle immediately! Cook for 3-4 minutes per side until deeply golden and crispy. Don’t peek too often – let that crust form! The chicken’s done when it reaches 165°F internally, or when juices run clear.
Assembling the Sandwich
Toast your bun lightly – just 30 seconds per side gives it structure without drying out. Spread the mayo-mustard mixture on both halves. Layer like this: bottom bun, crisp lettuce (it acts as a moisture barrier!), tomato slices, then your glorious golden chicken. Cap it with the top bun and press gently so everything sticks together nicely.
Serving Suggestions
This classic chicken sandwich shines on its own, but I love serving it with steak fries and a pickle spear for that diner feel. A simple side salad with tangy vinaigrette balances the richness perfectly. And don’t forget napkins – the good kind that can handle juicy tomatoes and sauce drips!
Pro Tips for Best Classic Chicken Sandwich
After making this sandwich more times than I can count, I’ve picked up some tricks that take it from good to “oh wow, this is incredible!” Here’s what I’ve learned:
- Pat chicken dry with paper towels before seasoning – moisture is the enemy of crispiness!
- Let cooked chicken rest 2 minutes before assembling – this keeps juices in the meat instead of sogging up your bun.
- Toast bun lightly – just until golden, so it holds up to the juicy chicken without turning into a crouton.
- Season each layer – a tiny pinch of salt on the tomatoes brings out their flavor beautifully.
- Warm plates matter – a quick microwave zap keeps your sandwich toasty while you eat.
Crispiness Hack
For extra crunch, try double-breading: after the first egg dip, give the chicken another quick dunk in egg and breadcrumbs. It creates an almost fried-chicken level of crispy goodness!
Storage and Reheating
Here’s how to keep your classic chicken sandwich tasting fresh (because leftovers happen!): Store components separately – chicken in an airtight container, veggies in a bag with a paper towel to absorb moisture, and sauce in a small jar. The bread? Keep it at room temperature in its bag. When ready to eat, revive that crispy magic by reheating chicken in an air fryer at 375°F for 3-4 minutes. The bun can get a quick toast refresh too. Pro tip: assemble right before eating to avoid sogginess!
Classic Chicken Sandwich Variations
One of my favorite things about this recipe is how easily it adapts to different tastes and diets! Here are some delicious twists that keep the classic chicken sandwich spirit alive:
Buffalo Style Twist
For days when you’re craving heat, swap the mayo-mustard sauce with 2 tbsp Buffalo sauce mixed with 1 tbsp blue cheese dressing. The spicy kick paired with cool, tangy cheese takes this sandwich to flavor town! Add some shredded iceberg and celery sticks for that authentic wings experience between buns.
Other tasty variations:
- Gluten-free: Use almond flour and gluten-free panko breadcrumbs
- Spicy: Mix 1/2 tsp cayenne into the breadcrumbs
- BBQ: Brush cooked chicken with your favorite sauce
- Avocado: Add slices of ripe avocado and lime juice
Nutritional Information
Just a friendly heads up – these nutrition estimates are for general guidance only since brands and ingredient sizes vary. My calculations show one classic chicken sandwich contains roughly:
- 450 calories
- 18g fat (3g saturated)
- 40g carbs (3g fiber, 5g sugar)
- 30g protein
Remember, using different bread, adjusting sauce amounts, or swapping ingredients will change these numbers. The chicken breast size makes the biggest difference! Always check your specific product labels if tracking closely.
FAQs About Classic Chicken Sandwich
Over the years, I’ve gotten so many great questions about making the perfect classic chicken sandwich. Here are the answers to the ones that pop up most often – straight from my kitchen to yours!
Can I bake the chicken instead of frying it?
Absolutely! For a baked version, place your breaded chicken on a wire rack over a baking sheet at 400°F for about 20 minutes, flipping halfway. It won’t get quite as crispy as pan-fried, but a quick broil at the end helps. Just keep an eye on it – that golden color can turn to burnt fast under the broiler!
How do I keep the breading from falling off?
Ah, the eternal struggle! First, make sure to pat your chicken really dry before starting. Then press the breadcrumbs on firmly – I mean really get in there! Letting the breaded chicken sit for 5 minutes before cooking helps the coating stick better too. And don’t move it around too much in the pan – let that crust set before flipping.
What’s the best bun for a classic chicken sandwich?
Personally, I’m team brioche all the way – that slight sweetness and pillowy texture is magic. But potato buns are a close second! Just avoid anything too crusty or dense. If all you have is regular hamburger buns, toasting them lightly makes a world of difference. Stale buns? Quick steam over boiling water brings them back to life!
Can I prep the chicken ahead of time?
You bet! Bread the chicken and keep it refrigerated on a wire rack (so it doesn’t get soggy) for up to 4 hours before cooking. For longer storage, freeze the breaded chicken on a sheet pan, then transfer to bags once frozen solid. Cook from frozen, adding a couple extra minutes to the cooking time.
Why does my chicken turn out dry sometimes?
Most likely culprit? Overcooking. Chicken breasts can go from juicy to sawdust in minutes! Use a meat thermometer – pull it at 160°F and let carryover cooking do the rest. Also, pounding the chicken to even thickness prevents thin parts from drying out while thicker parts cook. And that 2-minute rest after cooking? Non-negotiable for juicy results!
Got more questions? Drop them in the comments – I love hearing about your kitchen adventures with this classic chicken sandwich! And if you try any fun variations, I want to hear all about your creations.
Print
20-Minute Classic Chicken Sandwich You’ll Crave Daily
- Total Time: 22 mins
- Yield: 1 sandwich 1x
- Diet: Low Lactose
Description
A delicious and easy-to-make classic chicken sandwich with crispy chicken, fresh veggies, and a creamy sauce.
Ingredients
- 1 boneless chicken breast
- 1/4 cup flour
- 1 egg
- 1/4 cup breadcrumbs
- 1 tbsp oil
- 1 hamburger bun
- 2 lettuce leaves
- 2 tomato slices
- 1 tbsp mayonnaise
- 1 tsp mustard
- Salt and pepper to taste
Instructions
- Season chicken breast with salt and pepper.
- Coat chicken in flour, dip in beaten egg, then coat with breadcrumbs.
- Heat oil in a pan and cook chicken until golden and cooked through (about 5-6 minutes per side).
- Toast the hamburger bun lightly.
- Spread mayonnaise and mustard on the bun.
- Place lettuce, tomato, and cooked chicken on the bun.
- Serve immediately.
Notes
- Use panko breadcrumbs for extra crispiness.
- Add pickles for extra tang.
- Can substitute mayo with yogurt for a lighter option.
- Prep Time: 10 mins
- Cook Time: 12 mins
- Category: Sandwich
- Method: Pan-frying
- Cuisine: American
Nutrition
- Serving Size: 1 sandwich
- Calories: 450
- Sugar: 5g
- Sodium: 600mg
- Fat: 18g
- Saturated Fat: 3g
- Unsaturated Fat: 12g
- Trans Fat: 0g
- Carbohydrates: 40g
- Fiber: 3g
- Protein: 30g
- Cholesterol: 120mg
Keywords: chicken sandwich, classic sandwich, easy lunch