Oh my gosh, you HAVE to try these coffee truffles—they’re my little bites of heaven! I swear, nothing beats that moment when rich dark chocolate meets bold espresso flavor in one perfect melt-in-your-mouth bite. The best part? They’re embarrassingly easy to make—no fancy equipment, no baking, just pure chocolatey coffee bliss.
I first stumbled upon this recipe when I desperately needed a pick-me-up during finals week in college (hello, caffeine and chocolate therapy). Now they’re my go-to treat whenever I need something special—whether it’s for gifting friends or just treating myself after a long day. Trust me, once you try these, you’ll be hooked!
The magic happens with just five simple ingredients you probably already have. In about 15 minutes of hands-on time (plus some fridge patience), you’ll have these gorgeous little coffee truffles ready to impress. Let me show you how it’s done!
Why You’ll Love These Coffee Truffles
Listen, I get it—life’s busy, and sometimes you just need a little indulgence that doesn’t require hours in the kitchen. That’s where these coffee truffles come in! They’re the perfect little package of everything wonderful:
- That deep, rich chocolate flavor that makes your eyes roll back
- A kick of espresso that wakes up your taste buds
- Silky smooth texture that melts the second it hits your tongue
- No oven required—just mix, chill, and roll
- Endless ways to dress them up for any occasion
Perfect for Chocolate and Coffee Lovers
If you’re the type who can’t choose between an afternoon coffee break and a chocolate craving (hello, that’s me every day), these truffles are your dream come true. The dark chocolate gives that luxurious depth, while the espresso powder adds this amazing grown-up bitterness that cuts through the sweetness. It’s like your favorite mocha, but in bite-sized form!
Quick and No-Bake
Here’s the best part—you won’t even break a sweat making these! No fancy techniques, no waiting for things to cool in stages. Just melt, mix, and pop it in the fridge. I’ve made these when surprise guests show up (30 minutes notice? No problem!) and even when I’m in my pajamas at 10 PM craving something sweet. The hardest part is waiting for them to set—but hey, that’s what Netflix binges are for, right?
Ingredients for Coffee Truffles
Okay, let’s gather our goodies! You’ll be amazed how just a few simple ingredients transform into something so magical. Here’s what you’ll need:
- 200g dark chocolate (70% cocoa) – This is the star, so don’t skimp! I like to use bars instead of chips because they melt smoother
- 100ml heavy cream – Also called double cream in some places
- 1 tbsp instant espresso powder – The secret weapon for that coffee punch
- 1 tbsp unsalted butter – Just a knob for extra silkiness
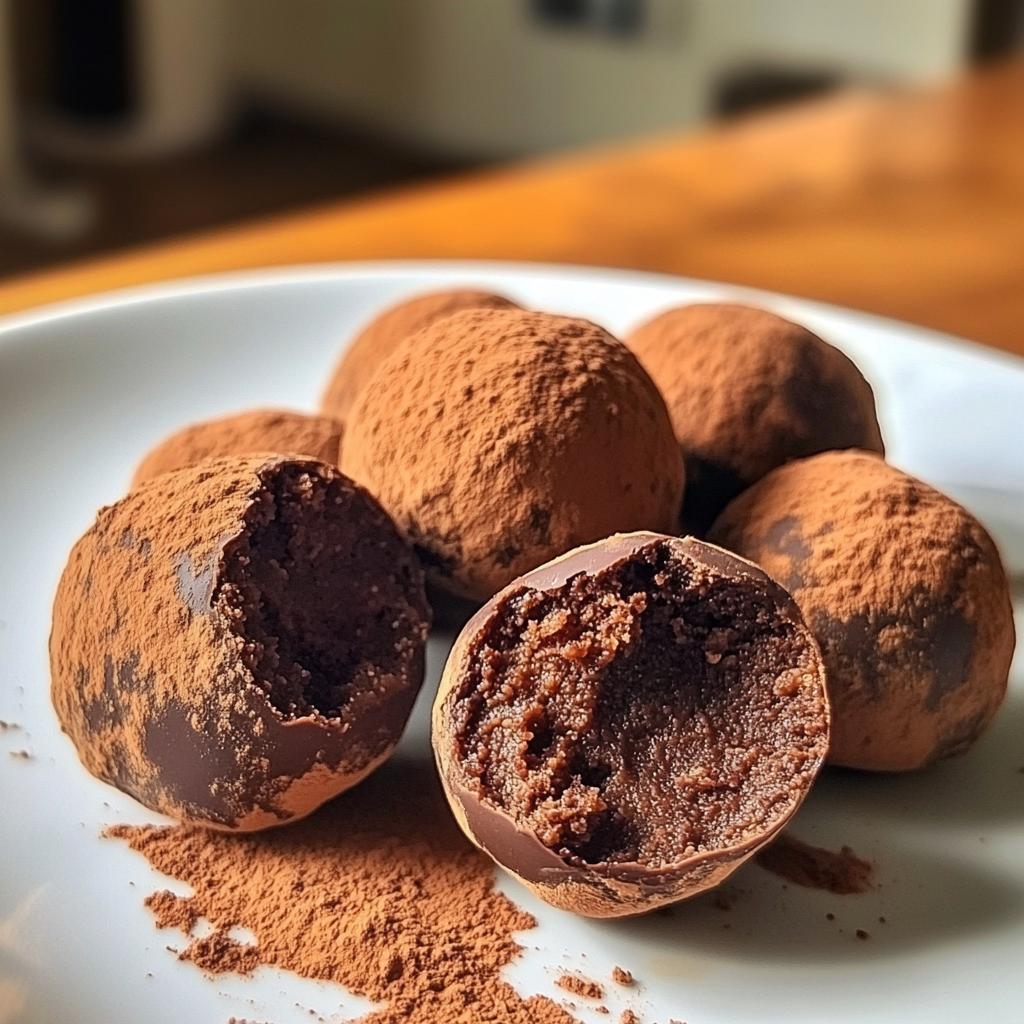
- Cocoa powder for dusting – For that classic truffle look
Ingredient Notes
Can we talk about chocolate for a sec? The better your chocolate, the better your truffles will taste – it’s that simple. I look for at least 70% cocoa for that perfect bittersweet balance. If you’re in a pinch, you can use semi-sweet, but trust me, it’s worth splurging on the good stuff.
No heavy cream? Full-fat coconut milk makes a great dairy-free substitute. And if you don’t have espresso powder, 1 tablespoon of very strongly brewed coffee works too (just reduce the heavy cream slightly). The butter? That’s my little luxury touch – it makes the texture absolutely dreamy!
How to Make Coffee Truffles
Alright, let’s get to the fun part—making these little coffee-flavored jewels! Don’t let the fancy name fool you; the process is surprisingly simple. Just follow these steps, and you’ll have restaurant-quality truffles without leaving your kitchen.
Melting the Chocolate
First things first—let’s melt that chocolate beautifully. I like to use the double-boiler method (just a heatproof bowl over simmering water) because it gives me more control. Chop your chocolate finely—the smaller the pieces, the smoother it’ll melt. Keep the water at a gentle simmer and stir occasionally with a dry spatula. No water droplets in the bowl, please—chocolate and water are frenemies!
Microwave folks, I’ve got you too: zap in 30-second bursts at 50% power, stirring between each. The chocolate should look shiny and smooth when it’s ready. Remove from heat the moment it’s almost melted—the residual heat will finish the job perfectly.
Mixing the Espresso and Cream
Now for the magic potion! Heat your cream until it just starts steaming—little bubbles at the edges are your cue. Pour it over the melted chocolate and let it sit untouched for 2 minutes. This “blooming” time helps the flavors marry. Then, stir from the center outward in slow circles until you’ve got this gorgeous, velvety ganache.
Add your espresso powder and butter next. Here’s my trick: sprinkle the espresso powder over the surface and let it sit for 30 seconds before stirring—this prevents those pesky little lumps. The butter? It’ll melt right in from the residual heat, making everything extra glossy.
Shaping and Coating the Truffles
After 2 hours in the fridge (or 45 in the freezer if you’re impatient like me), it’s playtime! Scoop with a melon baller or teaspoon—I aim for about 2cm balls. Pro tip: run your hands under cold water (then dry them!) before rolling to prevent sticking. Roll quickly between your palms—the warmth of your hands will smooth the surface beautifully.
For coating, I toss them in a bowl of cocoa powder like they’re little chocolate snowballs. Give them a gentle shake in a sieve afterward to knock off excess—you want them looking rustic, not dusty. For cleaner hands, use two forks to roll them in the powder. And voila! Coffee truffles ready to impress!
Tips for Perfect Coffee Truffles
After making dozens (okay, maybe hundreds) of these coffee truffles, I’ve picked up some tricks that make all the difference. First, always work with cold hands when shaping—I keep a bowl of ice water nearby to dip my fingers in. Nothing’s worse than melty truffle mixture sticking everywhere!
For the smoothest texture, sift your cocoa powder before dusting. Those little lumps might seem harmless, but they’ll show up on your finished truffles. And here’s my secret weapon—a tiny pinch of flaky sea salt sprinkled on top right after coating. It sounds crazy, but that salty crunch takes these from good to “Oh my god what is this sorcery?” good.
Presentation pro tip: store them in mini cupcake liners if you’re gifting them. Not only does it look adorable, but it keeps the cocoa powder from rubbing off in the box. Last thing—always let them come to room temperature for about 10 minutes before serving. That’s when the flavors really sing!
Variations of Coffee Truffles
Oh, the fun doesn’t stop with basic cocoa powder! Once you’ve mastered the original coffee truffles, try these delicious twists that’ll make you feel like a chocolatier. My personal favorite? Rolling them in crushed toasted hazelnuts—it’s like a fancy Ferrero Rocher but better because you made it!
For holiday gifts, I love mixing in a pinch of cinnamon or cardamom with the espresso powder—it adds this warm, festive note that people go crazy for. And if you’re feeling extra indulgent, try dipping the chilled truffles in melted white chocolate before the cocoa powder. The contrast between the dark coffee center and sweet white shell is absolutely magical.
Other coatings to play with: finely chopped pistachios, toasted coconut flakes, or even crushed freeze-dried raspberries for a tart surprise. The possibilities are endless—just don’t tell my original recipe I’m cheating on it with all these variations!
Serving and Storing Coffee Truffles
Here’s the beautiful thing about these coffee truffles—they’re just as wonderful fresh from the fridge as they are days later (if they last that long!). For serving, I love arranging them on a pretty plate with some whole coffee beans scattered around—it looks so fancy but took zero effort. Room temperature is key though—pull them out 10-15 minutes beforehand so the flavors really shine.
Storage is a breeze! Keep them in an airtight container in the fridge for up to two weeks (though mine never last more than three days). Pro tip: layer them between parchment paper so they don’t stick together. Want to save some for later? Freeze them flat on a tray first, then transfer to a freezer bag—they’ll keep beautifully for a month. Just thaw overnight in the fridge when that chocolate craving hits!
Nutritional Information for Coffee Truffles
Okay, let’s be real—we’re not eating truffles for their health benefits! But if you’re curious, each little chocolatey coffee bomb clocks in at about 80 calories. They’ve got that good-fat richness from the dark chocolate and cream, with just enough caffeine to put a pep in your step. Remember, these are estimates—your exact numbers might dance a bit depending on your chocolate’s cocoa percentage or how generous you are with the cocoa dusting!
Frequently Asked Questions About Coffee Truffles
I get asked about these coffee truffles all the time—they’re that good! Here are the questions that pop up most often from friends and readers who’ve fallen in love with this recipe (just like I knew they would!).
Can I Use Milk Chocolate Instead?
Oh honey, I won’t stop you—but fair warning! Milk chocolate makes sweeter, softer truffles that don’t hold their shape quite as well. The espresso flavor gets a bit lost too. If you go this route, reduce the cream by about 15ml so your mixture firms up properly. Personally? I’d stick with dark chocolate—that bittersweet punch is what makes these truffles so special!
How Long Do They Last in the Fridge?
In my house? About 24 hours! But realistically, they’ll stay perfect in an airtight container for up to two weeks. The cocoa powder coating helps protect them. Just don’t stack them without parchment between layers—nobody wants stuck-together truffles! For longer storage, freeze them (they thaw beautifully overnight in the fridge).
Other burning questions? Can you use decaf espresso powder? Absolutely—the flavor’s still amazing. Accidentally over-chilled your ganache? Let it sit at room temp for 15 minutes before rolling. Trust me, I’ve made every “mistake” possible with these—they’re practically foolproof!
Share Your Coffee Truffles Experience
Okay, confession time—I LIVE for hearing how your coffee truffle adventures turn out! Did you add a special twist? Did they disappear suspiciously fast at your dinner party? Snap a pic of your chocolatey masterpieces and tell me all about it—I’ll be grinning like a proud mama bear!
Drop me a comment below or tag me on social media (@mykitchenadventures). Your creations might just inspire someone else to discover their new favorite treat. Happy truffle-making, my fellow coffee-chocolate lovers!
Print
“5-Ingredient Coffee Truffles: Irresistible Chocolate Bliss”
- Total Time: 2 hours 20 minutes
- Yield: 20 truffles 1x
- Diet: Vegetarian
Description
Delicious coffee truffles made with rich dark chocolate and espresso for a bold flavor. Perfect for gifting or enjoying as a sweet treat.
Ingredients
- 200g dark chocolate (70% cocoa)
- 100ml heavy cream
- 1 tbsp instant espresso powder
- 1 tbsp unsalted butter
- Cocoa powder for dusting
Instructions
- Chop the dark chocolate finely and place it in a heatproof bowl.
- Heat the heavy cream in a saucepan until it simmers, then pour it over the chocolate.
- Let it sit for 2 minutes, then stir until smooth.
- Add the espresso powder and butter, stirring until fully combined.
- Cover the mixture and refrigerate for at least 2 hours.
- Once firm, scoop small portions and roll into balls.
- Coat each truffle in cocoa powder.
- Store in the fridge until ready to serve.
Notes
- Use high-quality chocolate for the best taste.
- Truffles can be frozen for up to a month.
- For variation, roll in chopped nuts or coconut flakes.
- Prep Time: 15 minutes
- Cook Time: 5 minutes
- Category: Dessert
- Method: No-bake
- Cuisine: International
Nutrition
- Serving Size: 1 truffle
- Calories: 80
- Sugar: 5g
- Sodium: 5mg
- Fat: 6g
- Saturated Fat: 3g
- Unsaturated Fat: 2g
- Trans Fat: 0g
- Carbohydrates: 7g
- Fiber: 1g
- Protein: 1g
- Cholesterol: 5mg
Keywords: coffee truffles, chocolate truffles, homemade candies, no-bake dessert