You know those desserts that disappear before you even realize you’ve made them? That’s my Creamy Banana Pudding Dessert in a nutshell. I first tasted this magical combination of silky pudding, ripe bananas, and crispy vanilla wafers at my aunt’s potluck years ago, and I’ve been obsessed ever since. What I love most is how effortlessly it comes together—no oven required, just some simple layering and patience while it chills into perfection. When that first spoonful hits your mouth with its cloud-like creaminess and nostalgic banana flavor, you’ll understand why this dessert has been my secret weapon for every gathering from backyard BBQs to “oops I forgot dessert” emergencies.
Why You’ll Love This Creamy Banana Pudding Dessert
Let me tell you why this dessert is about to become your new go-to:
- No oven required – Perfect for hot summer days when you can’t bear to turn on the stove
- Creamy dreamy texture – The whipped cream folded into pudding creates clouds of deliciousness
- Crowd-pleaser magic – Kids and adults alike go crazy for those banana-wafer-pudding layers
- Emergency dessert savior – Takes just 15 minutes active time, then the fridge does the rest
- Better next day – The flavors meld into something even more incredible overnight
Trust me, this pudding is so good you’ll want to make a double batch. I’ve seen full-grown adults lick their bowls clean!
Ingredients for Creamy Banana Pudding Dessert
Here’s everything you’ll need to make this dreamy dessert happen:
- 3 ripe bananas – spotted yellow ones work best
- 1 box (5 oz) instant vanilla pudding mix – the kind that says “just add milk”
- 2 cups cold milk – straight from the fridge works best
- 1 cup heavy cream – chilled is crucial for whipping
- 1/4 cup powdered sugar – sifted if you’re feeling fancy
- 1 tsp vanilla extract – the real stuff makes all the difference
- 1 box (11 oz) vanilla wafer cookies – those nostalgic little rounds
Ingredient Notes & Substitutions
Those bananas? They must be ripe – the more speckled, the sweeter your pudding will be. No cheating with green ones! For dairy-free folks, almond milk works surprisingly well in the pudding (though the texture changes slightly). And if you’re out of heavy cream, full-fat coconut milk whipped makes a delicious tropical twist. Just don’t tell my Southern grandma I suggested that!
The vanilla wafers are non-negotiable in my book – their crisp texture against the creamy layers is magic. But in a pinch, shortbread cookies or graham crackers can stand in. You’ll still get delicious results, just different nostalgic memories!
Equipment You’ll Need
Grab these basic tools from your kitchen—nothing fancy required!
- 1 large mixing bowl (for the pudding)
- 1 medium bowl (for whipping cream)
- Whisk or electric mixer
- Spatula
- Sharp knife (for banana surgery)
- 8-inch square dish or trifle bowl (for maximum layering drama)
That’s it! No special gadgets needed—just stuff you probably already have cluttering your drawers.
How to Make Creamy Banana Pudding Dessert
Okay, let’s get to the good part—turning these simple ingredients into that magical creamy dessert everyone will beg you to make again. Follow these steps carefully, and you’ll have pudding perfection!
Step 1: Prepare the Bananas and Pudding
First things first—banana surgery time! Slice those ripe bananas into thin rounds about 1/4-inch thick. Set them aside while you work on the pudding. Now grab your big mixing bowl and whisk together the instant pudding mix and cold milk. Don’t rush this part—whisk for a full 2 minutes until it’s completely smooth with no lumps. Let it sit for 5 minutes to thicken up properly (I know, waiting is hard!).
Step 2: Whip the Cream
Time to make clouds! In your other bowl, pour in the chilled heavy cream, powdered sugar, and that glorious teaspoon of vanilla extract. Whip it with your mixer (or strong arms!) until you get stiff peaks—that means when you lift the beaters, the cream stands straight up without flopping over. Be careful not to overdo it or you’ll end up with butter (learned that the hard way!). Gently fold this whipped cream into your pudding mixture until fully combined. The texture should be light as air!
Step 3: Layer and Chill
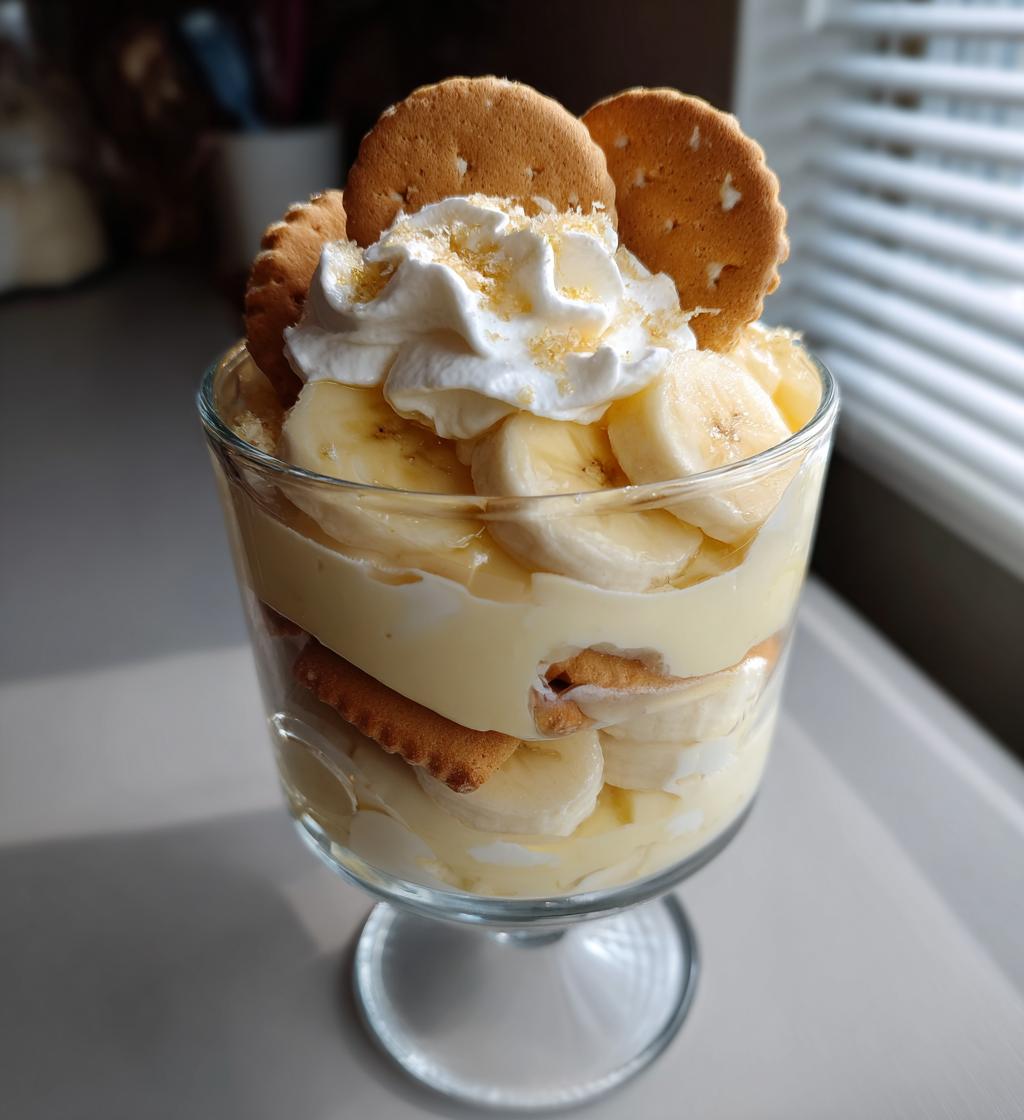
Here’s where the magic happens! In your serving dish, start with a layer of vanilla wafers (about one-third of them), then half your banana slices, then half the pudding mixture. Repeat these layers once more, finishing with a final layer of wafers on top for that perfect crunch. Now the hardest part—pop it in the fridge for at least 2 hours (overnight is even better!). This chill time lets the flavors marry and the wafers soften just right. Try not to peek—I know it’s tempting!
Tips for the Perfect Creamy Banana Pudding Dessert
Want to take your pudding game to the next level? Here are my hard-earned secrets:
- Chill your bowls – Pop them in the freezer for 10 minutes before whipping cream for better volume
- Banana timing – Slice them right before assembling to prevent browning
- Fresh wafers – Stale cookies won’t give you that perfect soft-yet-crisp texture
- Gentle folding – Use a spatula and light strokes when combining whipped cream and pudding
- Press down lightly – Gently press each wafer layer to help them absorb the creamy goodness
Follow these, and you’ll have people thinking you’re a dessert wizard!
Serving Suggestions for Creamy Banana Pudding Dessert
Oh, the joy of serving this beauty! I love using a clear glass trifle dish so everyone can admire those gorgeous layers. For special occasions, I’ll crush a few extra wafers and sprinkle them on top right before serving – that little crunch makes all the difference. This dessert pairs perfectly with:
- A hot cup of coffee (the bitterness balances the sweetness)
- Freshly whipped cream dolloped on top
- A sprinkle of cinnamon or nutmeg for warmth
- Chocolate shavings if you’re feeling fancy
Pro tip: Let it sit at room temperature for about 10 minutes before serving – those flavors really wake up! And don’t forget the spoons, because people will absolutely go back for seconds.
Storage & Reheating Instructions
This pudding keeps beautifully in the fridge for up to 2 days—just cover it tightly with plastic wrap. The wafers soften more over time (which I actually love!). Freezing? Don’t do it—the texture turns grainy and sad. If you must, eat it within 24 hours of thawing for best results.
Nutritional Information
Now, I’m no nutritionist, but here’s the scoop on what you’re getting in each heavenly serving (based on my exact recipe – your mileage may vary!). Keep in mind these are estimates since ingredient brands differ:
- Serving Size: 1/6 of the recipe (about 1 cup)
- Calories: 320 (worth every one!)
- Fat: 14g (7g saturated, 6g unsaturated)
- Carbs: 45g (2g fiber, 28g sugar – hello, bananas!)
- Protein: 4g (surprising protein boost from the milk)
- Sodium: 210mg
- Cholesterol: 35mg
Remember – nutrition varies based on your specific ingredients. But let’s be real, when that creamy banana goodness hits your tongue, numbers are the last thing on your mind!
Frequently Asked Questions
Can I make this ahead of time?
Absolutely! It actually tastes better after chilling overnight. Just assemble it completely, cover tightly, and refrigerate for up to 24 hours before serving. The wafers soften perfectly and flavors meld beautifully.
What’s the best way to layer the dessert?
Start with wafers, then bananas, then pudding—repeat! Always end with wafers on top for that signature crunch. Pro tip: slightly overlap the wafers like shingles so every bite gets some cookie goodness.
Can I use frozen bananas?
Not recommended—they turn mushy when thawed. Fresh, ripe bananas give the best texture and flavor. If you must use frozen, pat them very dry first, but expect a softer consistency in your pudding.
How to prevent banana browning?
Toss banana slices in a little lemon juice first! Or assemble right before serving. The pudding layers help slow browning, but some discoloration is natural and doesn’t affect taste.
Can I use homemade pudding?
Of course! Just make sure it’s cooled completely before folding in the whipped cream. Cooked pudding makes it richer, while instant pudding keeps it light and quick. Both are delicious!
Share Your Creamy Banana Pudding Dessert
Made this dreamy dessert? I’d love to see your masterpiece! Snap a pic of those perfect layers and tag me—nothing makes me happier than seeing your pudding creations. Happy scooping!
Print
Irresistible Creamy Banana Pudding Dessert in 15 Minutes
- Total Time: 2 hours 15 minutes
- Yield: 6 servings 1x
- Diet: Vegetarian
Description
A creamy and delicious banana pudding dessert that’s easy to make and perfect for any occasion.
Ingredients
- 3 ripe bananas
- 1 box (5 oz) instant vanilla pudding mix
- 2 cups cold milk
- 1 cup heavy cream
- 1/4 cup powdered sugar
- 1 tsp vanilla extract
- 1 box (11 oz) vanilla wafer cookies
Instructions
- Slice the bananas into thin rounds.
- Whisk the pudding mix and milk in a bowl for 2 minutes until smooth. Let it set for 5 minutes.
- In a separate bowl, whip the heavy cream, powdered sugar, and vanilla until stiff peaks form.
- Fold the whipped cream into the pudding until fully combined.
- Layer vanilla wafers, banana slices, and pudding mixture in a serving dish.
- Repeat the layers and refrigerate for at least 2 hours before serving.
Notes
- Use ripe bananas for the best flavor.
- Chill the dessert for at least 2 hours for better texture.
- You can add a sprinkle of cinnamon for extra flavor.
- Prep Time: 15 minutes
- Cook Time: 0 minutes
- Category: Dessert
- Method: No-Bake
- Cuisine: American
Nutrition
- Serving Size: 1/6 of recipe
- Calories: 320
- Sugar: 28g
- Sodium: 210mg
- Fat: 14g
- Saturated Fat: 7g
- Unsaturated Fat: 6g
- Trans Fat: 0g
- Carbohydrates: 45g
- Fiber: 2g
- Protein: 4g
- Cholesterol: 35mg
Keywords: banana pudding, creamy dessert, easy dessert, no-bake dessert