You know those nights when you’re staring into the fridge, wondering what to make that’s quick, satisfying, and won’t leave you with a mountain of dishes? That’s exactly how my love affair with these crispy oven-baked quesadillas began. I was desperate for something easy, and let me tell you—this recipe saved dinner that night and countless times since.
These quesadillas are my secret weapon for busy weeknights and meal prep Sundays. The oven does all the work, giving you perfectly crispy tortillas without standing over a skillet. I love how flexible they are—throw in whatever veggies are lingering in your fridge, swap in leftover chicken or beans, and boom—dinner’s ready. Even my picky kids devour them, especially when I let them customize their own fillings. The best part? You get that irresistible crunch without the greasy mess of pan-frying. Trust me, once you try this method, you’ll never go back.
Why You’ll Love These Crispy Oven-Baked Quesadillas
Let me count the ways these quesadillas will become your new kitchen bestie:
- Crazy quick: From fridge to table in under 30 minutes – faster than takeout!
- No babysitting: Pop them in the oven while you toss together a salad or help with homework
- Endlessly customizable: Raid your fridge – those lonely bell peppers and leftover chicken finally have purpose
- That perfect crunch: Golden, crispy shells without greasy fingers (oven magic, I tell ya)
- Kid-approved: My littles go wild assembling their own – sneaky veggie inclusion totally works
Seriously, these quesadillas check all the boxes for busy households. The first time I made them, my husband kept asking “Wait, these are baked?!” That crispy texture fools everyone.
Ingredients for Crispy Oven-Baked Quesadillas
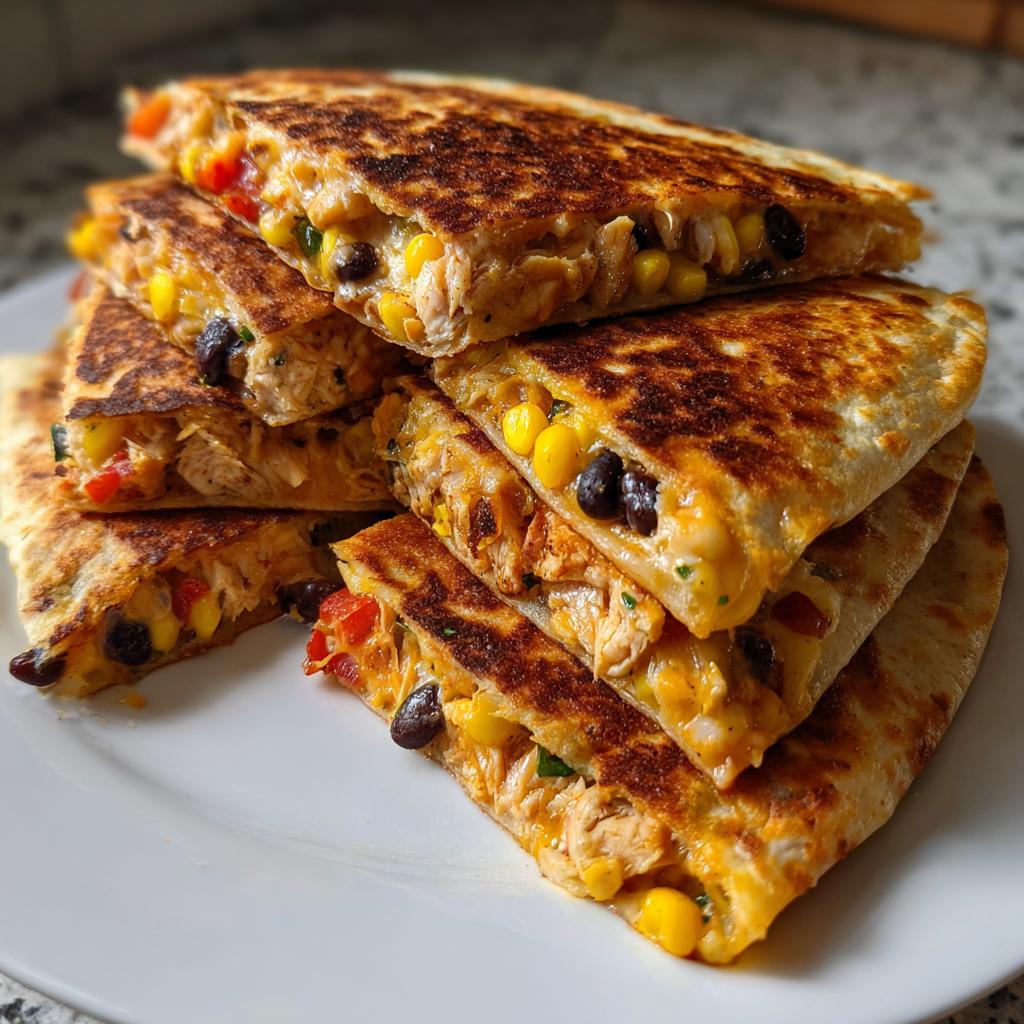
Here’s what you’ll need to make these magical, crispy delights. I’ve learned through trial and error – these ingredients create the perfect balance of flavor and crunch every time:
- 4 large flour tortillas (the burrito-size ones work best – they fold nicely)
- 1 cup shredded cheese (I use a mix of cheddar and Monterey Jack for maximum meltiness)
- 1/2 cup cooked chicken, diced (leftover rotisserie chicken is perfect here)
- 1/4 cup black beans, drained and rinsed (trust me, this adds great texture)
- 1/4 cup corn kernels (fresh, frozen, or canned all work)
- 1/4 cup diced bell peppers (I use whatever color I have – red adds nice sweetness)
- 1/4 cup diced onions (white or red both work beautifully)
- 1 tsp olive oil (for that perfect golden finish)
- 1/2 tsp cumin (my secret flavor booster)
- 1/2 tsp chili powder (adjust to your spice preference)
- Salt and pepper to taste (don’t skip this – it makes all the flavors pop!)
The best part? These are just suggestions – your fridge is the limit! I’ll share all my favorite variations later.
Equipment Needed for Crispy Oven-Baked Quesadillas
You probably already have everything you need for these quesadillas – that’s the beauty of this recipe! Here’s what I grab from my kitchen:
- Baking sheet (half-sheet size is perfect for 4 quesadillas)
- Parchment paper (no sticking and easy cleanup – my lazy hack!)
- Mixing bowl (any medium-sized bowl works for tossing fillings)
- Pastry brush (for that light olive oil coating – a spoon works in a pinch)
That’s it! No fancy gadgets needed, just basic kitchen essentials. Now let’s get cooking!
How to Make Crispy Oven-Baked Quesadillas
Ready to turn simple ingredients into crispy, melty magic? Follow these easy steps – I’ve made this recipe dozens of times, and these techniques never fail me. The secret is in the layering and that perfect bake!
Step 1: Preheat and Prep
First things first – fire up that oven! I set mine to 400°F (200°C) – hot enough to crisp everything beautifully without burning. While it heats, I line my baking sheet with parchment paper. This little trick prevents sticking (no scraping cheese off pans!) and makes cleanup a breeze. The parchment also helps the quesadillas crisp evenly – don’t skip this!
Step 2: Mix the Filling
Now for the fun part – the flavor party! In my favorite mixing bowl, I toss together the diced chicken, black beans, corn, bell peppers, and onions. Then comes my secret weapon – the spices! A generous sprinkle of cumin and chili powder transforms basic veggies into something special. I taste test here – sometimes I add a pinch more salt or an extra shake of chili if I’m feeling spicy. The filling should smell amazing already!
Step 3: Assemble the Quesadillas
Here’s where the magic happens. I place my tortillas on the prepared baking sheet and layer them like this: first, a blanket of cheese (this acts as the “glue”), then a scoop of that flavorful filling, and finally another cheese blanket to seal the deal. Pro tip: leave about half an inch border – this prevents oozing when you fold! Then comes the satisfying fold-over – I gently press down so everything sticks together. A quick brush of olive oil on top gives that gorgeous golden color we’re after.
Step 4: Bake to Crispy Perfection
Into the oven they go! After about 6 minutes, I peek in – you’ll see the cheese melting and the edges just starting to brown. This is when I carefully flip each quesadilla (use a wide spatula – melted cheese is sneaky!). Another 5-6 minutes and boom – crispy, golden perfection. If you want extra crunch, I sometimes broil for the last minute (but watch closely – they brown fast!). The telltale sign they’re done? That beautiful golden color and that irresistible crunch when you tap the top.
Tips for Perfect Crispy Oven-Baked Quesadillas
After making these dozens of times (sometimes desperately throwing them together!), I’ve picked up some foolproof tricks:
- Broil for the final minute – That extra blast of heat gives you next-level crunch (just don’t walk away!)
- Press the edges tight – Use a fork to crimp folded edges – keeps all that cheesy goodness inside
- Don’t overstuff – One heaping scoop per half is plenty – trust me, I’ve learned the messy way
- Room temp tortillas – Cold ones crack when folding – I leave mine out while preheating
- Rotate your pan – Ovens have hot spots – swapping positions halfway = even crispiness
My biggest lesson? Let them rest 2 minutes before cutting – molten cheese burns are no joke!
Variations for Crispy Oven-Baked Quesadillas
Oh, the possibilities! These quesadillas are like a blank canvas for your fridge clean-out creativity. Here are my favorite twists:
- Breakfast style: Scrambled eggs, crispy bacon, and cheddar – hello, brunch!
- Southwest kick: Swap chicken for seasoned ground beef and add pickled jalapeños
- Veggie-loaded: Mushrooms, zucchini, and spinach with pepper jack cheese
- Taco night remix: Leftover taco meat + crumbled cotija cheese
My rule? Whatever you’ve got, fold it in! Even leftover roasted veggies work beautifully. The oven transforms everything into crispy perfection.
Serving Suggestions for Crispy Oven-Baked Quesadillas
Oh, the dipping possibilities! I love setting up a little “quesadilla bar” with all my favorite sides – it makes dinner feel like a party. My go-to is fresh salsa and cool sour cream (the contrast with that crispy shell is everything). When I’m feeling fancy, I’ll whip up quick guacamole – the creamy avocado pairs perfectly with the melted cheese. For busy nights, a simple side salad dressed with lime juice balances everything out nicely. And here’s my secret – leftover quesadillas make amazing next-day lunches when packed with a little container of ranch for dipping!
Storage and Reheating Instructions
Here’s my foolproof system for keeping leftover quesadillas tasting fresh – because let’s be real, they rarely all get eaten in one sitting! I let them cool completely (hot quesadillas create steam = soggy sadness), then stack them between parchment paper in an airtight container. They’ll stay crispy-good for up to 3 days in the fridge.
When reheating, skip the microwave unless you want rubbery tortillas (been there!). Instead, I pop them back in a 350°F oven for 5-7 minutes or throw them in my toaster oven until the cheese gets melty again. For emergency snack attacks, a quick minute in a dry skillet revives that perfect crunch. Pro tip: If you’re meal prepping, assemble unbaked quesadillas and freeze between parchment – just add a few extra minutes when baking from frozen!
Nutritional Information
Okay, full transparency – I’m not a nutritionist, just a quesadilla enthusiast! These numbers are estimates based on my standard recipe with chicken and cheese. Your mileage may vary depending on tortilla brands or fillings. Each crispy quesadilla comes in around 280 calories – not bad for something this satisfying! The protein keeps you full, and hey, those veggies totally count. Remember, homemade always beats drive-thru!
Frequently Asked Questions About Crispy Oven-Baked Quesadillas
Over the years, I’ve gotten so many questions about these quesadillas – here are the ones that pop up most often:
Can I freeze these quesadillas? Absolutely! I freeze unbaked assembled quesadillas between parchment paper – just add 3-5 extra minutes when baking from frozen. Already baked ones reheat beautifully in the oven too.
Why are my quesadillas soggy? Usually from overstuffing or not getting them crispy enough initially. Stick to the recommended fillings amount and don’t skip that olive oil brush – it makes all the difference!
Can I use corn tortillas instead? You can, but they won’t get as crispy. Flour tortillas crisp up better in the oven – that’s why they’re my go-to.
How do I keep the fillings from falling out? The cheese layer “glue” is key! Also, press edges firmly before baking and don’t overfill. A fork crimp around the edges works wonders.
What’s the best cheese blend? I swear by my cheddar-Monterey Jack combo – great melt and flavor. But any good melting cheese works – even pepper jack for some heat!
Print
Crispy Oven-Baked Quesadillas – 30-Minute Family Favorite
- Total Time: 22 minutes
- Yield: 4 quesadillas 1x
- Diet: Vegetarian
Description
Crispy oven-baked quesadillas are a quick and easy meal, perfect for meal prep or family dinners. They’re packed with flavor and require minimal effort.
Ingredients
- 4 large flour tortillas
- 1 cup shredded cheese (cheddar or Monterey Jack)
- 1/2 cup cooked chicken, diced (optional)
- 1/4 cup black beans, drained and rinsed
- 1/4 cup corn kernels
- 1/4 cup diced bell peppers
- 1/4 cup diced onions
- 1 tsp olive oil
- 1/2 tsp cumin
- 1/2 tsp chili powder
- Salt and pepper to taste
Instructions
- Preheat oven to 400°F (200°C). Line a baking sheet with parchment paper.
- In a bowl, mix chicken, black beans, corn, bell peppers, onions, cumin, chili powder, salt, and pepper.
- Place tortillas on the baking sheet. Sprinkle half of each tortilla with cheese.
- Spoon the filling mixture over the cheese, then top with remaining cheese.
- Fold the tortillas in half, pressing lightly to seal.
- Brush the tops with olive oil for crispiness.
- Bake for 10-12 minutes, flipping halfway, until golden and crispy.
- Slice into wedges and serve with salsa or sour cream.
Notes
- Use any protein or veggies you prefer.
- For extra crispiness, broil for 1-2 minutes at the end.
- Store leftovers in an airtight container for up to 3 days.
- Prep Time: 10 minutes
- Cook Time: 12 minutes
- Category: Main Dish
- Method: Baking
- Cuisine: Mexican
Nutrition
- Serving Size: 1 quesadilla
- Calories: 280
- Sugar: 2g
- Sodium: 450mg
- Fat: 12g
- Saturated Fat: 5g
- Unsaturated Fat: 6g
- Trans Fat: 0g
- Carbohydrates: 30g
- Fiber: 3g
- Protein: 14g
- Cholesterol: 25mg
Keywords: easy quesadillas, baked quesadillas, meal prep, family dinner