Oh man, have I got the perfect solution for those “what should I make for dinner?” nights! This Ground Beef and Cheese Roll has saved my bacon more times than I can count. I first threw it together one desperate Tuesday when the kids were hangry and my fridge was looking bare – now it’s our go-to comfort food. What makes it magic? You probably have everything you need already, it comes together in under an hour, and that melty cheese center? Absolute perfection. My family goes wild for it every time – even my picky eater who normally turns up his nose at anything with “roll” in the name!
Why You’ll Love This Ground Beef and Cheese Roll
Listen, I know what you’re thinking – another ground beef recipe? But trust me, this one’s different. Here’s why it’ll become your new weeknight hero:
Quick and Easy
From fridge to table in 45 minutes flat – including that glorious resting time when you’re desperately trying not to sneak a slice early. Just mix, roll, bake, and boom! Dinner’s ready faster than takeout.
Family-Friendly
My kids call this “meat pizza rolls” because they go nuts for that ooey-gooey cheese center. The savory beef and melty cheese combo makes even vegetable-haters come running to the table. Pro tip: make two – leftovers disappear fast!
- Budget magic: Basic ingredients that won’t break the bank
- Freezer friendly: Make ahead for crazy nights
- Endless variations: Swap cheeses, add veggies, go wild!
Seriously, this roll checks all the boxes – easy, delicious, and something everyone actually wants to eat. What more could you ask for?
Ingredients for Ground Beef and Cheese Roll
Okay, let’s gather our goodies! The beauty of this recipe is how simple the ingredient list is – I bet you’ve got most of these hanging around already. But here’s the thing: choosing the right stuff makes all the difference between “meh” and “OHMYGOSH” results.
The Must-Haves
- 1 lb lean ground beef (85/15): I swear by this ratio – enough fat for flavor but not so much that you end up with a greasy mess. Trust me, I learned that the hard way!
- 1 cup packed shredded cheese: My go-to is sharp cheddar for that perfect tang, but mozzarella makes an epic melt if that’s your jam. None of that pre-shredded stuff though – those anti-caking agents? Total texture killers.
- 1/2 cup breadcrumbs: Plain or Italian-style both work great. No breadcrumbs? Crush up some crackers or toast – I won’t tell!
The Supporting Cast
- 1 large egg: Our glue that holds everything together. Room temp works best if you remember to take it out early (I never do).
- 1 tsp salt: Don’t skimp here – beef needs its flavor friend!
- 1/2 tsp black pepper: Freshly cracked if you’re fancy, but the stuff in the shaker works in a pinch.
- 1 tsp each garlic powder and onion powder: My secret flavor boosters. Granulated garlic and onion work too.
- 1 tbsp olive oil: Just enough to give our roll that gorgeous golden crust.
See? Nothing crazy! Now, if you’re feeling adventurous, wait till you see the fun swaps in the variations section. But first – let’s make magic with these basics.
How to Make Ground Beef and Cheese Roll
Okay, time for the fun part! Don’t let the “roll” part intimidate you – I promise it’s easier than it looks. Just follow these steps and you’ll have golden, cheesy perfection in no time. Ready? Let’s get rolling!
Step 1: Prep the Beef Mixture
First things first – preheat that oven to 375°F. While it’s heating up, let’s make magic happen in a big mixing bowl. Throw in your ground beef, breadcrumbs, egg, and all those yummy seasonings. Now here’s where muscle meets flavor – get in there with your hands and mix it all together!
Pro tip: Don’t be shy – you want everything evenly distributed. I usually mix for about 1-2 minutes until it looks like one happy, uniform meat mixture. Too dry? Add a splash of water. Too wet? A sprinkle more breadcrumbs. Easy peasy!
Step 2: Roll and Bake
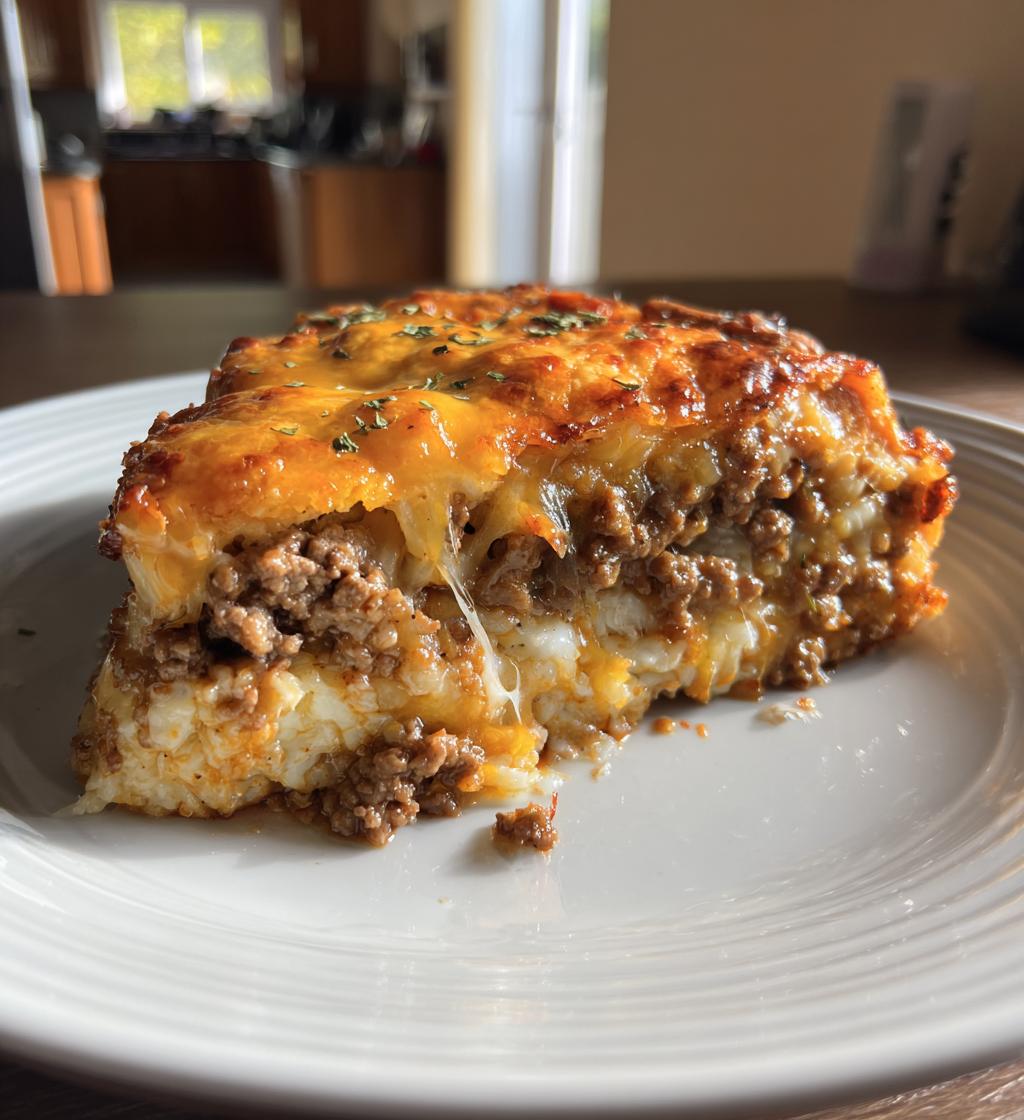
Now for the main event! Lay out a big piece of parchment paper (trust me, this makes cleanup a breeze). Plop your meat mixture in the center and press it into a rough rectangle shape – about 1/4 inch thick is perfect.
Sprinkle that glorious cheese evenly over the top, leaving about an inch bare around the edges. Then comes the fun part – using the parchment paper to help you, slowly roll it up like a jelly roll, pinching the ends closed as you go.
Gently transfer your masterpiece to a baking sheet (keep the parchment under it!), brush with olive oil, and pop it in the oven for 25-30 minutes. You’ll know it’s done when it’s beautifully browned and the internal temp hits 160°F.
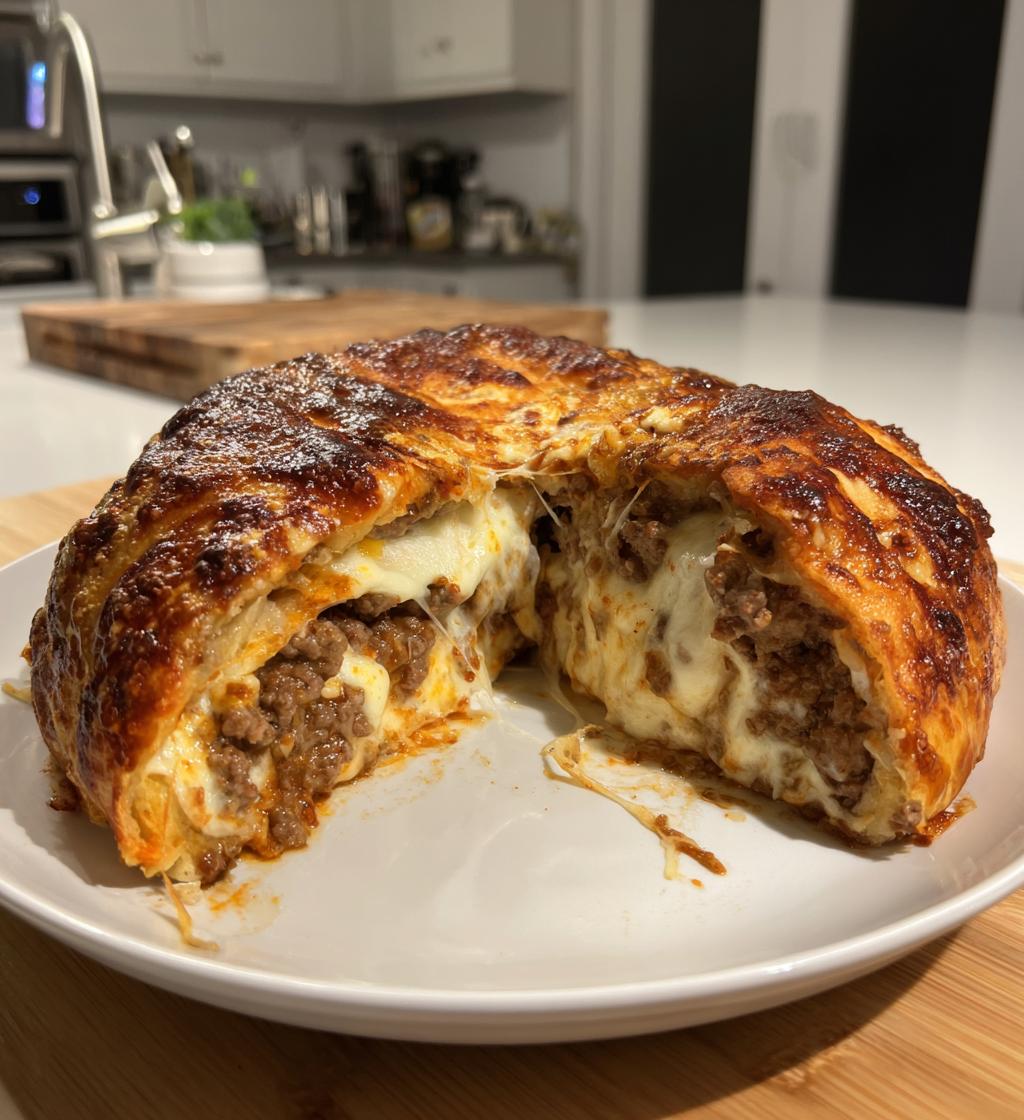
Critical last step: Let it rest for 5 minutes before slicing! I know, the smell will be killing you, but this keeps all that melty cheese from becoming a lava flow when you cut into it.
See? Told you it was easy! Now grab your knife, slice into those gorgeous spirals, and prepare for the compliments to roll in (pun totally intended).
Tips for the Perfect Ground Beef and Cheese Roll
Alright, let me spill my hard-earned secrets for making this Ground Beef and Cheese Roll absolutely foolproof. I’ve made every mistake possible so you don’t have to – from cheese explosions to sad, crumbling logs. Here’s what really makes the difference:
Parchment Paper is Your Best Friend
That first time I tried rolling directly on the counter? Disaster. Now I never skip the parchment paper – it makes rolling a breeze and keeps cleanup to literally zero. Bonus: you can use the same sheet to transfer your roll to the baking tray without it falling apart. Just fold the edges of the parchment over the roll and use them like handles to flip it onto the pan. Genius, right?
The Chill Factor
If you’ve got an extra 15 minutes (and willpower to wait), pop your assembled roll in the fridge before baking. This helps it hold its shape beautifully and gives the flavors a chance to get cozy. I call this my “cheater’s rest” when I’m feeling fancy. No time? No problem – it’ll still taste amazing!
Get Creative with Add-Ins
Once you’ve mastered the basic roll, the world’s your oyster! My family goes nuts when I mix in any of these:
- 1/2 cup sautéed mushrooms (chopped small so they roll nicely)
- A handful of fresh spinach (wilt it first and squeeze out excess water)
- 1 tbsp Worcestershire sauce mixed into the beef – total game changer!
The Cheese Safety Net
Here’s my sneaky trick: after sprinkling the main cheese layer, leave about two inches at one end bare. When you roll it up, that cheese-free edge seals perfectly – no leaks! Also, go light on the cheese near the ends (I know, it hurts) to prevent oozing during baking. Trust me, there’s still plenty of cheesy goodness in every bite.
Remember, even if your roll isn’t picture-perfect, it’ll still taste incredible. Some of my ugliest rolls have gotten the most compliments – proof that flavor always wins!
Serving Suggestions for Ground Beef and Cheese Roll
Now comes the best part – loading up your plate! This roll plays well with so many sides. My family loves it with a crisp green salad – the fresh crunch balances that rich, cheesy goodness perfectly. Roasted veggies (hello, garlicky green beans!) are another winner. And if you’re feeling saucy? A little warm marinara for dipping takes it next-level. Sometimes I’ll even slice the roll thick and pile it on toasted buns for killer sandwiches. Honestly? It’s so flavorful it shines all on its own too – no sides required!
Storing and Reheating Ground Beef and Cheese Roll
Here’s the good news – this roll keeps like a dream! I always make extras because (A) leftovers are life, and (B) the flavors actually get better as they mingle overnight. But you’ve got to store it right to keep that perfect texture.
Fridge Storage Tips
Once cooled, wrap your roll tightly in foil or pop it in an airtight container. It’ll stay fresh in the fridge for up to 3 days. Pro tip: slice it before storing if you want quick grab-and-go portions for lunches! Just layer parchment between slices to prevent sticking.
Freezer Magic
This recipe freezes beautifully for busy nights. Wrap individual slices or the whole roll in plastic wrap, then foil to prevent freezer burn. It’ll keep for 2-3 months. When hunger strikes? No need to thaw – just bake frozen slices at 350°F for 15-20 minutes until heated through.
Reheating Like a Pro
Microwaving works in a pinch, but for that just-baked quality? Oven’s the way to go! Place slices or the whole roll on a baking sheet at 325°F for about 10 minutes. Cover loosely with foil to prevent drying out. The cheese gets melty again while the edges crisp up beautifully – almost better than the first time around!
Need it faster? My emergency method is the toaster oven – gives you that crispness without heating up the whole kitchen. Whatever you do, don’t skip the quick spray of oil before reheating – it makes all the difference between “meh” and “Mmm!”
Ground Beef and Cheese Roll Variations
Okay, let’s get creative! Once you’ve mastered the basic roll (which is amazing on its own), it’s time to play with flavors. These variations have all been kitchen-tested in my house – some became such hits they got promoted to regular rotation status! Here are my favorite ways to mix things up:
The Italian Stallion
Swap out half the ground beef for Italian sausage (remove casings first). Mix in 1/4 cup sun-dried tomatoes (chopped) and 2 tbsp grated Parmesan with the cheese layer. Finish with a sprinkle of Italian seasoning on top before baking. Serve with warm marinara for dipping – instant comfort food magic!
Mexican Fiesta Roll
Replace cheddar with pepper jack cheese and mix 1 tbsp taco seasoning into the beef. For extra fun, add 1/4 cup black beans (rinsed and mashed slightly) and 2 tbsp diced green chiles. After baking, top with fresh pico de gallo and a dollop of sour cream. Ole!
Turkey & Spinach Lightened-Up Version
For a leaner option, use ground turkey instead of beef. The trick? Mix in 1 tbsp olive oil to keep it moist. I love adding 1/2 cup cooked spinach (squeezed dry) and some crumbled feta cheese – makes it feel fancy without much extra work. Bonus: my veggie-resistant kids never notice the greens!
Everything Bagel Luxury Roll
This is my brunch special! Replace breadcrumbs with everything bagel seasoning (about 2 tbsp). Use a mix of cream cheese and shredded Swiss for the filling – spread the cream cheese thinly before sprinkling with Swiss. Top the baked roll with more everything seasoning and serve with garlic aioli. Trust me, it’s addicting!
The best part? Once you get comfortable, you’ll start inventing your own combos. My neighbor adds roasted red peppers and goat cheese – heavenly! The possibilities are endless when you’ve got this basic technique down.
Ground Beef and Cheese Roll Nutrition
Now, I’m no dietitian, but I know we all like to have a general idea of what we’re eating. These numbers are estimates based on the basic recipe – your actual nutrition may vary depending on the exact ingredients you use. (Like when I go wild with extra cheese… no judgment!)
Here’s the breakdown per serving (assuming you slice that beautiful roll into 4 generous portions):
- Calories: About 320 per slice
- Protein: 25g – great for keeping you full!
- Fat: 20g (8g saturated, 10g unsaturated)
- Carbs: 10g with 1g fiber
- Sugar: Just 1g naturally occurring
- Sodium: Around 450mg
- Cholesterol: 90mg
Want to lighten it up? Try using 93% lean ground beef or turkey, reduced-fat cheese, or skipping the breadcrumbs (though texture will change). But honestly? Life’s too short to always count every calorie – sometimes you just need that melty cheese moment!
FAQs About Ground Beef and Cheese Roll
I’ve gotten so many questions about this Ground Beef and Cheese Roll over the years – seems like everyone wants to make it their own way! Here are the most common ones I hear, plus my hard-earned kitchen wisdom:
Can I freeze the Ground Beef and Cheese Roll?
Absolutely! That’s one of my favorite things about this recipe. You’ve got two great options: freeze the whole baked roll (cool completely first!) or slice it before freezing. Either way, wrap it tightly in plastic wrap then foil to prevent freezer burn. It’ll keep beautifully for 2-3 months. When you’re ready, bake frozen slices at 350°F for 15-20 minutes – no thawing needed!
What cheese works best for the filling?
Oh boy, where do I start? My go-to is sharp cheddar for that perfect tang, but honestly, almost any melty cheese works. Mozzarella gives you that stretchy, gooey factor, while pepper jack adds a nice kick. Feeling fancy? Try Gruyère or Swiss for extra depth. Just avoid super dry cheeses like Parmesan for the filling – they don’t melt well. Pro tip: shred your own cheese! The pre-shredded stuff has anti-caking agents that can make the texture grainy.
Can I use something besides ground beef?
You sure can! Ground turkey or chicken work great (add a bit more seasoning and maybe a splash of olive oil to keep it moist). For a pork twist, try ground sausage – Italian or breakfast style both rock. My vegetarian friends even substitute plant-based ground “meat” with excellent results. The key is keeping that 1:1 ratio and adjusting seasonings to match your protein.
Why does my roll sometimes fall apart when slicing?
Ah, the heartbreak of a crumbly roll! Two likely culprits: not enough binding (egg/breadcrumbs) or cutting too soon. Make sure you’re using a large egg and full 1/2 cup breadcrumbs. And that 5-minute rest after baking? Non-negotiable – it lets everything set up properly. If you’re still having trouble, try chilling the baked roll for 15 minutes before slicing. Works like magic!
Can I make this ahead for parties?
Yes! This is my secret weapon for entertaining. You can assemble the raw roll up to a day ahead – just wrap tightly and refrigerate until baking time (add 5-10 minutes to cook time since it’s cold). Or bake it fully, slice, and reheat when guests arrive. Either way, you’ll look like a kitchen rock star with minimal last-minute fuss!
Got more questions? Hit me up – I could talk about this roll all day! The beauty is how adaptable it is, so don’t be afraid to experiment until you find your perfect version.
Print
Savory Ground Beef and Cheese Roll: 5-Star Family Favorite!
- Total Time: 45 minutes
- Yield: 4 servings 1x
- Diet: Low Lactose
Description
A savory dish with ground beef and cheese rolled into a delicious, easy-to-make meal.
Ingredients
- 1 lb ground beef
- 1 cup shredded cheese (cheddar or mozzarella)
- 1/2 cup breadcrumbs
- 1 egg
- 1 tsp salt
- 1/2 tsp black pepper
- 1 tsp garlic powder
- 1 tsp onion powder
- 1 tbsp olive oil
Instructions
- Preheat oven to 375°F.
- Mix ground beef, breadcrumbs, egg, salt, pepper, garlic powder, and onion powder in a bowl.
- Spread the mixture into a thin layer on parchment paper.
- Sprinkle shredded cheese evenly over the beef mixture.
- Roll tightly into a log shape.
- Brush with olive oil and place on a baking sheet.
- Bake for 25-30 minutes until cooked through.
- Let rest for 5 minutes before slicing.
Notes
- Use lean ground beef for best results.
- Experiment with different cheese types for variety.
- Serve with a side of marinara sauce if desired.
- Prep Time: 15 minutes
- Cook Time: 30 minutes
- Category: Main Dish
- Method: Baking
- Cuisine: American
Nutrition
- Serving Size: 1 slice
- Calories: 320
- Sugar: 1g
- Sodium: 450mg
- Fat: 20g
- Saturated Fat: 8g
- Unsaturated Fat: 10g
- Trans Fat: 0g
- Carbohydrates: 10g
- Fiber: 1g
- Protein: 25g
- Cholesterol: 90mg
Keywords: ground beef, cheese roll, easy dinner, baked dish