
There’s something truly magical about heart-shaped desserts, isn’t there? Whether it’s Valentine’s Day, an anniversary, or just a sweet surprise for someone you love, these delightful treats bring a smile to faces and warmth to hearts. I mean, who can resist a beautifully crafted heart-shaped cake that’s not only delicious but also so charming? It’s like giving a little slice of love. I often find myself whipping up these sweet goodies just to brighten someone’s day, and trust me, they never fail to impress! The best part? They’re surprisingly easy to make, and this recipe will guide you step-by-step to create your very own heart-shaped chocolate cake that’s perfect for any occasion. You’ll be amazed at how quickly you can turn simple ingredients into a stunning dessert that looks as good as it tastes. So grab your apron, let’s dive into the joy of baking, and make some heart-shaped desserts that are sure to leave everyone wanting more!
Ingredients List
To make the most delicious heart-shaped desserts, you’ll need the following ingredients:
- 1 cup all-purpose flour
- 1/2 cup unsweetened cocoa powder
- 1 cup sugar
- 2 large eggs
- 1/2 cup butter, melted
- 1 teaspoon vanilla extract
- 1/2 teaspoon baking powder
- 1/4 teaspoon salt
Make sure to use fresh ingredients for the best flavor and texture! I always find that using high-quality cocoa powder really elevates the taste of my heart-shaped desserts. And don’t skimp on the butter—real butter gives that rich, melt-in-your-mouth goodness that everyone loves. Now that you have your ingredients ready, let’s get baking!
How to Prepare Heart-Shaped Desserts
Preheat and Prepare
First things first! Preheat your oven to 350°F (175°C). This step is crucial because it ensures that your heart-shaped desserts bake evenly and rise beautifully. While the oven is warming up, grab your heart-shaped baking pan and grease it well. I like to use a little melted butter or cooking spray to make sure the cake slides out effortlessly once it’s baked. Don’t skip this part; nobody wants a dessert stuck in the pan, right?
Mix Dry Ingredients
Now, let’s get our dry ingredients ready! In a large mixing bowl, combine 1 cup of all-purpose flour, 1/2 cup of unsweetened cocoa powder, 1 cup of sugar, 1/2 teaspoon of baking powder, and 1/4 teaspoon of salt. Whisk them together thoroughly, so the baking powder disperses evenly. This step will help your heart-shaped cake rise perfectly and have that rich chocolate flavor we’re aiming for. Trust me, the smell of cocoa will already start to make your kitchen feel cozy!
Combine Wet Ingredients
In a separate bowl, it’s time to whisk together your wet ingredients. Crack open the 2 large eggs, add in the 1/2 cup of melted butter, and pour in 1 teaspoon of vanilla extract. Whisk everything until it’s well combined and a little frothy. This step is super important because it helps to create a lovely texture in your cake. You want to make sure the eggs are fully blended in; this will create that moist, tender crumb we all love!
Combine Mixtures
Now comes the fun part—combining the wet and dry ingredients! Pour the wet mixture into the bowl with the dry ingredients. Gently fold everything together until you have a smooth batter. Don’t overmix; just stir until you see no more dry flour. A few small lumps are totally okay! This helps keep the cake light and fluffy, which is just what we want for our heart-shaped desserts.
Pour and Bake
Once your batter is ready, it’s time to pour it into the prepared heart-shaped pan. Use a spatula to scrape down the sides of the bowl and make sure you get every last drop of that delicious batter in there. Smooth out the top with the spatula for an even bake. Slide your pan into the preheated oven and bake for about 25-30 minutes. To check for doneness, insert a toothpick into the center—if it comes out clean or with a few moist crumbs, you’re all set!
Cooling and Serving
After baking, carefully remove the pan from the oven and let it cool for about 10-15 minutes. This waiting period is essential as it helps the cake firm up a bit. Once it’s cool enough to handle, gently invert the pan onto a wire rack to let it cool completely. When you’re ready to serve, you can dust it with powdered sugar or drizzle it with chocolate ganache for that extra touch of love. Honestly, it looks stunning either way, and I guarantee it’ll be a hit at any occasion!
Why You’ll Love This Recipe
- Quick and Easy: With just 15 minutes of prep time and 30 minutes in the oven, you can whip up these heart-shaped desserts in no time!
- Perfect for Romantic Occasions: Whether it’s a special dinner, Valentine’s Day, or an anniversary, these delightful treats are sure to impress your loved ones.
- Deliciously Chocolatey: The rich cocoa flavor makes every bite a heavenly experience, satisfying any chocolate lover’s cravings.
- Customizable: You can easily add your favorite flavors or toppings, like fruit, nuts, or whipped cream, to make it uniquely yours!
- Fun to Decorate: Let your creativity shine! Dust with powdered sugar or drizzle with ganache to make these desserts even more visually appealing.
- Great for Sharing: This recipe yields 8 servings, making it perfect for sharing with friends and family or enjoying a slice yourself!
Tips for Success
To ensure your heart-shaped desserts come out perfectly every time, I’ve got some handy tips that will make your baking experience smoother and more enjoyable:
- Measure Accurately: Baking is all about precision, so make sure to measure your ingredients accurately. Use the spoon and level method for flour—spoon it into the measuring cup, then level it off with a knife. This helps avoid a dense cake!
- Room Temperature Ingredients: For the best results, let your eggs and melted butter come to room temperature before mixing. This helps them blend more easily, resulting in a smoother batter and a fluffier cake.
- Don’t Overmix: When combining your wet and dry ingredients, mix just until combined. Overmixing can develop gluten in the flour, leading to a tougher texture. A few lumps in the batter are perfectly fine!
- Check Your Oven Temperature: Ovens can vary in temperature, so it’s wise to use an oven thermometer if you have one. This helps ensure your heart-shaped desserts bake evenly and prevents under or overbaking.
- Cool Completely: Allow your dessert to cool fully before decorating or slicing. This prevents the cake from crumbling apart and gives you clean slices for a beautiful presentation.
- Experiment with Flavors: Don’t be afraid to add a personal touch! Consider incorporating spices like cinnamon or a splash of espresso powder to enhance the chocolate flavor. It’s a great way to make the recipe your own!
- Storage Tips: If you have leftovers (which is rare, but it happens!), store them in an airtight container at room temperature for up to three days. They’ll stay soft and delicious!
With these tips in your back pocket, you’ll be a pro at making heart-shaped desserts that not only look stunning but taste absolutely divine. Happy baking!
Variations
The beauty of heart-shaped desserts lies not just in their shape but in how versatile they can be! Once you get the hang of this chocolate base, feel free to get creative and mix things up. Here are some fun variations to try:
- Flavored Extracts: Swap out the vanilla extract for almond or coconut extract for a different flavor profile. Just a teaspoon will give the cake a lovely twist!
- Fruit Add-ins: Consider folding in some fresh raspberries, chopped strawberries, or even cherries into the batter. They’ll add a burst of flavor and a pop of color that looks gorgeous once baked.
- Nuts for Crunch: If you enjoy a bit of texture, try adding some chopped walnuts or pecans into the batter. They’ll provide a delightful crunch that contrasts beautifully with the soft cake.
- Minty Freshness: For a refreshing twist, add a few drops of peppermint extract to the batter. You could even top the cooled cake with a mint chocolate ganache for a delightful mint-chocolate experience!
- Spiced Chocolate Cake: Amp up the flavor with a teaspoon of cinnamon or nutmeg. It adds a warm spice that pairs wonderfully with the chocolate and makes it perfect for cozy gatherings.
- Layered Cake: If you’re feeling ambitious, consider making two heart-shaped layers and stacking them with whipped cream or your favorite frosting in between. It transforms your dessert into a stunning layer cake!
- Gluten-Free Option: Substitute the all-purpose flour with a gluten-free blend that works cup-for-cup. It’s a simple swap that ensures everyone can enjoy these heart-shaped delights!
These variations not only let you personalize your heart-shaped desserts but also make them even more special for every occasion. So go ahead, let your creativity shine, and have fun experimenting with flavors and textures. I can’t wait to hear what delicious combinations you come up with!
Storage & Reheating Instructions
Now that you’ve created these delightful heart-shaped desserts, it’s important to know how to store them properly to keep that deliciousness intact! Here’s what you need to do:
- Storing Leftovers: If you happen to have any leftovers (which is rare, but it happens!), let the heart-shaped desserts cool completely before storing. Place them in an airtight container and keep them at room temperature. They’ll stay soft and tasty for up to three days. If you want to keep them longer, you can refrigerate them, but I recommend bringing them back to room temperature before serving to enjoy the best flavor and texture.
- Freezing for Later: If you want to save some for a special occasion, these heart-shaped desserts freeze beautifully! Wrap them tightly in plastic wrap and then place them in a freezer-safe bag or container. They can be frozen for up to three months. When you’re ready to enjoy them, simply thaw them in the refrigerator overnight and bring them to room temperature before serving.
- Reheating Instructions: If you prefer your desserts warm, you can gently reheat them in the oven or microwave. For the oven, preheat it to 300°F (150°C) and place the heart-shaped dessert on a baking sheet for about 10-15 minutes, or until warmed through. If you’re using the microwave, heat in short bursts of about 10-15 seconds until just warm—be careful not to overdo it, as the cake can become dry.
With these storage and reheating tips, you can savor your heart-shaped desserts long after they come out of the oven! Enjoy every last bite!
Nutritional Information
Understanding the nutritional details of your heart-shaped desserts can be helpful, especially if you’re watching your intake or just curious about what’s in your delicious creation! Below is the estimated nutritional data based on a serving size of one slice. Keep in mind that these values are estimates and can vary based on ingredient brands and exact measurements:
- Calories: 250
- Total Fat: 10g
- Saturated Fat: 6g
- Trans Fat: 0g
- Cholesterol: 70mg
- Sodium: 150mg
- Total Carbohydrates: 35g
- Dietary Fiber: 2g
- Sugar: 20g
- Protein: 4g
This heart-shaped dessert is indulgent yet balanced, making it a delightful treat for any occasion. Whether you’re enjoying it at a romantic dinner or sharing it with friends, it’s nice to have an idea of what you’re savoring. Enjoy every delicious bite!
Share Your Thoughts
I’d love to hear from you! Have you tried making these heart-shaped desserts? What did you think? Whether you followed the recipe to a tee or added your own twist, your feedback really matters to me. Did you decorate yours with powdered sugar, or did you go all out with chocolate ganache? Every little detail makes a difference, and I’m always eager to learn from your baking adventures!
If you have any tips, tricks, or creative variations that made your heart-shaped desserts extra special, please share them in the comments below. I believe that cooking is all about sharing and connecting, so let’s inspire each other in this delicious journey! Can’t wait to see what you come up with!
Print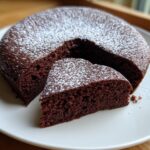
Heart-shaped desserts: 7 Sweet Ways to Spread Love
- Total Time: 45 minutes
- Yield: 8 servings 1x
- Diet: Vegetarian
Description
Delicious heart-shaped desserts perfect for any occasion.
Ingredients
- 1 cup all-purpose flour
- 1/2 cup unsweetened cocoa powder
- 1 cup sugar
- 2 large eggs
- 1/2 cup butter, melted
- 1 teaspoon vanilla extract
- 1/2 teaspoon baking powder
- 1/4 teaspoon salt
Instructions
- Preheat your oven to 350°F (175°C).
- Grease a heart-shaped baking pan.
- In a bowl, mix flour, cocoa powder, sugar, baking powder, and salt.
- In another bowl, whisk eggs, melted butter, and vanilla.
- Combine wet and dry ingredients and mix until smooth.
- Pour batter into the prepared pan.
- Bake for 25-30 minutes.
- Let cool before serving.
Notes
- You can decorate with powdered sugar or chocolate ganache.
- Store leftovers in an airtight container.
- This recipe can be doubled for larger gatherings.
- Prep Time: 15 minutes
- Cook Time: 30 minutes
- Category: Dessert
- Method: Baking
- Cuisine: American
Nutrition
- Serving Size: 1 slice
- Calories: 250
- Sugar: 20g
- Sodium: 150mg
- Fat: 10g
- Saturated Fat: 6g
- Unsaturated Fat: 4g
- Trans Fat: 0g
- Carbohydrates: 35g
- Fiber: 2g
- Protein: 4g
- Cholesterol: 70mg
Keywords: Heart-shaped desserts, chocolate cake, Valentine's Day, romantic desserts