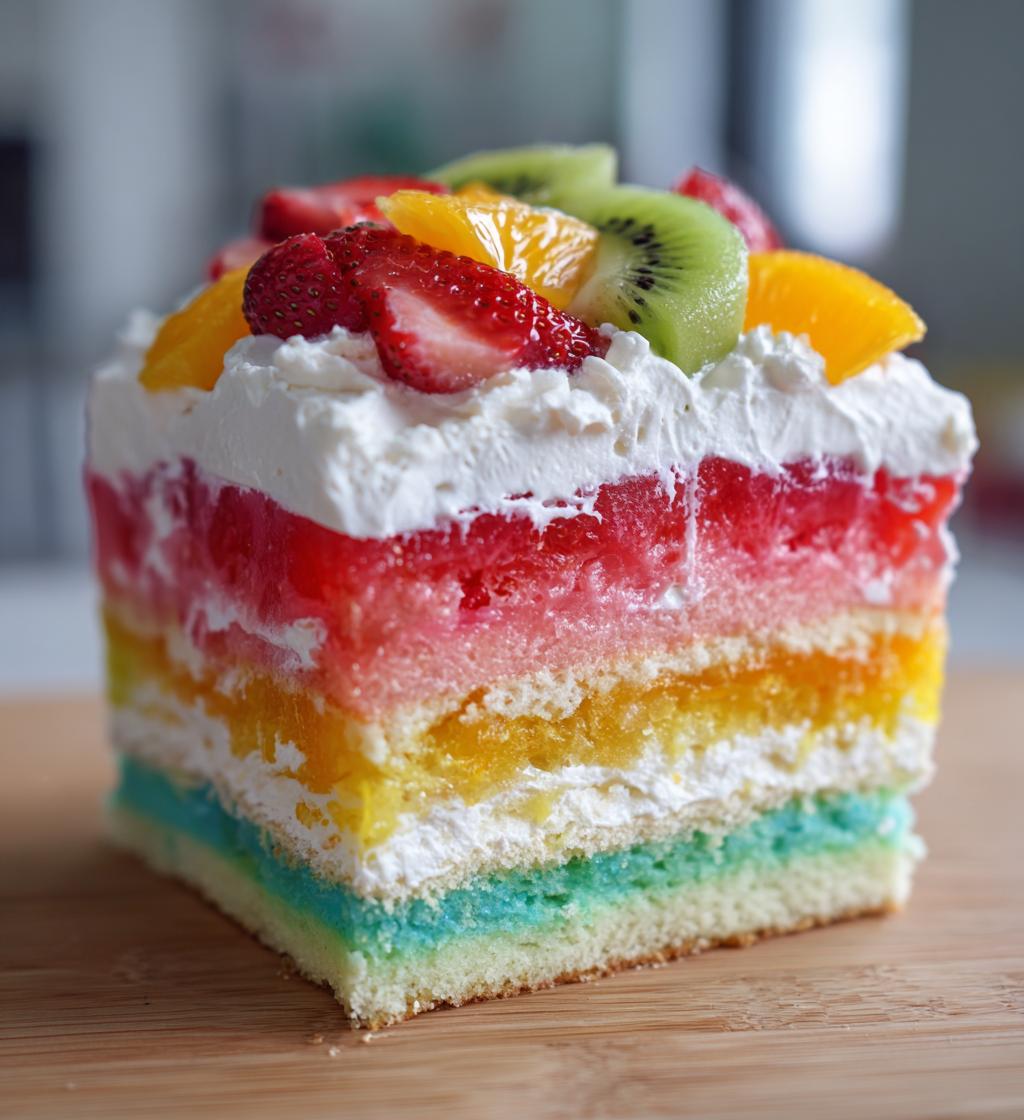
Oh my goodness, let me tell you about the magic of a jello poke cake! It’s like a party in your mouth with every bite. Seriously, nothing screams “refreshing summer dessert” quite like this colorful beauty. The way the jello seeps into the cake creates these delightful little pockets of flavor that just burst when you take a bite. And then, topping it all off with a fluffy layer of cool whip? Wow! It’s like a cloud of happiness on your plate.
Every time I make this cake, it takes me back to warm family gatherings where laughter filled the air, and desserts were the highlight of the day. I remember one summer picnic, I made this jello poke cake, and my cousin couldn’t stop raving about it! He said it reminded him of his childhood birthday parties, and honestly, that’s what makes this dessert so special—its ability to create memories. It’s simple, delicious, and absolutely perfect for any occasion. Trust me, once you try this jello poke cake recipe with cool whip, you’ll be hooked!
Ingredients for Jello Poke Cake Recipe Cool Whip
To whip up this delightful jello poke cake, you’ll need just a handful of simple ingredients! Here’s what you’ll need:
- 1 box of vanilla cake mix
- 3 large eggs
- 1 cup water
- 1 cup jello (any flavor of your choice)
- 1 cup boiling water
- 1 container of cool whip (8 oz)
- Fresh fruit for topping (optional, but highly recommended for that extra pop!)
Make sure to grab your favorite jello flavor because that’s where the fun begins! Whether you go for classic strawberry, vibrant blue raspberry, or even zesty lemon, each choice will give this cake its unique flair. Enjoy gathering these ingredients; the magic is about to happen!
How to Prepare Jello Poke Cake Recipe Cool Whip
Alright, let’s dive into making this fantastic jello poke cake! I promise, you’ll be amazed at how simple it is to create this colorful masterpiece. Follow these steps closely, and you’ll have a showstopper dessert in no time!
Preheat the Oven
First things first—preheat your oven to 350°F (175°C). This step is super important because it ensures your cake bakes evenly. You want that oven nice and toasty when your batter goes in, so don’t skip this part!
Prepare the Cake Batter
Now, grab your mixing bowl, and let’s get to work on that cake batter! Follow the instructions on the vanilla cake mix box. Usually, it involves mixing the cake mix with 3 large eggs and 1 cup of water until everything is smooth and well combined. I like to use a hand mixer for this part; it really makes it light and fluffy. Just make sure you scrape down the sides of the bowl to get every bit mixed in. Once it’s ready, you’ll have a lovely, creamy batter!
Bake the Cake
Pour the batter into a greased 9×13 inch baking pan. Pop it in the oven and let it bake for about 25-30 minutes. You’ll know it’s done when a toothpick inserted into the center comes out clean. I always recommend checking at the 25-minute mark, just to be safe. While it’s baking, your kitchen will start smelling heavenly!
Poke and Add Jello
Once the cake is out of the oven, let it cool for about 10 minutes. This is critical! Then grab a fork and poke holes all over the top of the cake—don’t be shy! You want those holes to be deep enough to hold all that delicious jello. Now, mix your jello powder with 1 cup of boiling water in a separate bowl, stirring until it’s completely dissolved. Pour the jello mixture over the cake, making sure to fill in all the holes. Watch as it seeps in—this is where the magic happens!
Refrigerate and Top with Cool Whip
Next, it’s time for the cake to chill out in the refrigerator for at least 2 hours. But if you can manage to let it sit overnight, you’ll be rewarded with even more flavor! Once it’s chilled, spread that fluffy cool whip all over the top. It’s like putting the perfect blanket on your cake! Feel free to add fresh fruit on top for a pop of color and extra yumminess. Then, slice it up, serve, and watch everyone fall in love with this delightful treat!
Tips for Success
Let’s make sure your jello poke cake turns out absolutely perfect, shall we? Here are some tried-and-true tips that I’ve gathered from my own baking adventures, plus a few common pitfalls to avoid:
Use Fresh Ingredients
Always check the expiration dates on your cake mix and jello. Fresh ingredients lead to better flavor and texture. Trust me, there’s nothing worse than realizing your jello’s been sitting in the pantry for ages—yikes!
Don’t Rush the Cooling Process
Let your cake cool for a full 10 minutes before poking holes. If you poke too soon, the cake might crumble when you try to lift it out of the pan. Patience is key here! You want that cake to cool enough so it can hold its shape while still allowing the jello to seep in.
Be Generous with the Poking
When you’re poking those holes, don’t hold back! Aim for a good number of holes all over the cake. Each hole should be deep enough to catch that sweet jello goodness. If you don’t poke enough, the jello won’t soak in properly, and you’ll miss out on that burst of flavor in each bite.
Customize Your Jello
Feel free to experiment with different jello flavors! You can mix and match to create fun combinations. Just remember to think about how the flavors will blend with the cake. For instance, tropical flavors like pineapple or orange can make for a refreshing twist!
Let It Chill
The longer you let your cake chill, the better it tastes! If you can, prepare it a day ahead of time. The flavors meld beautifully, and the cake becomes extra moist and delicious. Plus, it gives you one less thing to worry about on the day of your gathering!
Watch the Serving Temperature
Serve your jello poke cake nice and cold! It’s the perfect refreshing dessert, especially on a hot day. If it’s been sitting out for a while, pop it back in the fridge to keep that cool whip fluffy and the cake lovely and chilled.
By keeping these tips in mind, you’re sure to impress everyone with your jello poke cake! Happy baking, and enjoy every colorful, delicious bite!
Variations of Jello Poke Cake Recipe Cool Whip
Now that you’ve mastered the classic jello poke cake with cool whip, let’s have some fun with variations! This dessert is so versatile that you can switch things up to match your taste or the occasion. Here are some ideas to get those creative juices flowing:
Flavor Swaps
First up, let’s talk about jello flavors! While strawberry and raspberry are crowd-pleasers, don’t be afraid to try something different. Lime jello adds a refreshing twist that pairs wonderfully with the vanilla cake. Or how about blue raspberry for a vibrant, eye-catching cake? If you’re feeling adventurous, mix two flavors for a fun ombre effect!
Creamy Fillings
For an added layer of yumminess, consider adding a creamy filling between the cake and the cool whip! A layer of vanilla pudding or lemon curd works beautifully. Just spread it on top of the jello-soaked cake before adding the cool whip. It adds a delicious surprise that will wow your guests!
Fruit Add-Ins
Fresh fruit can elevate your jello poke cake to a whole new level! Try stirring in some chopped strawberries, blueberries, or even diced peaches into the jello mixture before pouring it over the cake. As the cake chills, the fruit adds bursts of flavor, making each bite even more delightful!
Garnishes Galore
When it comes to toppings, the sky’s the limit! While cool whip is a classic choice, you might consider drizzling some chocolate sauce or caramel over the top for added decadence. Toasted coconut or crushed nuts sprinkled on top provide an extra crunch that contrasts nicely with the fluffy cool whip.
Themed Variations
If you’re hosting a party, think about creating themed jello poke cakes! For a summer BBQ, use watermelon jello and top it with fresh fruit like strawberries and kiwi. For a festive touch during the holidays, go for cranberry jello and garnish with pomegranate seeds for a beautiful presentation!
With these variations, you can make the jello poke cake your own and impress everyone with your creativity. Enjoy experimenting, and remember, the best part is sharing your delicious creations with loved ones. Happy baking!
Nutritional Information Disclaimer
Just a little heads up! The nutritional information provided for this jello poke cake recipe with cool whip may vary based on the specific ingredients and brands you choose to use. While I strive to give accurate estimates, it’s important to remember that different products can have different nutritional values. So, feel free to calculate based on your own ingredients for a more precise breakdown. Happy baking and enjoy every delicious bite without worries!
FAQ About Jello Poke Cake Recipe Cool Whip
Got questions about the jello poke cake? Don’t worry, I’ve got you covered! Here are some common queries I’ve encountered, along with my trusty answers to help you out:
How do I store leftover jello poke cake?
To keep your jello poke cake fresh, store it in the refrigerator, covered with plastic wrap or in an airtight container. It should last for about 3-4 days, but I doubt it’ll last that long with how delicious it is! Just remember to keep it chilled until you’re ready to serve.
Can I make substitutions in this recipe?
Absolutely! This recipe is super flexible. You can swap the vanilla cake mix for a lemon or almond-flavored mix for a twist. As for the jello, feel free to experiment with any flavor you love! Just keep in mind that each flavor will bring its own unique taste to the cake.
How do I serve the cake?
When it’s time to serve, slice the cake into squares and place them on dessert plates. I love adding a dollop of extra cool whip on top for a little flair, and if you’ve got fresh fruit, toss a few pieces on there too! For the best experience, serve it chilled; it’s the ultimate refreshing treat!
Can I make this cake ahead of time?
You bet! In fact, making it a day in advance is even better. Letting it sit overnight allows all those amazing jello flavors to soak in, making it even more delicious. Just remember to keep it stored in the fridge until you’re ready to serve.
What if I don’t have a 9×13 inch pan?
No worries! You can use any baking dish you have on hand. Just keep in mind that if you use a different size or shape, the baking time may vary. Just keep an eye on it and do the toothpick test to check for doneness.
That should cover most of your questions! If you think of anything else, don’t hesitate to reach out. I’m always here to help you create the best jello poke cake ever!
Why You’ll Love This Recipe
- Quick and Easy: This jello poke cake recipe is a breeze to whip up! With just a few simple steps, you can have a stunning dessert ready in no time.
- Refreshing Delight: The combination of moist cake and flavorful jello makes each bite a refreshing treat, perfect for warm days or any gathering.
- Customizable: With endless jello flavors and topping options, you can easily tailor this cake to suit any occasion or personal taste!
- Family-Friendly: Kids and adults alike will love this colorful dessert, making it a hit for birthday parties, picnics, or holiday celebrations.
- Make-Ahead Friendly: This cake gets even better after chilling, so you can prepare it ahead of time and let it sit in the fridge until you’re ready to serve.
- Visually Stunning: The vibrant colors of the jello and the fluffy cool whip topping create a beautiful presentation that will impress your guests.

Jello Poke Cake Recipe Cool Whip: 5 Steps to Blissful Delight
- Total Time: 2.5 hours
- Yield: 12 servings 1x
- Diet: Vegetarian
Description
A refreshing jello poke cake topped with cool whip.
Ingredients
- 1 box of vanilla cake mix
- 3 large eggs
- 1 cup water
- 1 cup jello (any flavor)
- 1 cup boiling water
- 1 container cool whip (8 oz)
- Fresh fruit for topping (optional)
Instructions
- Preheat your oven to 350°F (175°C).
- Prepare the vanilla cake mix according to package instructions.
- Pour the batter into a greased 9×13 inch baking pan.
- Bake for 25-30 minutes or until a toothpick comes out clean.
- Allow the cake to cool for 10 minutes.
- Poke holes in the cake using a fork.
- Mix jello powder with boiling water until dissolved.
- Pour the jello mixture over the cake, filling the holes.
- Refrigerate the cake for at least 2 hours.
- Spread cool whip over the top of the cake.
- Top with fresh fruit if desired.
- Slice and serve chilled.
Notes
- Choose your favorite jello flavor for variety.
- Let the cake chill overnight for the best flavor.
- Store leftovers in the refrigerator.
- Prep Time: 20 minutes
- Cook Time: 30 minutes
- Category: Dessert
- Method: Baking
- Cuisine: American
Nutrition
- Serving Size: 1 piece
- Calories: 250
- Sugar: 22g
- Sodium: 200mg
- Fat: 8g
- Saturated Fat: 4g
- Unsaturated Fat: 3g
- Trans Fat: 0g
- Carbohydrates: 38g
- Fiber: 0g
- Protein: 2g
- Cholesterol: 50mg
Keywords: jello poke cake recipe cool whip