Oh, let me tell you about the magic of jello poke cakes! These delightful creations are not just desserts; they’re a celebration of color and flavor that can brighten any gathering. Imagine a fluffy yellow cake, perfectly baked and laced with vibrant jello that seeps into every nook and cranny, creating a refreshing treat that’s as fun to make as it is to eat. The best part? You can choose any flavor of jello, so you can totally customize it to suit any occasion or mood. I remember the first time I made one for a summer barbecue; the kids were mesmerized by the bright colors, and the adults couldn’t resist sneaking a slice (or two!). It became an instant hit, and now it’s my go-to dessert for gatherings. Every time I slice into that colorful masterpiece, I see smiles all around. Plus, it’s so easy to prepare! If you’re looking for a dessert that’s sure to impress and bring joy, jello poke cakes are the way to go!
Ingredients for Jello Poke Cakes
Here’s what you’ll need to create this colorful dessert masterpiece. It’s super simple, and you probably have most of these ingredients already in your kitchen! Let’s break it down:
- 1 box of yellow cake mix: This is the base of your cake. Just grab your favorite brand and follow the instructions on the box for the best results.
- 3 large eggs: These add moisture and richness to the cake. Make sure they’re at room temperature for easier mixing!
- 1 cup water: This is needed for the cake mix. It helps create that fluffy texture we all love.
- 1 package of jello (any flavor): The star of the show! You can get creative here—think strawberry, orange, or even blue raspberry! The choice is yours.
- 1 cup boiling water: This helps dissolve the jello completely, ensuring a smooth mixture that seeps perfectly into the cake.
- 1 cup cold water: Adding cold water helps to cool down the jello mixture before pouring it over the cake.
- 1 container of whipped topping: This light and fluffy topping is perfect for finishing off your cake. It adds a creamy texture that balances the sweetness!
- Fresh fruit for topping (optional): I love adding fresh berries or sliced fruit on top for a pop of color and a fresh taste. It’s totally optional but oh-so-delicious!
With these ingredients on hand, you’re all set to whip up a jello poke cake that’s sure to impress!
How to Prepare Jello Poke Cakes
Now, let’s dive into making this colorful delight! I promise it’s easier than you might think, and the steps are super straightforward. Just follow along, and you’ll have a stunning jello poke cake in no time!
Prepping the Cake
First things first, you’ll want to preheat your oven to 350°F (175°C). This is crucial because a hot oven ensures your cake bakes evenly and rises beautifully. While that’s warming up, grab a mixing bowl and prepare your yellow cake mix according to the package instructions. It’s usually as simple as adding the eggs, water, and mixing until smooth. Make sure there are no lumps—this is where that fluffy texture starts!
Once your batter is ready, pour it into a greased 9×13 inch baking dish. I like to use a non-stick spray for easy cleanup, but butter works well too. Bake the cake for about 25 to 30 minutes. You’ll know it’s done when a toothpick inserted into the center comes out clean. Trust me; that moment when you pull the cake from the oven is pure joy! Let it cool for about 10 minutes in the pan before moving on to the next step.
Poking and Pouring
After your cake has cooled for a bit, it’s time to poke some holes! Using a fork, gently poke holes all over the surface of your cake. Don’t be shy—these holes are where the jello will seep in, making every bite a burst of flavor. Now, let’s prepare the jello. In a separate bowl, mix your jello powder with 1 cup of boiling water, stirring until it completely dissolves. Then, add 1 cup of cold water to cool it down. This step is key—if the jello is too hot, it can melt your cake instead of soaking into it!
Once your jello mixture is ready, pour it evenly over the cake, making sure to fill those holes nicely. You want every bit of that jello goodness to soak in! Now, cover the cake with plastic wrap and refrigerate for at least 4 hours or, even better, overnight. This chilling time allows the jello to set properly and makes for a more refreshing treat.
Topping the Cake
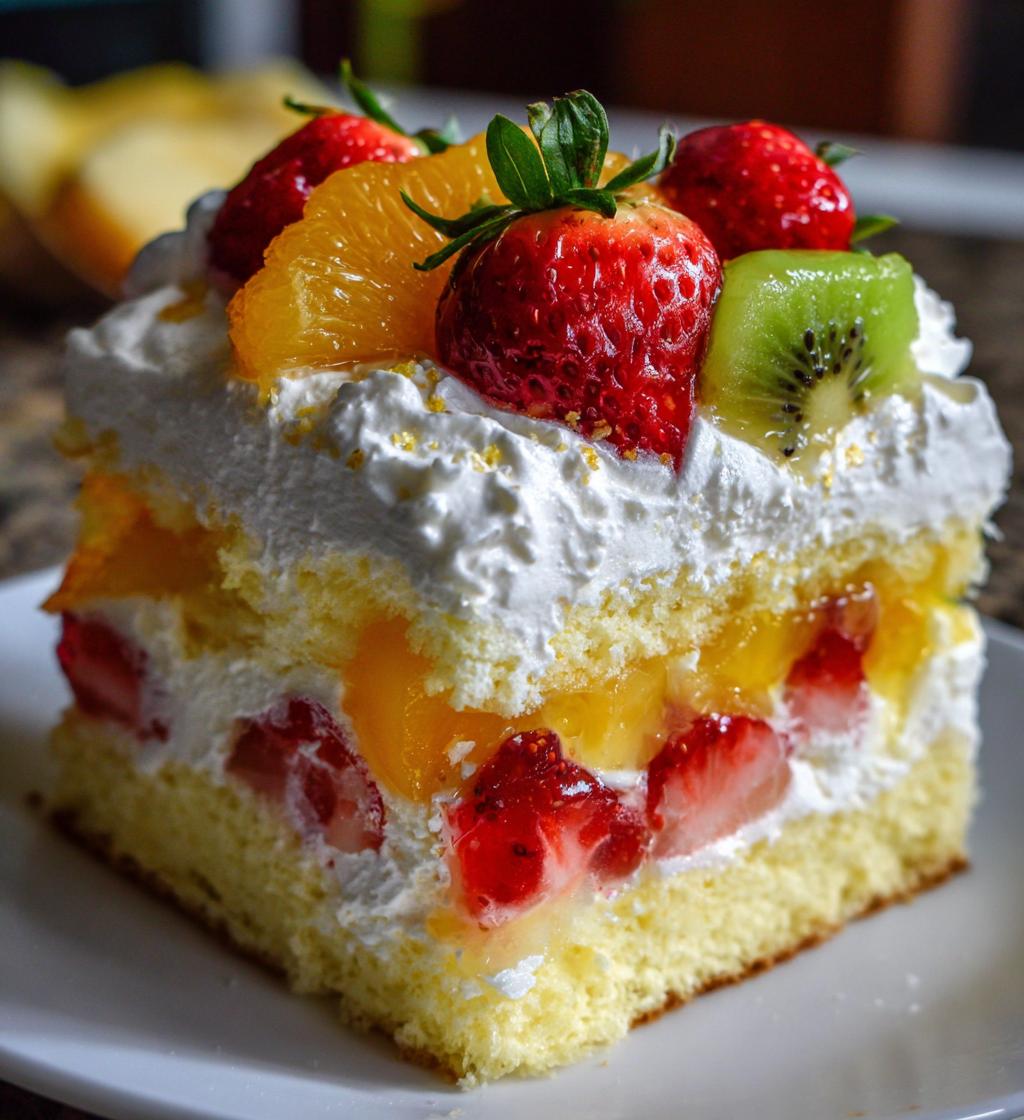
Finally, it’s time to crown your creation! Once the cake has chilled and the jello is set, spread a generous layer of whipped topping over the entire surface. I love this part because it makes the cake look so inviting! For an extra touch, you can add fresh fruit on top—think strawberries, blueberries, or even kiwi slices! Not only does it look fabulous, but it also adds a fresh burst of flavor.
When you’re ready to serve, slice it up and watch the smiles light up the room! Jello poke cakes are perfect for any occasion, and the colorful layers are sure to impress. Enjoy every bite!
Why You’ll Love This Recipe
Jello poke cakes are truly a gem in the dessert world, and here’s why you’ll absolutely adore making and sharing this treat:
- Super easy to make: With just a few simple steps, you can whip up this colorful cake in no time. Perfect for both novice bakers and seasoned pros!
- Endless flavor combinations: You can customize your jello poke cake with any flavor of jello you fancy! From classic strawberry to wild blue raspberry, the sky’s the limit!
- Visually stunning: The vibrant colors of the jello peeking through the cake make for a show-stopping presentation. It’s a dessert that’s as fun to look at as it is to eat!
- Perfect for gatherings: Whether it’s a birthday party, potluck, or just a summer BBQ, this cake is sure to be a crowd-pleaser. People can’t resist its bright allure!
- Make-ahead friendly: You can easily prepare this cake a day in advance. It saves you time on the day of your event, allowing you to relax and enjoy!
- Refreshing taste: The combination of light cake and fruity jello creates a refreshing treat that’s perfect for warm weather. It’s a slice of happiness on a plate!
Trust me, once you try making a jello poke cake, you’ll want to share it with everyone you know!
Tips for Success
Want to make your jello poke cake the absolute best it can be? I’ve got you covered with some tried-and-true tips that’ll help you nail this dessert every single time!
- Let the cake cool completely: This is crucial! If you poke holes in a warm cake, the jello won’t soak in properly, and you’ll end up with a soggy mess instead of a delightful treat. So, be patient and let it cool for at least 10 minutes before poking those holes!
- Choose complementary jello flavors: While you can mix and match however you like, pairing the cake with jello flavors that complement each other makes a big difference. For example, lemon cake with strawberry jello or vanilla cake with blue raspberry can create amazing flavor combinations!
- Poke holes generously: Don’t be shy about poking those holes! The more you poke, the more jello goodness will penetrate the cake. Aim for evenly spaced holes, about an inch apart, to ensure every slice is bursting with flavor.
- Give it time to chill: I can’t stress this enough! Chilling the cake for at least 4 hours (or overnight) allows the jello to set and meld with the cake. This step transforms your jello poke cake into a refreshing delight that everyone will love.
- Get creative with toppings: While whipped topping is a classic, don’t hesitate to get creative! Try adding toasted coconut, crushed graham crackers, or even a drizzle of chocolate syrup for a twist. Fresh fruit adds color and flavor, making your cake even more enticing!
- Use a serrated knife for slicing: When it’s time to cut your cake, use a serrated knife. This will help you get clean, beautiful slices without squishing all that lovely jello out!
With these tips in your back pocket, you’ll be a jello poke cake pro in no time. Enjoy the process and the smiles that come with sharing this colorful dessert!
Storage & Reheating Instructions
Now that you’ve whipped up this beautiful jello poke cake, you might be wondering how to store any leftovers (if there are any, right?). Proper storage is key to keeping the cake fresh and delicious for days to come!
First off, if you have leftover cake, make sure to cover it tightly with plastic wrap or transfer it to an airtight container. This helps prevent it from drying out while it’s in the fridge. I recommend storing it in the refrigerator, where it will stay fresh for up to 5 days. The jello keeps the cake moist, so no worries about it becoming stale too quickly!
If you want to freeze your jello poke cake, you can definitely do that too! Just slice the cake into individual portions and wrap each piece tightly in plastic wrap, then place them in a freezer-safe container or a resealable freezer bag. When you’re ready to enjoy a slice, simply thaw it in the refrigerator for a few hours or overnight. This method preserves the flavors and textures beautifully, so you can savor that refreshing taste even later on!
As for reheating, it’s best not to heat jello poke cake since the jello might lose its delightful texture. It’s really meant to be enjoyed cold, so slice it straight from the fridge and serve! If you prefer a bit of warmth, you can pop it in the microwave for about 10-15 seconds, but be careful not to overdo it. Just a quick warm-up will do the trick without compromising that lovely jello layer.
So, whether you’re storing it for later or serving it fresh, these tips will help you keep your jello poke cake as vibrant and tasty as the day you made it. Enjoy every last bite!
Nutritional Information
Let’s talk numbers! Here’s a quick breakdown of the estimated nutritional values for each slice of this delightful jello poke cake. Keep in mind that these values can vary based on the specific ingredients you use, but this will give you a good idea of what to expect:
- Serving Size: 1 slice
- Calories: 250
- Fat: 10g
- Saturated Fat: 3g
- Unsaturated Fat: 5g
- Trans Fat: 0g
- Cholesterol: 30mg
- Sodium: 200mg
- Carbohydrates: 38g
- Fiber: 1g
- Sugar: 20g
- Protein: 3g
This jello poke cake is a fun and fruity treat that’s perfect for satisfying your sweet tooth without going overboard. With its light texture and refreshing flavor, it’s a dessert you can enjoy without the guilt. Just remember to savor each colorful bite!
FAQ Section
Got questions about jello poke cakes? Don’t worry—I’ve got you covered! Here are some common queries I hear along with my tasty answers:
Can I use different flavors of jello?
Absolutely! One of the best things about jello poke cakes is their versatility. You can experiment with any flavor of jello you like, from classic strawberry to tropical lime. Don’t hesitate to mix and match flavors either! For example, a lemon cake with raspberry jello creates a deliciously refreshing combination.
Is there a way to make this cake gluten-free?
Yes, you can definitely make a gluten-free jello poke cake! Just swap the yellow cake mix for a gluten-free version. There are plenty of great options available in stores nowadays. Just make sure to check the jello packaging to confirm it’s gluten-free as well, though most varieties are!
Can I use fresh fruit instead of jello?
While the jello is the star of the show, you can certainly get creative! If you want to use fresh fruit, consider making a fruit puree or sauce to drizzle over the cake instead. Just keep in mind that the texture and flavor will be different, but it can still be a delicious alternative!
How do I serve jello poke cake at a party?
Serving a jello poke cake at a party is a breeze! I recommend slicing it into neat squares and placing them on a colorful platter. You can also garnish each slice with a small dollop of whipped topping and a piece of fresh fruit for a beautiful presentation. It’s not only visually appealing but also super inviting!
Can I make this cake in advance?
Absolutely! In fact, making it a day in advance is often best since it gives the jello plenty of time to set and meld with the cake. Just be sure to store it in the fridge, covered tightly. This also allows the flavors to develop beautifully, making your jello poke cake even more delightful when it’s time to serve!
What’s the best way to store leftovers?
If you have any leftovers (which is rare, but it happens!), just cover the cake tightly with plastic wrap or transfer it to an airtight container. Keep it in the fridge, and it should stay fresh for about 5 days. The jello helps keep the cake moist, so you can enjoy it for a little while longer!
These are just a few common questions I get about jello poke cakes. If you have more, feel free to reach out! I love sharing the joy of this colorful dessert with everyone!
Print
Jello poke cakes: 5 Reasons They Bring Joy to Every Table
- Total Time: 4 hours 50 minutes
- Yield: 12 servings 1x
- Diet: Vegetarian
Description
A fun and colorful dessert that combines cake and jello for a refreshing treat.
Ingredients
- 1 box of yellow cake mix
- 3 large eggs
- 1 cup water
- 1 package of jello (any flavor)
- 1 cup boiling water
- 1 cup cold water
- 1 container of whipped topping
- Fresh fruit for topping (optional)
Instructions
- Preheat the oven to 350°F (175°C).
- Prepare the yellow cake mix according to package instructions.
- Pour the batter into a greased 9×13 inch baking dish.
- Bake for 25-30 minutes or until a toothpick comes out clean.
- Let the cake cool for 10 minutes.
- Poke holes all over the cake using a fork.
- In a bowl, mix jello with boiling water until dissolved.
- Add cold water to the jello mixture.
- Pour the jello mixture over the cooled cake, filling the holes.
- Refrigerate for at least 4 hours or overnight.
- Top with whipped topping and fresh fruit before serving.
Notes
- Use any flavor of jello for different variations.
- Allow the cake to chill properly for best results.
- This cake can be made a day in advance.
- Prep Time: 20 minutes
- Cook Time: 30 minutes
- Category: Dessert
- Method: Baking
- Cuisine: American
Nutrition
- Serving Size: 1 slice
- Calories: 250
- Sugar: 20g
- Sodium: 200mg
- Fat: 10g
- Saturated Fat: 3g
- Unsaturated Fat: 5g
- Trans Fat: 0g
- Carbohydrates: 38g
- Fiber: 1g
- Protein: 3g
- Cholesterol: 30mg
Keywords: jello poke cakes, dessert recipes, colorful cake, jello dessert