Mother’s Day is such a special time of year, isn’t it? It’s the perfect occasion to show our love and appreciation for the incredible women in our lives. And what better way to do that than with homemade treats that are as fun to make as they are to eat? I can still remember the excitement of surprising my mom with sweet, colorful cakesicles I whipped up one year. The look on her face when she unwrapped them was priceless! These *mothers day cakesicles ideas* are not only adorable but also incredibly customizable, making them perfect for putting a personal touch on your gift. Plus, they’re super easy to make, even if you’re not a pro in the kitchen. Trust me, your mom will absolutely adore these delightful little treats, and they’ll definitely add a sprinkle of joy to her special day!
Ingredients List
To create these delightful cakesicles, you’ll need a few simple ingredients that come together beautifully. Here’s what you’ll need:
- 1 box of cake mix: Any flavor your mom loves! Chocolate, vanilla, or even red velvet work wonders.
- 1 cup of frosting: You can use store-bought or homemade – cream cheese, buttercream, or chocolate frosting all add a delicious touch.
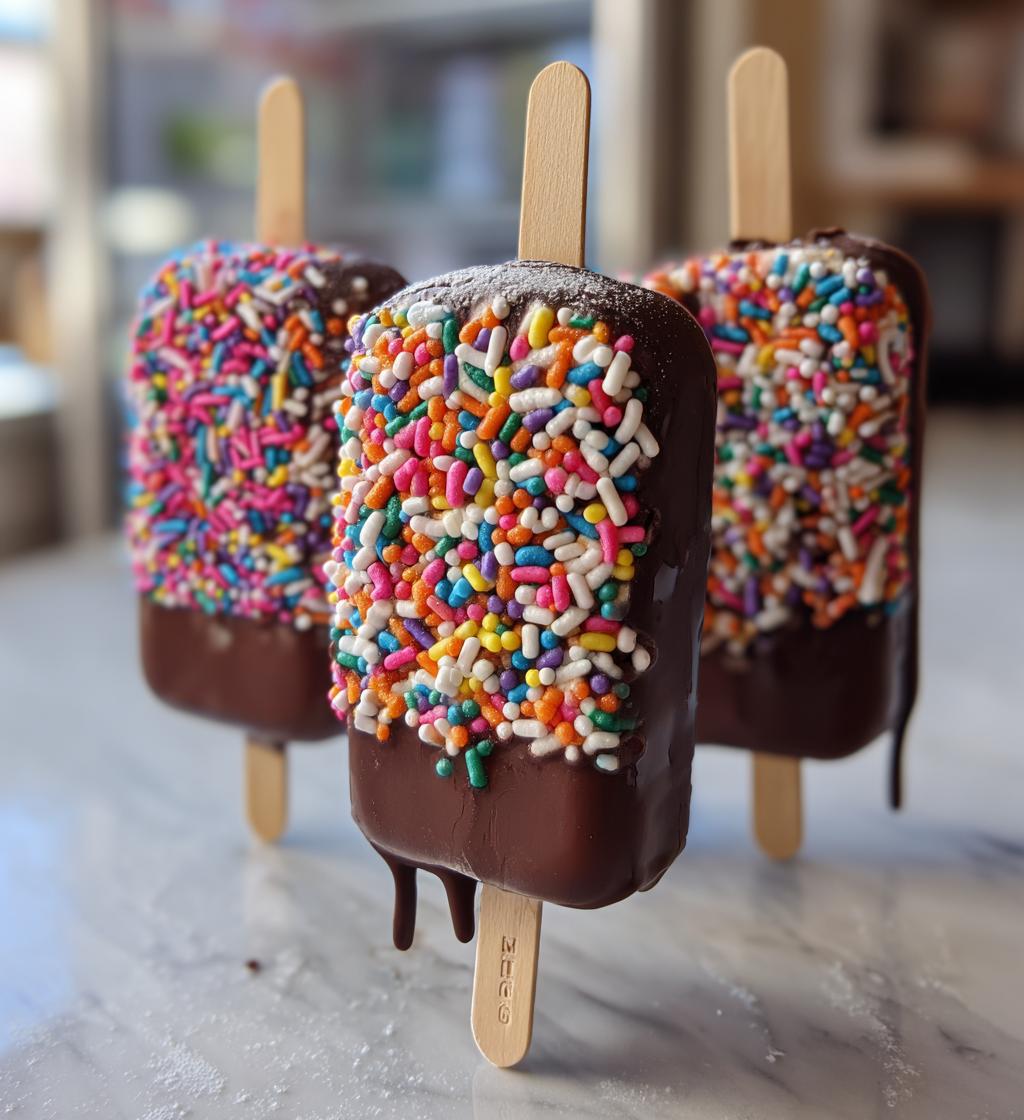
- 12 ounces of melting chocolate: Choose your favorite type, whether it’s milk, dark, or white chocolate. It’ll be the perfect coating!
- Sprinkles for decoration: Get creative with colors and shapes to make them festive and fun!
- Wooden sticks: These will help you turn your cakes into cute popsicles. You can find them in any craft or baking store!
Gather these ingredients, and let’s start creating some magical cakesicles for Mother’s Day!
How to Prepare *Mothers Day Cakesicles Ideas*
Getting ready to make these scrumptious cakesicles is such a fun process! I promise, once you get the hang of it, you’ll be whipping up these delightful treats in no time. Let’s dive into the step-by-step preparation – it’s super easy!
Step-by-Step Instructions
First things first, let’s get that cake mix ready. Start by preparing the cake mix according to the package instructions. This usually involves mixing the cake mix with eggs, water, and oil. Once your batter is smooth, pour it into a greased baking pan and pop it into the oven. Bake it for about 30 minutes or until a toothpick comes out clean. Oh, the sweet smell of baking cake fills the house – you’ll love it!
Once the cake is baked, take it out and let it cool completely. This is super important! If you try to crumble the cake when it’s too warm, it might end up mushy, and we don’t want that. Once it’s cool, crumble the cake into a large bowl. I find using my hands works best – it’s a little messy, but so worth it!
Now, add your cup of frosting to the crumbled cake. Get in there and mix it all together until combined. You want a doughy consistency that holds together when you form it into shapes. Speaking of which, grab a handful of the mixture and mold it into your desired cakesicle shape, then insert a wooden stick into each one. Aim for a nice, compact shape to avoid any breakage later on.
Pop those beauties in the freezer for at least 30 minutes to firm up. This step is crucial for making sure they hold their shape when you dip them in chocolate. While you wait, melt your chocolate in a microwave-safe bowl, stirring every 30 seconds until it’s smooth and ready. When the cakesicles are set, dip each one into the melted chocolate, letting the excess drip off. Finally, decorate with sprinkles before the chocolate sets – just like that, your cakesicles are ready to impress!
Why You’ll Love This Recipe
This cakesicle recipe is a total winner for so many reasons! Here’s why you’ll absolutely adore making these treats:
- Quick and Easy: You can whip these up in just about an hour, perfect for last-minute surprises!
- Customizable: Play around with flavors and decorations to match your mom’s favorites or the theme of your celebration.
- Fun to Make: Get the kids involved! They’ll love shaping and decorating their own cakesicles.
- Perfect for Gifting: These adorable treats make sweet gifts and look beautiful presented in a box or on a platter.
- Deliciously Indulgent: With a cake center and a chocolate coating, these are irresistible to anyone with a sweet tooth!
Tips for Success
To ensure your cakesicles turn out perfect every time, here are a few pro tips that I’ve learned along the way:
- Cool Completely: Make sure the cake is completely cool before crumbling; this prevents a soggy mixture.
- Don’t Overmix: When combining the cake and frosting, mix just until combined. Overmixing can lead to a dense texture.
- Shape with Care: Form the cakesicles firmly but gently to avoid cracks. If they seem too soft, pop them back in the freezer for a few minutes.
- Chocolate Coating: Ensure the chocolate is smooth and not too hot when dipping to prevent melting the cakesicles.
- Experiment with Flavors: Don’t hesitate to try different cake mixes or frostings for unique combinations that your mom will love!
Variations
There are so many fun ways to mix up these cakesicles and keep things exciting for Mother’s Day! Here are a few ideas to get your creative juices flowing:
- Flavor Swaps: Try using lemon or almond extract in your cake mix for a refreshing twist. You could even switch to a funfetti cake mix for a festive look!
- Chocolate Choices: Experiment with different types of melting chocolate, like caramel or butterscotch, for a unique coating that adds a new flavor dimension.
- Seasonal Themes: For a spring vibe, use pastel-colored chocolate and floral sprinkles. For a more elegant touch, consider drizzling white chocolate over dark chocolate-dipped cakesicles.
- Stuffed Cakesicles: Add a surprise filling by incorporating mini chocolate chips or fruit preserves into the cake mixture before shaping.
These variations allow you to personalize each cakesicle, making them not only delicious but also a delightful treat that your mom will treasure!
Storage & Reheating Instructions
Storing your leftover cakesicles is super easy! Simply place them in an airtight container and keep them in the refrigerator. They’ll stay fresh for up to a week, but trust me, they might not last that long because they’re just so irresistible! If you want to keep them longer, you can also freeze them! Just make sure to wrap each cakesicle individually in plastic wrap before placing them in a freezer-safe bag. When you’re ready to enjoy them again, let them thaw in the fridge for a couple of hours. No need to reheat; they’re delicious cold, just like a popsicle!
Nutritional Information
Keep in mind that the nutritional values can vary based on the specific ingredients and brands you use. On average, each cakesicle contains approximately 200 calories, with 12g of sugar and 10g of fat. Always check your ingredients for the most accurate nutritional information as you make these delightful treats!
FAQ Section
Q1. Can I use any cake mix flavor for these cakesicles?
Absolutely! Feel free to get creative with any flavor of cake mix your mom loves. Chocolate, vanilla, or even strawberry will work beautifully!
Q2. How long can I store the cakesicles?
You can keep your cakesicles in the refrigerator for up to a week in an airtight container. If you want to store them longer, wrap them individually and freeze them. They’ll be just as delicious later!
Q3. What type of chocolate is best for coating?
I recommend using melting chocolate, but you can choose between milk, dark, or white chocolate depending on your preference. Each adds its own delicious twist!
Q4. Can I make these cakesicles ahead of time?
Definitely! You can prepare them a day or two in advance. Just keep them refrigerated or frozen until you’re ready to serve. Perfect for planning ahead!
Q5. Are there any egg-free options for the cake mix?
Yes! Many brands offer egg replacers or you can use applesauce or yogurt to substitute eggs in your cake mix. Just check the box for specific measurements!

mothers day cakesicles ideas: 7 Joyful Treats to Make
- Total Time: 1 hour
- Yield: 12 cakesicles 1x
- Diet: Vegetarian
Description
Delicious and creative cakesicles perfect for Mother’s Day.
Ingredients
- 1 box of cake mix
- 1 cup of frosting
- 12 ounces of melting chocolate
- Sprinkles for decoration
- Wooden sticks
Instructions
- Prepare the cake mix according to package instructions.
- Bake the cake and let it cool completely.
- Crumble the cake into a large bowl.
- Add frosting to the crumbled cake and mix well.
- Form the mixture into shapes and insert wooden sticks.
- Freeze the cakesicles for at least 30 minutes.
- Melt the chocolate and dip each cakesicle into it.
- Decorate with sprinkles before the chocolate sets.
Notes
- Use different flavors of cake for variety.
- Try colored chocolate for a festive look.
- Store in the fridge until ready to serve.
- Prep Time: 20 minutes
- Cook Time: 30 minutes
- Category: Dessert
- Method: Baking and freezing
- Cuisine: American
Nutrition
- Serving Size: 1 cakesicle
- Calories: 200
- Sugar: 12g
- Sodium: 150mg
- Fat: 10g
- Saturated Fat: 5g
- Unsaturated Fat: 3g
- Trans Fat: 0g
- Carbohydrates: 24g
- Fiber: 1g
- Protein: 2g
- Cholesterol: 30mg
Keywords: mothers day cakesicles ideas, cakesicles, dessert recipes