Mother’s Day is all about celebrating the amazing women in our lives, and what better way to show your love than with a delicious homemade dessert? If you’re looking for something that everyone can enjoy, these *mothers day desserts gluten free* are the perfect choice! I absolutely adore this recipe because it’s not only gluten-free, but it also brings a rich, chocolatey flavor that will have everyone asking for seconds. Trust me, even those who aren’t gluten-sensitive will rave about how moist and tasty these treats are. Let’s dive into making something special for Mom that she’ll truly appreciate!
Ingredients List
Gathering the right ingredients is key to making these *mothers day desserts gluten free* truly shine. Here’s what you’ll need:
- 2 cups almond flour: This will give our dessert a lovely nutty flavor and a moist texture. Make sure it’s finely ground for the best results.
- 1/2 cup coconut sugar: A natural sweetener that adds a hint of caramel flavor while keeping things gluten-free.
- 1/4 cup unsweetened cocoa powder: This is what brings the rich chocolatey goodness. Go for quality cocoa for the best taste!
- 1/4 cup maple syrup: Adds sweetness and moisture while keeping the recipe naturally sweetened.
- 1/2 cup coconut oil, melted: This replaces traditional butter, keeping our dessert dairy-free and adding a subtle coconut flavor.
- 3 large eggs: They’re essential for binding the ingredients together and giving our dessert that perfect rise.
- 1 tsp vanilla extract: A must for enhancing all those lovely flavors. Use pure vanilla extract for the best outcome!
- 1/2 tsp baking soda: This will help our dessert rise and become nice and fluffy.
- 1/4 tsp salt: Just a pinch to balance the sweetness and enhance the flavors.
With these simple yet delicious ingredients, you’ll be well on your way to creating an irresistible gluten-free dessert that Mom will adore!
How to Prepare Mothers Day Desserts Gluten Free
Getting ready to whip up these *mothers day desserts gluten free* is a fun process, and I’m here to guide you every step of the way! Let’s get started with some important steps that will make your dessert not just good, but truly unforgettable!
Preheat the Oven
First things first, preheating your oven is absolutely crucial. It ensures that your dessert bakes evenly from the get-go! Set your oven to 350°F (175°C). While you mix your ingredients, your oven will be warming up, saving you time later. Trust me, it makes a difference!
Prepare the Dry Ingredients
In a large mixing bowl, combine the almond flour, cocoa powder, coconut sugar, baking soda, and salt. Use a whisk to mix them all together until it’s a uniform blend. This step is super important! Properly mixing the dry ingredients helps distribute the baking soda and salt evenly, which means your dessert will rise beautifully and taste perfectly balanced.
Mix the Wet Ingredients
Now, grab another bowl for the wet ingredients. Whisk together the eggs, maple syrup, melted coconut oil, and vanilla extract until they’re well combined. I like to use a hand whisk for this part; it keeps things simple! Make sure the coconut oil isn’t too hot, or it might cook the eggs. You want everything to blend smoothly for a rich, moist texture!
Combine Wet and Dry Ingredients
Time to bring it all together! Pour the wet mixture into the bowl with your dry ingredients. Gently fold them together using a spatula until just combined. Don’t overmix! A few small lumps are okay; it keeps the cake light and fluffy. Just make sure there are no dry spots left—this is key!
Bake the Dessert
Pour your batter into a greased baking dish and spread it out evenly. Now, pop it in the oven and set your timer for 25-30 minutes. To check for doneness, use the classic toothpick test. Insert a toothpick into the center of the cake, and it should come out clean or with just a few moist crumbs clinging to it. If it’s coated in batter, give it a few more minutes!
Cooling Before Serving
Once baked, let your dessert cool in the pan for about 10-15 minutes before transferring it to a wire rack. This cooling period is super important, as it allows the flavors to settle and makes it easier to slice. You can serve it warm or let it cool completely—either way, it’s going to be a hit!
Nutritional Information Section
Let’s talk numbers! Here’s the estimated nutritional information for each serving of these *mothers day desserts gluten free*. Keep in mind that these values can vary based on the specific ingredients you use, but they give you a solid idea of what to expect:
- Calories: 200
- Fat: 15g
- Saturated Fat: 10g
- Unsaturated Fat: 5g
- Trans Fat: 0g
- Cholesterol: 30mg
- Sodium: 150mg
- Carbohydrates: 18g
- Fiber: 3g
- Protein: 5g
- Sugar: 8g
These delightful treats are not only gluten-free but also provide a nice balance of wholesome ingredients that make them a guilt-free indulgence for Mother’s Day celebrations!
Why You’ll Love This Recipe
This recipe for *mothers day desserts gluten free* is a game-changer for your Mother’s Day celebrations! Here’s why you’ll adore it:
- Quick and Easy: With just 15 minutes of prep time, you can whip up this delightful dessert in no time!
- Flavorful: Rich chocolate flavor from cocoa powder and the natural sweetness of coconut sugar make every bite heavenly.
- Healthy Ingredients: Made with almond flour and coconut oil, it’s a wholesome treat you can feel good about serving.
- Gluten-Free: Perfect for everyone at the table, whether they have dietary restrictions or not.
- Moist and Delicious: The combination of wet and dry ingredients ensures a tender, moist texture that everyone will love.
Trust me, this dessert will be the highlight of your Mother’s Day meal!
Tips for Success
Now that you’re all set to bake these *mothers day desserts gluten free*, here are some pro tips to ensure everything turns out just right! Trust me, these little nuggets of wisdom make a world of difference.
Measure Your Ingredients Accurately
When it comes to baking, precision is key! Make sure to use a kitchen scale for measuring your almond flour if you have one. It’ll help you avoid using too much flour, which can lead to a dense dessert. If you’re using cups, be sure to spoon the flour into the measuring cup and level it off with a knife for accuracy.
Don’t Overmix the Batter
Mixing is crucial, but don’t go overboard! Overmixing can develop gluten, even in gluten-free baking, and lead to a chewy texture. Just mix until everything is combined, and a few lumps are perfectly fine. Remember, we want a tender, fluffy dessert!
Check Your Ingredients’ Freshness
Old ingredients can ruin your dessert’s flavor and texture. Check the expiration dates on your baking soda and cocoa powder. Fresh ingredients make all the difference in the final taste!
Use the Right Baking Dish
The type of baking dish you use can impact cooking time and texture. A lighter-colored pan will help prevent the edges from over-baking while ensuring the center cooks through. If you’re using a dark pan, keep an eye on the baking time as it may cook faster.
Let It Cool Completely
Cooling your dessert is essential for the perfect slice! If you cut into it too soon, it may crumble or fall apart. Give it that 10-15 minutes of cooling in the pan, then transfer it to a wire rack to cool completely before slicing. This patience pays off in flavor and presentation!
With these tips, you’ll be well on your way to creating a stunning gluten-free dessert that Mom will absolutely love. Happy baking!
Variations
If you’re feeling adventurous, there are so many fun ways to mix things up with these *mothers day desserts gluten free*! Here are a few delightful variations that will add a personal touch to your creation:
- Nutty Additions: Fold in 1/2 cup of chopped walnuts or pecans into the batter for a lovely crunch. They add a nice texture and flavor that complements the chocolate beautifully!
- Fruity Twist: Add 1/2 cup of fresh raspberries or blueberries to the batter for a fruity surprise. The tartness will balance the sweetness, and they look gorgeous in the cake!
- Minty Fresh: For a refreshing twist, incorporate 1 tsp of peppermint extract along with the vanilla. This gives the dessert a delightful minty flavor that’s perfect for spring!
- Chocolate Chips Galore: Stir in 1/2 cup of dairy-free chocolate chips to amp up the chocolatey goodness. Who can resist more chocolate, right?
- Spiced Up: Add a dash of cinnamon or espresso powder to the dry ingredients for an extra layer of flavor. The warmth of cinnamon or the depth of espresso can really elevate the chocolate taste!
Feel free to mix and match these ideas or come up with your own! The beauty of this recipe is that it’s versatile, allowing you to create something uniquely special for your Mother’s Day celebrations. Enjoy experimenting!
Serving Suggestions
Now that you’ve whipped up these delicious *mothers day desserts gluten free*, it’s time to think about what to serve alongside them to create a beautiful and memorable meal! Here are some delightful ideas that pair perfectly with your dessert and will make your Mother’s Day celebration truly special:
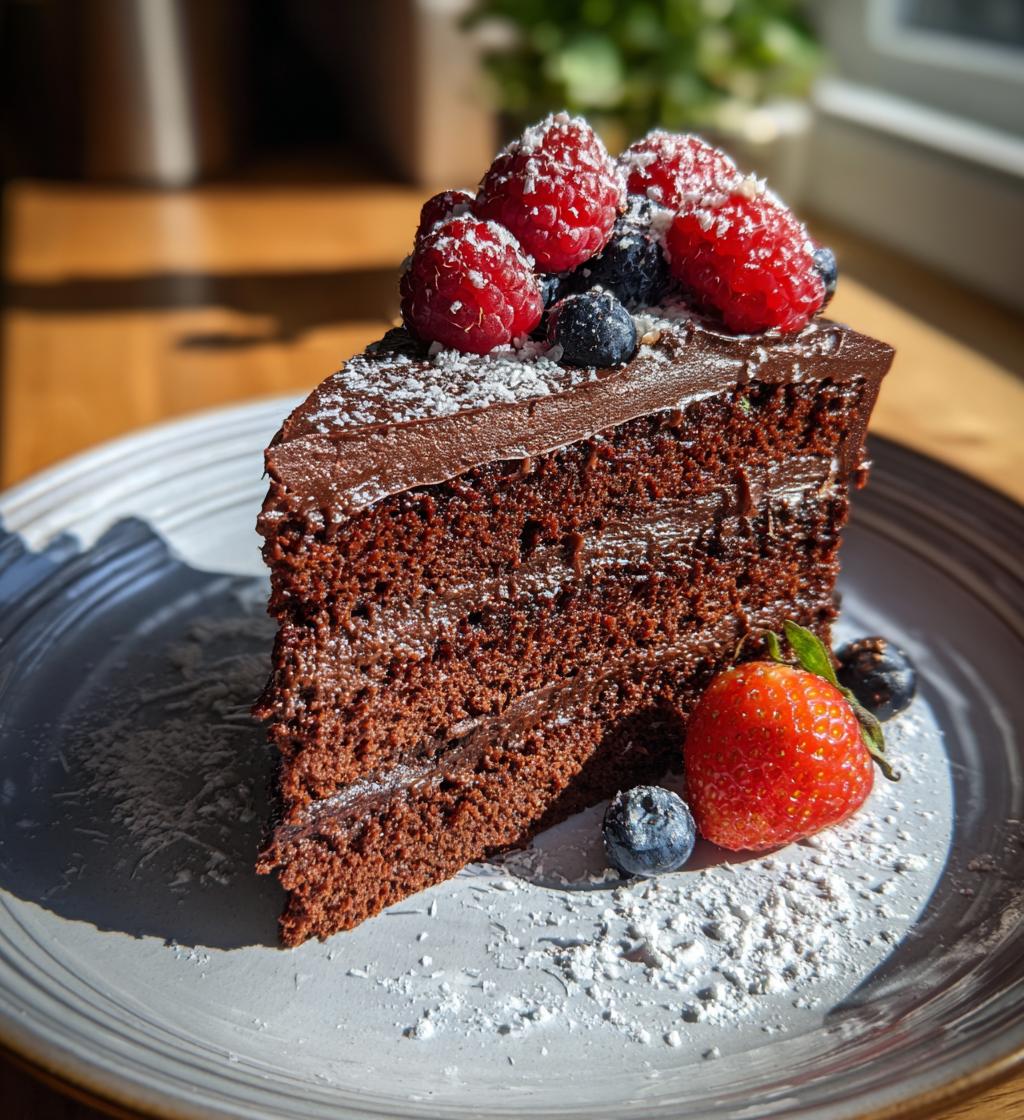
- Fresh Berries: Serve your dessert with a medley of fresh strawberries, blueberries, and raspberries. Their bright colors and natural sweetness provide a lovely contrast to the rich chocolate.
- Whipped Coconut Cream: For a dairy-free option, whip up some coconut cream to top your dessert. Just chill a can of coconut milk, scoop out the solid part, and whip it until fluffy. A dollop on each slice adds a dreamy touch!
- Tea or Coffee: Pair your dessert with a warm cup of herbal tea or freshly brewed coffee. The warmth of the beverage perfectly complements the chocolatey goodness and enhances the overall experience.
- Vanilla Ice Cream: If you’re not strictly dairy-free, a scoop of vanilla ice cream on the side takes the dessert to the next level. The creamy coldness is a delightful contrast to the warm dessert.
- Chocolate Drizzle: Consider drizzling some melted dark chocolate over the top of your dessert before serving. It adds a touch of elegance and a boost of chocolate flavor that’s hard to resist!
- Nut Butter Swirl: A swirl of almond or peanut butter on top adds a rich, nutty flavor that pairs beautifully with chocolate. Just warm it slightly for easy drizzling.
These serving suggestions will not only elevate your dessert but also create a feast that Mom will remember fondly. Enjoy celebrating this special day with your loved ones!
Storage & Reheating Instructions
After enjoying your delightful *mothers day desserts gluten free*, you might have some leftovers (though I doubt it!). If you do, here’s how to store and reheat them to keep that deliciousness intact!
Storing Leftovers
To keep your dessert fresh, let it cool completely before storing. Once cooled, slice it into individual pieces and place them in an airtight container. This helps lock in moisture and keeps the cake from drying out. If you want to keep it even fresher, you can wrap each slice tightly in plastic wrap before placing them in the container. They can be stored at room temperature for up to three days or in the fridge for about a week. Just make sure to keep it covered!
Reheating Tips
When you’re ready to enjoy a slice again, reheating is super easy! For the best results, I recommend using the oven. Preheat it to 300°F (150°C). Place a slice on a baking sheet and warm it in the oven for about 5-10 minutes or until it’s warmed through. This method helps retain the moist texture while giving it a nice, fresh-baked feel.
If you’re in a hurry, you can also microwave individual slices. Just pop a slice on a microwave-safe plate, cover it with a damp paper towel (this keeps it moist), and heat it for about 15-20 seconds. Check if it’s warm enough, and if not, give it a few more seconds. Just be careful not to overdo it, as microwaving too long can dry it out.
With these storage and reheating tips, you can savor this delightful dessert long after Mother’s Day has come and gone. Enjoy every bite!
Engage with Us
I absolutely love hearing from you! If you try these *mothers day desserts gluten free*, please leave a comment below and let me know how it turned out. Don’t forget to rate the recipe and share your own twists or experiences on social media. Let’s celebrate together!
Print
Mothers Day Desserts Gluten Free: 5 Irresistible Treats
- Total Time: 45 minutes
- Yield: 8 servings 1x
- Diet: Gluten Free
Description
Delicious gluten-free desserts perfect for Mother’s Day celebrations.
Ingredients
- 2 cups almond flour
- 1/2 cup coconut sugar
- 1/4 cup unsweetened cocoa powder
- 1/4 cup maple syrup
- 1/2 cup coconut oil, melted
- 3 large eggs
- 1 tsp vanilla extract
- 1/2 tsp baking soda
- 1/4 tsp salt
Instructions
- Preheat your oven to 350°F (175°C).
- In a bowl, mix almond flour, cocoa powder, coconut sugar, baking soda, and salt.
- In another bowl, whisk eggs, maple syrup, coconut oil, and vanilla extract.
- Combine the wet and dry ingredients until fully blended.
- Pour the batter into a greased baking dish.
- Bake for 25-30 minutes or until a toothpick comes out clean.
- Let it cool before serving.
Notes
- Store leftovers in an airtight container.
- Serve with fresh berries for added flavor.
- This recipe can be doubled for larger gatherings.
- Prep Time: 15 minutes
- Cook Time: 30 minutes
- Category: Dessert
- Method: Baking
- Cuisine: American
Nutrition
- Serving Size: 1 slice
- Calories: 200
- Sugar: 8g
- Sodium: 150mg
- Fat: 15g
- Saturated Fat: 10g
- Unsaturated Fat: 5g
- Trans Fat: 0g
- Carbohydrates: 18g
- Fiber: 3g
- Protein: 5g
- Cholesterol: 30mg
Keywords: mothers day desserts gluten free