Oh, let me tell you about the joy of making old fashioned fudge! This classic treat takes me straight back to my childhood kitchen, where the air was thick with the sweet aroma of chocolate and sugar. I remember standing on my tiptoes, peering over the counter, watching my mom work her magic as she whisked together simple ingredients like granulated sugar, cocoa powder, and creamy milk. It was pure magic! This recipe is not just a dessert; it’s a time capsule of memories, laughter, and a sprinkle of nostalgia.
What I adore about old fashioned fudge is its simplicity. You don’t need fancy gadgets or hard-to-find ingredients—just a saucepan and a few pantry staples. It’s that comfort food we all crave, rich and silky, melting in your mouth with every bite. Plus, it’s perfect for sharing! Whether it’s a holiday gathering or a cozy afternoon with friends, this fudge brings everyone together. So, roll up your sleeves, gather your ingredients, and let’s make some of this delightful fudge that’ll have your loved ones asking for seconds (and thirds!).
Ingredients for Old Fashioned Fudge
Gathering the right ingredients is the first step to creating that perfect batch of old fashioned fudge. Here’s what you’ll need:
- 2 cups granulated sugar
- 1/2 cup whole milk
- 1/4 cup unsweetened cocoa powder
- 1/4 cup butter
- 1 teaspoon vanilla extract
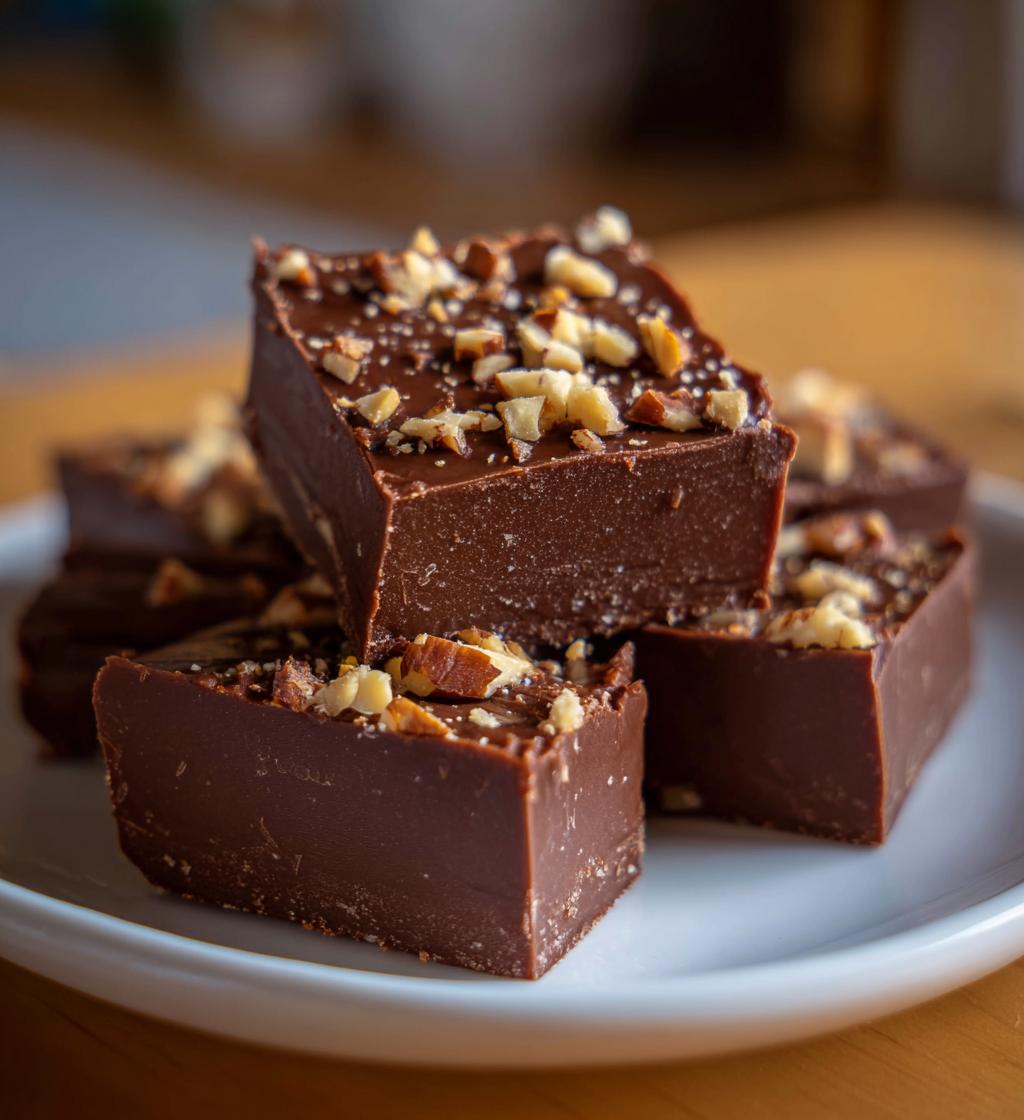
- 1/2 cup chopped nuts (optional, but I highly recommend for that extra crunch!)
Make sure to measure everything accurately. That’s key to getting that rich, creamy texture we all love. Trust me, using real butter and whole milk makes a world of difference in flavor. And if you’re feeling adventurous, toss in some nuts for that delightful surprise in every bite! Now that you’ve got your ingredients ready, let’s get to the fun part—making the fudge!
How to Prepare Old Fashioned Fudge
Now that you’ve gathered all your ingredients, let’s dive into the delightful process of making old fashioned fudge! Don’t worry; I’ll walk you through each step so you can create that creamy, dreamy fudge with ease.
Step 1: Combine Ingredients
Start by grabbing a medium saucepan, and then combine the 2 cups of granulated sugar, 1/2 cup of whole milk, and 1/4 cup of unsweetened cocoa powder. Use a whisk or a wooden spoon to mix everything together until it’s well combined. You want to ensure there are no lumps of cocoa powder, so take your time here. Once it looks smooth, set the saucepan over medium heat.
Step 2: Boil the Mixture
Here’s where the magic begins! Bring the mixture to a gentle boil, stirring constantly. This step is crucial—stirring helps prevent the sugar from crystallizing. You’ll want to keep it boiling for exactly 5 minutes without stirring. Yes, you heard me right! Just let it bubble away, and watch for that gorgeous chocolatey color deepening. It’s such a satisfying sight!
Step 3: Add Final Ingredients
After your 5 minutes are up, it’s time to remove the saucepan from the heat. Carefully add in the 1/4 cup of butter and 1 teaspoon of vanilla extract. This is where the fudge gets its rich flavor! Now, grab a sturdy whisk or an electric mixer and start beating the mixture. You’ll want to beat it until it thickens and starts to lose its glossy sheen, which usually takes about 2-3 minutes. Trust me; this step is vital for that perfect fudge texture!
Step 4: Incorporate Nuts and Spread
If you’re using nuts, now’s the moment to fold in those 1/2 cup of chopped nuts. They add such a delightful crunch! Once that’s done, pour the fudge mixture into a greased pan—an 8×8-inch pan works perfectly. Spread it evenly with a spatula, making sure it fills all corners. You’re almost there!
Step 5: Cooling and Cutting
Let the fudge cool completely at room temperature. This usually takes about 1-2 hours, but I know the wait can be tough! Once it’s set, you can cut it into squares. Store any leftovers in an airtight container at room temperature. Just be careful; they might disappear faster than you think!
Why You’ll Love This Recipe
This old fashioned fudge recipe is not just a treat; it’s a beloved tradition that brings joy and sweetness to any occasion. Here’s why you’ll absolutely adore making it:
- Quick Preparation: You can whip up this fudge in just about 25 minutes, making it the perfect last-minute dessert or gift!
- Simple Ingredients: With just a handful of pantry staples, you won’t have to worry about hunting down obscure items. It’s all about the basics!
- Delicious Flavor: The rich combination of chocolate, buttery goodness, and a hint of vanilla creates a flavor that’s simply irresistible!
- Nostalgic Treat: Each bite takes you back to simpler times, evoking warm memories of family gatherings and homemade delights.
Trust me, once you taste this fudge, you’ll be dreaming up reasons to make it again and again!
Tips for Success with Old Fashioned Fudge
Making old fashioned fudge is a joy, but there are a few tips and tricks that can help ensure your fudge turns out perfectly every time. Trust me; these little nuggets of wisdom can make all the difference!
Use a Candy Thermometer for Precision
If you want to be extra precise, consider using a candy thermometer. The mixture should reach about 234°F (the soft ball stage) for that perfect fudge texture. If you don’t have one, don’t worry! Just follow the timing closely, and you’ll be fine.
Stir, Stir, Stir (But Not While Boiling)
When combining your ingredients, stir well to avoid any pesky lumps, but once it’s boiling, resist the urge to stir! Stirring while boiling can cause the sugar to crystallize, which can lead to grainy fudge. Let it bubble freely for those 5 minutes!
Cool Completely Before Cutting
Patience is key! Make sure to let your fudge cool completely before cutting it into squares. If you try to cut it too soon, it might end up messy and crumbly. Give it a good hour or two to set; it’s worth the wait!
Store It Right
To keep your fudge fresh, store it in an airtight container. It’ll last for about a week at room temperature, but I doubt it’ll last that long in your house! If you want to keep it for longer, you can refrigerate it, just remember to let it come to room temperature before enjoying it again.
Experiment with Flavors
Once you’ve mastered the classic version, feel free to mix things up! Try adding a pinch of sea salt on top for a sweet-salty combo, or swirl in some peanut butter or caramel for an extra layer of flavor. The possibilities are endless!
Follow these tips, and you’ll be well on your way to making the best old fashioned fudge that impresses everyone! Happy fudging!
Nutritional Information
Understanding the nutritional values of your homemade old fashioned fudge can help you enjoy it mindfully. Here’s a breakdown of the estimated nutritional values based on typical ingredients:
- Serving Size: 1 piece
- Calories: 150
- Total Fat: 5g
- Saturated Fat: 3g
- Unsaturated Fat: 2g
- Trans Fat: 0g
- Cholesterol: 15mg
- Sodium: 10mg
- Total Carbohydrates: 25g
- Dietary Fiber: 1g
- Sugars: 20g
- Protein: 1g
Keep in mind that these values are just estimates and can vary slightly depending on the specific ingredients you use, especially if you decide to include nuts or other additions. Enjoy your fudge in moderation, and savor every delicious bite!
FAQ About Old Fashioned Fudge
I know you might have a few questions about making the perfect old fashioned fudge, so let’s dive into some of the most common queries. I’ve been there, and I want to make sure you have all the information you need!
Can I use different types of sugar in this recipe?
While granulated sugar is the star of this old fashioned fudge recipe, you can experiment with brown sugar for a deeper flavor. Just keep in mind that it might change the texture slightly, but hey, sometimes a little twist is fun!
What if my fudge doesn’t set properly?
If your fudge is still gooey after cooling, it may not have reached the right temperature during cooking. Don’t worry! You can try reheating it gently, then stirring in a bit more sugar, and bringing it back to a boil for a few minutes. Just be careful not to overcook it!
How do I know when my fudge is done?
The best way to know if your fudge is done is by timing it correctly—those 5 minutes of boiling are key! Additionally, the mixture should thicken and lose its glossy appearance when you’re beating it. If it holds its shape when poured into the pan, you’re good to go!
Can I add flavors to this old fashioned fudge?
Absolutely! This recipe is incredibly versatile. You can mix in some peppermint extract for a festive twist, or even add a pinch of espresso powder for a coffee-flavored kick. Just remember to keep the total liquid volume in mind if you’re adding extracts!
What’s the best way to cut the fudge into squares?
Once your fudge has completely cooled, use a sharp knife to cut it into squares. For cleaner cuts, you can oil the knife slightly or even dip it in hot water before slicing. It makes a world of difference, trust me!
If you have any other burning questions, feel free to reach out! I’m here to help you make the best old fashioned fudge your loved ones will rave about!
Storage & Reheating Instructions
Storing your delicious old fashioned fudge properly is essential to keep it fresh and tasty for as long as possible. Here’s how I do it:
Let the fudge cool completely at room temperature before storing it. Once it’s set, transfer it to an airtight container. This helps keep it soft and prevents it from drying out. You can layer pieces of wax paper or parchment paper between the fudge squares to avoid sticking—trust me, it makes serving a breeze!
If you plan to enjoy your fudge within a week, just keep it at room temperature. However, if you want to keep it longer, you can pop it in the refrigerator. Just remember to let it come back to room temperature before indulging for that ultimate melt-in-your-mouth experience!
Now, if you happen to have some leftovers (which is a big “if” in my house!), reheating isn’t really necessary since fudge is best enjoyed at room temperature. But if you want to warm it up a bit, simply place a piece in the microwave for about 10-15 seconds. This way, it’ll soften up just enough to bring back that delightful creaminess without losing its charm. Happy snacking!
Print
Old Fashioned Fudge: 5 Steps to Pure Nostalgia
- Total Time: 25 minutes
- Yield: 24 pieces 1x
- Diet: Vegetarian
Description
Classic old fashioned fudge made with simple ingredients.
Ingredients
- 2 cups granulated sugar
- 1/2 cup whole milk
- 1/4 cup unsweetened cocoa powder
- 1/4 cup butter
- 1 teaspoon vanilla extract
- 1/2 cup chopped nuts (optional)
Instructions
- In a saucepan, combine sugar, milk, and cocoa powder.
- Bring to a boil over medium heat, stirring constantly.
- Boil for 5 minutes without stirring.
- Remove from heat and add butter and vanilla.
- Beat until the mixture thickens and loses its gloss.
- Add nuts if desired and spread into a greased pan.
- Let cool before cutting into squares.
Notes
- Store in an airtight container.
- Can be made without nuts for a nut-free version.
- Adjust cooking time for desired consistency.
- Prep Time: 10 minutes
- Cook Time: 15 minutes
- Category: Dessert
- Method: Stovetop
- Cuisine: American
Nutrition
- Serving Size: 1 piece
- Calories: 150
- Sugar: 20g
- Sodium: 10mg
- Fat: 5g
- Saturated Fat: 3g
- Unsaturated Fat: 2g
- Trans Fat: 0g
- Carbohydrates: 25g
- Fiber: 1g
- Protein: 1g
- Cholesterol: 15mg
Keywords: old fashioned fudge, fudge recipe, chocolate fudge