Oh my goodness, let me tell you about these *Oreo cheesecake balls*! They’re like little bites of heaven wrapped in chocolate, and the best part? They’re no-bake! Seriously, you could whip these up in a flash with just three simple ingredients, and before you know it, you’ll have a crowd-pleasing treat that everyone will adore.
I remember the first time I made them for a family gathering. I was running around the kitchen, trying to prepare for the big day, and I thought, “What’s something quick and easy that everyone will love?” That’s when I stumbled upon this recipe. After chilling them in the fridge, I was nervous about how they’d be received. But as soon as I set them out, they disappeared faster than I could blink! My cousins kept coming back for seconds, and even my picky uncle raved about them. Now, they’re a staple at every family potluck, and I just love seeing the smiles on everyone’s faces when they take a bite. Trust me, once you make these, you’ll be hooked!
Ingredients for Oreo Cheesecake Balls
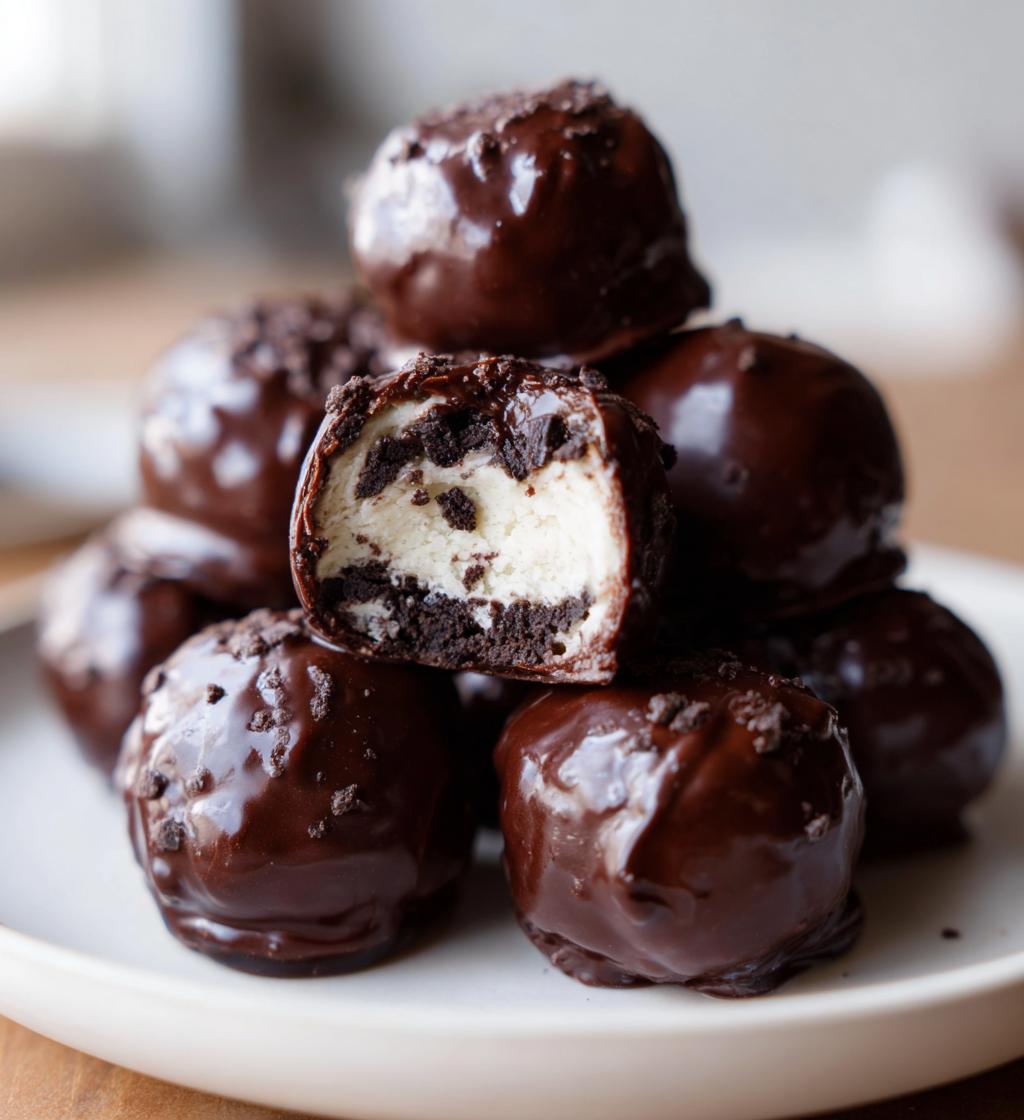
- 1 package (15.35 oz) of Oreo cookies – These are the star of the show! Grab a standard package of classic Oreos for that perfect crunch and flavor.
- 8 oz of softened cream cheese – Make sure it’s softened to room temperature, so it blends smoothly with the crushed Oreos for a creamy texture.
- 1 cup of chocolate chips – You can use semi-sweet or milk chocolate, depending on your preference. This will give the cheesecake balls their delightful outer coating.
How to Prepare Oreo Cheesecake Balls
Alright, let’s dive into the fun part—making these delicious *Oreo cheesecake balls*! I promise it’s a breeze, and you’ll love how quickly you can whip them up. Just follow these easy steps, and you’ll be on your way to dessert bliss!
Step 1: Crush the Oreo Cookies
First things first, you’ll want to crush those Oreo cookies. The best way to do this is with a food processor. Just toss the whole package in there and pulse until you have fine crumbs. Trust me, it’ll take just a minute. You want them to be super fine, almost like sand, so they mix nicely with the cream cheese. If you don’t have a food processor, no worries! You can also place the Oreos in a zip-top bag and crush them with a rolling pin. Just be sure to get them nice and small!
Step 2: Mix with Cream Cheese
Now, grab that softened cream cheese and put it in a mixing bowl. It’s so important that the cream cheese is softened to room temperature; otherwise, you’ll end up with lumps. You can use a hand mixer or just a sturdy spatula to mix the crushed Oreos and cream cheese together until fully combined. It should be smooth and creamy—like a delicious frosting! Don’t be shy; really mix it well so every bite has that amazing Oreo flavor.
Step 3: Forming the Balls
Once your mixture is ready, it’s time to form the balls! I like to use a small cookie scoop or just my hands. Aim for about a tablespoon of the mixture for each ball. Roll them between your palms until they’re nice and round. Place each ball on a baking sheet lined with parchment paper. Make sure to leave some space between them; they’ll need room to chill out in the fridge later!
Step 4: Chilling the Mixture
Now that your balls are formed, it’s time for the chilling! Pop the baking sheet in the refrigerator for about 30 minutes. This step is super important because it helps the balls firm up, making them easier to dip in chocolate later. Plus, it enhances that delightful texture you’re going for!
Step 5: Melting the Chocolate
While those little treats are chilling, let’s melt the chocolate! You can do this in a microwave-safe bowl in the microwave, heating it in short bursts of about 30 seconds, stirring in between until smooth. Alternatively, you can use a double boiler on the stovetop. Just simmer some water and place a heat-safe bowl over it to melt the chocolate gently. Either way, keep an eye on it! You want it melted but not too hot.
Step 6: Dipping the Balls
Once your chocolate is melted and slightly cooled (this is key!), it’s time to dip those chilled cheesecake balls! Using a fork or a toothpick, dip each ball into the chocolate, making sure it’s fully coated. Let the excess chocolate drip off before placing them back on the parchment-lined baking sheet. If you want to get fancy, feel free to sprinkle some crushed Oreos on top before the chocolate sets!
Step 7: Final Refrigeration
Finally, return the dipped balls to the fridge for another 15-30 minutes, or until the chocolate has set completely. You’ll know they’re ready when the chocolate is firm to the touch and looks glossy. Once they’re done, you can admire your beautiful creations! Just try not to eat them all in one sitting—though I won’t judge if you do!
Nutritional Information Disclaimer
Now, before you dive into these scrumptious *Oreo cheesecake balls*, I want to take a moment to chat about the nutritional information. It’s important to remember that nutrition can vary quite a bit based on the specific ingredients and brands you choose to use. So while I’ve provided some general values, they might not be spot on for everyone. Always consider your own choices and how they might affect the final numbers. That said, these little treats are meant to be enjoyed, so don’t stress too much! Just savor every bite and share with friends and family!
Why You’ll Love This Recipe
Let me tell you, there are so many reasons to adore these *Oreo cheesecake balls*! They’re not just a treat; they’re a total game changer for any occasion. Here’s why you’ll fall head over heels for this recipe:
- Quick and Easy: With just three ingredients and zero baking involved, you can whip these up in no time. Perfect for those last-minute dessert cravings!
- Crowd-Pleaser: I can’t tell you how many times these little bites have stolen the show at parties. Everyone loves them, and they’re always a hit, from kids to grandparents!
- No-Bake Delight: On those hot days when you don’t want to heat up the oven, these are your go-to dessert. Chill them in the fridge, and you’re all set!
- Versatile Flavors: Feel free to experiment with different Oreo flavors! From mint to birthday cake, the possibilities are endless. You can switch it up and keep it exciting!
- Make Ahead: These cheesecake balls can be made ahead of time and stored in the fridge, making them a fantastic option for busy schedules or holiday gatherings.
Trust me, once you make these, you’ll be coming back for more, and your friends will be begging for the recipe!
Tips for Success with Oreo Cheesecake Balls
Now that you’re ready to make these delightful *Oreo cheesecake balls*, here are some tips to ensure your treats turn out perfectly every time!
- Experiment with Oreo Flavors: Don’t be afraid to switch things up! Try using different Oreo flavors like peanut butter, mint, or even lemon. Each variation brings a unique twist to your cheesecake balls that keeps things fun and exciting!
- Proper Cream Cheese Softening: Make sure your cream cheese is softened enough before mixing. If it’s too cold, you’ll end up with lumps that just won’t blend well. If you’re short on time, you can cut it into small cubes to speed up the softening process.
- Chill Time is Key: Don’t skip the chilling steps! Giving your mixture and dipped balls enough time in the fridge is crucial for achieving that perfect texture. It helps them firm up and makes dipping in chocolate much easier.
- Storage Tips: Store your cheesecake balls in an airtight container in the refrigerator to keep them fresh. They’ll last about a week, but trust me, they won’t last that long once everyone gets a taste!
- Chocolate Coating Variations: Feel free to mix it up with the chocolate coating! You can use white chocolate, dark chocolate, or even drizzle some colored candy melts for a fun presentation.
With these tips in your back pocket, you’ll be a pro at making *Oreo cheesecake balls* in no time! Enjoy every delicious bite!
FAQ about Oreo Cheesecake Balls
Got some questions about these delightful *Oreo cheesecake balls*? Don’t worry, I’ve got you covered! Here are some common queries that pop up when folks are making these sweet treats:
Can I use different types of Oreos?
Absolutely! One of the best things about this recipe is its versatility. You can use any flavor of Oreos you like—think mint, peanut butter, or even the seasonal pumpkin spice ones. Each flavor brings a unique twist to your cheesecake balls, so feel free to get creative!
How should I store the cheesecake balls?
To keep your *Oreo cheesecake balls* fresh, store them in an airtight container in the refrigerator. They’ll stay delicious for about a week (if they last that long!). Just make sure to separate layers with parchment paper to prevent sticking.
Can I freeze these cheesecake balls?
You sure can! If you want to make them ahead of time, freeze the balls before dipping them in chocolate. Once they’re frozen solid, place them in a freezer-safe container. When you’re ready to enjoy, just dip them in melted chocolate straight from the freezer. Easy peasy!
What can I substitute for cream cheese?
If you’re looking for a dairy-free option, you can use vegan cream cheese, which works beautifully in this recipe. Just make sure it’s softened to room temperature for the best mixing results. For a lighter version, you could also try Greek yogurt, but keep in mind it might change the texture slightly.
How do I make these more festive for a party?
To amp up the presentation, consider rolling the chocolate-dipped balls in crushed nuts, sprinkles, or even shredded coconut! You can also drizzle some contrasting chocolate on top for a fun design. They’ll look just as good as they taste!
Serving Suggestions for Oreo Cheesecake Balls
When it comes to serving these delightful *Oreo cheesecake balls*, presentation is key! I love to arrange them on a beautiful platter, maybe with a sprinkle of crushed Oreos or colorful sprinkles to add a pop of fun. You could even place them in mini cupcake liners for that extra touch of cuteness!
Pair these treats with a side of fresh fruit, like strawberries or raspberries, for a lovely contrast. The tartness of the berries complements the sweetness of the cheesecake balls perfectly. If you’re feeling fancy, consider serving them with a drizzle of chocolate or caramel sauce on the side for dipping! They make a fantastic addition to dessert tables at parties or gatherings, and trust me, they’ll be the stars of the show. Enjoy every bite!
Print
Oreo Cheesecake Balls: 7 No-Bake Delights You’ll Adore
- Total Time: 45 minutes
- Yield: 24 balls 1x
- Diet: Vegetarian
Description
Oreo cheesecake balls are a delightful no-bake dessert made with crushed Oreos and cream cheese, coated in chocolate.
Ingredients
- 1 package of Oreo cookies (15.35 oz)
- 8 oz cream cheese, softened
- 1 cup chocolate chips
Instructions
- Crush the Oreo cookies in a food processor.
- Mix the crushed cookies with softened cream cheese until well combined.
- Form the mixture into small balls and place them on a baking sheet.
- Chill in the refrigerator for 30 minutes.
- Melt the chocolate chips in a microwave or double boiler.
- Dip each ball into the melted chocolate and place back on the baking sheet.
- Refrigerate until the chocolate sets.
Notes
- Use any flavor of Oreos for variety.
- Store in an airtight container in the refrigerator.
- Allow the chocolate to cool slightly before dipping.
- Prep Time: 15 minutes
- Cook Time: 0 minutes
- Category: Dessert
- Method: No-bake
- Cuisine: American
Nutrition
- Serving Size: 1 ball
- Calories: 120
- Sugar: 10g
- Sodium: 50mg
- Fat: 7g
- Saturated Fat: 4g
- Unsaturated Fat: 2g
- Trans Fat: 0g
- Carbohydrates: 14g
- Fiber: 1g
- Protein: 2g
- Cholesterol: 15mg
Keywords: oreo cheesecake balls, no-bake dessert, easy dessert