
There’s something magical about the smell of chocolate filling the house during the holidays, isn’t there? Every December, without fail, I pull out my stained recipe card for The Retro Brownies I Make Every Year for the Holidays. It’s the same one my mom used when I was little, complete with her handwritten notes in the margins (“Don’t overbake!” and “Walnuts optional but recommended”). These aren’t just any brownies – they’re rich, fudgy squares of nostalgia that transport me right back to childhood Christmases. The secret? Real butter, good cocoa powder, and that special retro touch of chopped walnuts on top. Trust me, once you try them, you’ll understand why this recipe has been passed down in my family for generations.
Why You’ll Love The Retro Brownies I Make Every Year for the Holidays
Let me tell you why these brownies become the star of every holiday gathering:
- They’re impossibly easy – just one bowl and basic ingredients you probably have right now
- That perfect texture – crispy edges with a fudgy center that melts in your mouth
- Pure nostalgia – they taste exactly like the ones Grandma used to make
- Total crowd-pleasers – even picky eaters go back for seconds (and thirds!)
Honestly, I’ve never brought leftovers home from a party. The empty pan speaks for itself!
Ingredients for The Retro Brownies I Make Every Year for the Holidays
Here’s everything you’ll need – I promise it’s all simple stuff! The quality really matters here, especially with the chocolate.
- 1 cup unsalted butter, melted and slightly cooled
- 2 cups granulated sugar
- 4 large eggs, at room temperature (trust me, it makes a difference!)
- 1 teaspoon pure vanilla extract
- 1 cup all-purpose flour
- 1/2 cup good-quality cocoa powder
- 1/4 teaspoon salt
- 1/2 cup chopped walnuts (optional, but they give that retro crunch)
Equipment You’ll Need
Don’t worry—this isn’t one of those recipes that needs fancy gadgets! Just grab:
- A 9×13-inch baking pan (my trusty old metal one works best)
- Medium saucepan for melting butter
- Large mixing bowl
- Whisk or wooden spoon
- Fine-mesh sieve (for that smooth cocoa powder)
See? Told you it was simple. Now let’s get baking!
How to Make The Retro Brownies I Make Every Year for the Holidays
Okay, here we go! Making these brownies is like riding a bike – once you learn the rhythm, you’ll never forget it. Just follow these steps and you’ll have perfect retro brownies every single time. Promise!
Step 1: Prep the Pan and Oven
First things first – preheat that oven to 350°F (175°C). While it’s warming up, grab your 9×13-inch pan and give it a good greasing. I use butter (what else?) and a little dusting of flour, but you can use baking spray too. This is crucial – nobody wants brownies stuck to the pan!
Step 2: Melt and Mix Wet Ingredients
Now for the fun part! Melt your butter in a saucepan over low heat – watch it carefully because burnt butter is no one’s friend. Once melted, take it off the heat and stir in the sugar until it’s all dissolved and glossy. Let it cool just a minute (we don’t want scrambled eggs!), then beat in the eggs one at a time. This patience pays off in texture! Finish with the vanilla – that heavenly smell means we’re on the right track.
Step 3: Combine Dry Ingredients
Here’s my little secret: sift the flour, cocoa powder and salt together. I know it seems fussy, but it makes the batter so silky smooth! Gradually mix the dry ingredients into the wet mixture – don’t overdo it, just until combined. Now’s when you’d fold in those walnuts if you’re using them. The batter should be thick and shiny – like chocolate lava!
Step 4: Bake and Cool
Pour that beautiful batter into your prepared pan and smooth the top. Bake for 25-30 minutes – start checking at 25. The toothpick test is key here: you want a few moist crumbs, not clean. They’ll keep cooking as they cool. And speaking of cooling – resist cutting them for at least 30 minutes! I know it’s hard, but it makes for cleaner squares. The wait is torture, but so worth it.
Tips for Perfect The Retro Brownies I Make Every Year for the Holidays
After decades of making these brownies (and eating way too many test batches), here are my foolproof secrets:
- Underbake slightly – pull them out when the center still jiggles a tiny bit for ultimate fudginess
- Room temp eggs are non-negotiable – cold eggs make the butter seize up (I leave mine out overnight!)
- Try different nuts – pecans or hazelnuts work great if you’re not a walnut person
- Line your pan with parchment – makes cleanup a breeze and lifting them out so easy
Oh, and always lick the bowl – it’s tradition!
Variations on The Retro Brownies I Make Every Year for the Holidays
Want to mix things up? Here are some fun twists I’ve tried over the years:
- Swap the walnuts for pecans, hazelnuts, or even almonds for a different crunch
- Add a festive touch with a teaspoon of peppermint extract – perfect for Christmas!
- Swirl in caramel or peanut butter before baking for a gooey surprise
- Top with sea salt right after baking for a sweet-and-salty kick
Get creative – these brownies are your canvas!
Storing and Serving Suggestions
These brownies keep beautifully in an airtight container at room temperature for up to 5 days (if they last that long!). For an extra-decadent treat, pop a square in the microwave for 10 seconds and serve with vanilla ice cream – the way my dad always did. Coffee makes the perfect pairing for that classic diner-style dessert experience!
Nutritional Information
Just so you know what you’re indulging in (because let’s be real – you’re having more than one!), here’s the scoop per brownie. Remember, estimates vary based on your specific ingredients:
- Calories: 180
- Fat: 9g
- Sugar: 18g
- Protein: 2g
Totally worth every delicious bite if you ask me!
Frequently Asked Questions
Can I use oil instead of butter?
Oh honey, I get this one all the time! While you technically can, butter gives these retro brownies their signature richness and that nostalgic flavor. If you must substitute, use 3/4 cup vegetable oil – but I promise Grandma’s butter version is worth the extra calories!
How do I make these gluten-free?
Easy peasy! Just swap the all-purpose flour for your favorite 1:1 gluten-free blend. I’ve had great results with Bob’s Red Mill. The texture comes out slightly denser, but still deliciously fudgy.
Why do my brownies sink in the middle?
Ah, the classic brownie tragedy! Usually means you’re opening the oven door too early or overmixing the batter. Resist peeking until at least 25 minutes, and mix just until combined – no power tools needed!
Can I freeze these holiday brownies?
Absolutely! They freeze beautifully for up to 3 months. Wrap individual squares tightly in plastic wrap, then pop them in a freezer bag. Thaw overnight – or microwave straight from frozen for emergency chocolate fixes!
Did you make these nostalgic treats? Tag us in your photos – we’d love to see your retro brownie creations!
Print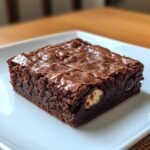
Irresistible Retro Brownies I Make Every Year for the Holidays
- Total Time: 45 minutes
- Yield: 24 brownies 1x
- Diet: Vegetarian
Description
Classic brownies with a retro twist, perfect for holiday gatherings.
Ingredients
- 1 cup unsalted butter
- 2 cups granulated sugar
- 4 large eggs
- 1 tsp vanilla extract
- 1 cup all-purpose flour
- 1/2 cup cocoa powder
- 1/4 tsp salt
- 1/2 cup chopped walnuts (optional)
Instructions
- Preheat oven to 350°F (175°C). Grease a 9×13-inch baking pan.
- Melt butter in a saucepan over low heat. Remove from heat and stir in sugar.
- Beat in eggs one at a time, then add vanilla.
- Sift flour, cocoa, and salt together. Gradually stir into the butter mixture.
- Fold in walnuts if using. Spread batter evenly in the prepared pan.
- Bake for 25-30 minutes or until a toothpick comes out clean.
- Cool before cutting into squares.
Notes
- For fudgier brownies, reduce baking time by 5 minutes.
- Store in an airtight container for up to 5 days.
- Prep Time: 15 minutes
- Cook Time: 30 minutes
- Category: Dessert
- Method: Baking
- Cuisine: American
Nutrition
- Serving Size: 1 brownie
- Calories: 180
- Sugar: 18g
- Sodium: 45mg
- Fat: 9g
- Saturated Fat: 5g
- Unsaturated Fat: 3g
- Trans Fat: 0g
- Carbohydrates: 23g
- Fiber: 1g
- Protein: 2g
- Cholesterol: 50mg
Keywords: brownies, holiday, retro, dessert, chocolate