Hey there, fellow food lovers! If you’re like me and always on the lookout for ripe banana recipes healthy enough to satisfy your sweet tooth without the guilt, then you’re in for a treat! Today, I’m excited to share a recipe that takes the classic marshmallow to a whole new level of fun and festivity—perfect for St. Patrick’s Day celebrations or any whimsical occasion.
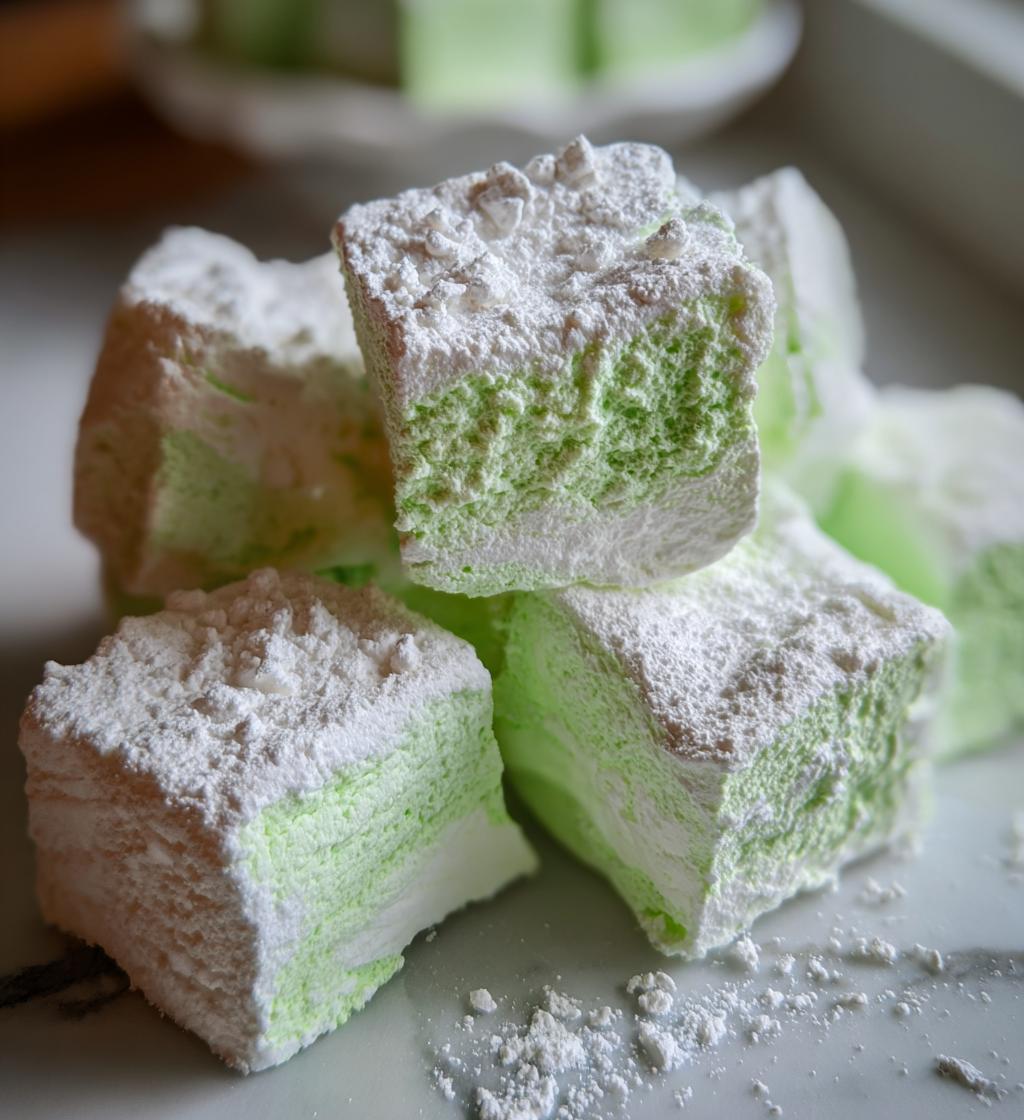
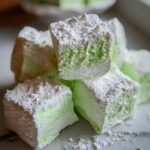
These homemade marshmallows are not only delightful and fluffy, but they also bring a splash of color and sweetness to your table! Imagine biting into a soft, chewy marshmallow that’s bursting with the spirit of the holiday. I love how versatile this recipe is, allowing for different flavors and colors depending on the event. Plus, they’re super easy to make, and I promise you’ll impress your friends and family with your marshmallow-making prowess!
So, whether you’re planning a festive gathering or just looking for a fun treat to whip up at home, these St. Patrick’s Day marshmallows are sure to be a hit. Let’s dive into the ingredients and get started on making something truly special! Trust me, you won’t want to miss this delicious adventure.
Ingredients List
Before we get our marshmallow magic underway, let’s gather our ingredients! Each one plays a key role in creating those fluffy, festive treats you’ll love. Here’s what you’ll need:
- 1 cup granulated sugar: This is our sweet base. It adds that delightful sweetness we all crave!
- 1/2 cup corn syrup: This sticky syrup helps give our marshmallows that perfect chewy texture. Don’t skip it!
- 1/4 cup water: Just plain water to help dissolve the sugar and create a syrupy mixture.
- 1/4 teaspoon salt: A pinch of salt enhances the sweetness and balances the flavors beautifully.
- 1 tablespoon vanilla extract: This adds a warm, aromatic flavor that’s simply irresistible. Use the good stuff if you can!
- 1 tablespoon green food coloring: For that festive St. Patrick’s Day touch! You can adjust the amount based on how vibrant you want the color to be.
- 1/4 teaspoon cream of tartar: This helps stabilize the egg whites, making our marshmallows fluffier.
- 3 egg whites: Fresh, room-temperature egg whites are crucial for achieving those lovely peaks. They’ll give our marshmallows their airy texture.
- Powdered sugar for dusting: This will keep the marshmallows from sticking together and add a lovely sweet finish.
Make sure to have everything measured out and ready to go before you start. It’ll make the process so much smoother and more fun—trust me!
How to Prepare Ripe Banana Recipes Healthy
Alright, let’s get down to the nitty-gritty of making these delightful marshmallows! Trust me, it’s going to be a fun ride, and I’ll guide you through each step. Just follow along, and you’ll be a marshmallow pro in no time!
Step-by-Step Instructions
First things first, grab your saucepan and let’s start cooking that sugar mixture. Here’s how to do it:
- Combine the ingredients: In your medium-sized saucepan, mix together the granulated sugar, corn syrup, water, and salt. This combination is where the magic begins, so make sure you get it all in there!
- Heat it up: Place the saucepan over medium heat. Stir gently until the sugar dissolves completely and the mixture comes to a boil. It’s important to keep an eye on it—don’t walk away! You want to catch it right as it starts bubbling.
- Whip the egg whites: While your sugar mixture is heating, grab a mixing bowl and beat your egg whites along with the cream of tartar. Use an electric mixer on medium speed. You’re looking for soft peaks to form, which should take about 2-3 minutes. It’s so satisfying to watch them fluff up!
- Combine the hot mixture with egg whites: Once your sugar mixture is boiling, carefully (and I mean carefully—it’s hot!) pour it into the bowl with the whipped egg whites. Do this slowly while continuing to beat the mixture on high speed. This step is crucial for getting that fluffy texture, so don’t rush it!
- Beat it until thick: Keep mixing until the marshmallow mixture becomes thick and fluffy. This might take about 5-7 minutes. You’ll know it’s ready when it’s glossy and holds stiff peaks. Wow, just look at that transformation!
- Add flavor and color: Now, let’s jazz it up! Gently mix in the vanilla extract and green food coloring until they’re fully incorporated. You can adjust the color to your liking—make it vibrant or subtle, it’s totally up to you!
- Pour and spread: Grab your greased pan (don’t forget to grease it well!) and pour the marshmallow mixture into it. Use a spatula to spread it evenly, smoothing out the top. This is where you can get creative—make it as neat as you want!
- Let it set: Here comes the hardest part—waiting! Let the marshmallows sit at room temperature for at least 4 hours to set properly. I know, it’s tough, but it’ll be worth it when you finally get to taste them!
- Dust and cut: Once the marshmallows are set, dust the top with powdered sugar to prevent sticking. Then, turn them out onto a cutting board and cut them into squares. Make sure to coat all sides with a bit more powdered sugar for that perfect finish.
And there you have it! Delicious, homemade marshmallows that are ready to dazzle your taste buds. Just remember to savor the process, and don’t rush through the waiting time—it’s all part of the fun!
Nutritional Information Section
Alright, let’s talk about the numbers! These homemade marshmallows are a sweet treat, and while they’re delightful, it’s always good to keep an eye on the nutritional side of things. Here’s a breakdown of the estimated nutritional values per serving, which is one marshmallow:
- Calories: 40
- Sugar: 9g
- Sodium: 5mg
- Fat: 0g
- Saturated Fat: 0g
- Unsaturated Fat: 0g
- Trans Fat: 0g
- Carbohydrates: 10g
- Fiber: 0g
- Protein: 0g
- Cholesterol: 0mg
Keep in mind that these values are just estimates, and your marshmallows may vary slightly based on exact measurements and ingredients used. They’re certainly a fun indulgence, so enjoy them in moderation and share the love with friends and family!
Tips for Success
Now that you’re all set to whip up these delightful marshmallows, let me share some golden tips to help you achieve the absolute best results! Trust me, these little nuggets of wisdom will make your marshmallow-making experience a breeze!
Use the freshest ingredients
Always choose fresh eggs and quality vanilla extract for the best flavor. I can’t stress enough how much fresh ingredients elevate the taste of your marshmallows. It really makes a difference!
Get your egg whites to room temperature
For the fluffiest marshmallows, let your egg whites sit out at room temperature for about 30 minutes before whipping them. This little trick helps them whip up better and achieve those lovely stiff peaks!
Watch the sugar mixture closely
When you’re heating the sugar, keep a close eye on it! Stir gently and don’t let it burn. If it starts to darken too much, it can change the flavor and texture. You want it to be a nice, clear syrup before adding it to the egg whites.
Be patient while it sets
I know waiting can be tough, but let those marshmallows set for at least 4 hours, or even overnight if you can! This ensures they become perfectly firm and easy to cut. Trust me, it’s worth it!
Coat with powdered sugar generously
To prevent sticking, make sure to dust the marshmallows with powdered sugar on all sides after cutting them. Don’t be shy with it! It keeps them from clumping together and adds a lovely sweetness.
Experiment with flavors
Feel free to get creative! Swap out the vanilla extract for other flavors like almond or peppermint, or add a bit of cocoa powder for a chocolatey twist. This way, you can tailor your marshmallows to fit any occasion!
With these tips in your back pocket, you’ll be well on your way to making marshmallow magic! Enjoy the process and have fun with it—you’re going to love the results!
Variations
One of the best things about these St. Patrick’s Day marshmallows is how easily you can switch things up! If you’re looking to explore different flavors or colors, I’ve got some fun ideas for you that will keep your marshmallow game exciting and delicious. Let’s get creative!
Flavor Infusions
- Chocolate Marshmallows: For a rich twist, add 1/4 cup of cocoa powder to the dry ingredients before mixing in the egg whites. You can even swirl in some melted chocolate for an extra treat!
- Fruit Flavored Marshmallows: Replace the vanilla extract with natural fruit extracts like strawberry, orange, or raspberry. You can also fold in some pureed fruit to give your marshmallows a vibrant color and fruity flavor!
- Minty Fresh Marshmallows: A few drops of peppermint extract will give your marshmallows a refreshing kick, perfect for holiday gatherings. You can also use green food coloring to enhance the minty aesthetic!
Colorful Creations
- Rainbow Marshmallows: Divide the marshmallow mixture into separate bowls and add different colors to each. Layer them in the pan for a fun, colorful treat that’s sure to impress!
- Seasonal Colors: You can easily switch up the color theme based on upcoming holidays. Think pastel shades for Easter or vibrant red and blue for Independence Day. The possibilities are endless!
Textural Twists
- Chocolate-Dipped Marshmallows: After cutting your marshmallows, dip them halfway in melted chocolate and then sprinkle with crushed nuts or sprinkles for a delightful crunch!
- Marshmallow Fluff Bars: Use a graham cracker crust and spread the marshmallow mixture on top. Chill until set, then cut into squares for a no-bake dessert that’s sure to please!
With these variations, you can turn the classic marshmallow into a unique treat for any occasion. Get creative and have fun experimenting with flavors and colors! After all, it’s about making these ripe banana recipes healthy while keeping the festive spirit alive. Enjoy every sweet moment!
Storage & Reheating Instructions
Now that you’ve whipped up your delightful marshmallows, you’re probably wondering how to keep them fresh and tasty! Don’t worry; I’ve got you covered with some simple storage tips that will ensure your treats stay as fluffy and delicious as the day you made them.
First things first, once your marshmallows are cut and dusted with powdered sugar, it’s time to store them. Here’s how to do it:
- Use an airtight container: Place your marshmallows in an airtight container, separating layers with parchment paper to prevent them from sticking together. This will help maintain their fluffy texture.
- Keep them cool: Store your marshmallows in a cool, dry place, away from direct sunlight or heat sources. Avoid keeping them in the fridge, as this can cause them to become sticky.
- Enjoy within a week: For the best taste and texture, try to enjoy your marshmallows within a week. If they start to lose their freshness, you can revive them slightly by giving them a quick dusting of powdered sugar.
If you find yourself with extra marshmallows that you just can’t finish in time, you can freeze them for later! Here’s how:
- Freezing: Place the marshmallows in a single layer on a baking sheet and freeze them until solid. Once frozen, transfer them to a freezer-safe bag or container. They’ll keep well for up to three months!
- Thawing: When you’re ready to enjoy your frozen marshmallows, simply take out what you need and let them sit at room temperature for about 30 minutes before serving. You’ll have that fluffy goodness back in no time!
As for reheating, marshmallows are best enjoyed fresh and fluffy, so there’s really no need to reheat them. However, if you want to use them in a recipe that requires melting, just pop them in the microwave for about 10-15 seconds. Be careful, as they can puff up quickly! Just keep an eye on them so they don’t explode—oops!
With these simple storage and reheating tips, you can savor your homemade marshmallows for days to come. Enjoy every sweet bite and share them with friends and family—you’re going to be the star of any gathering!
Why You’ll Love This Recipe
- Quick and Easy: With just a few simple steps, you can create delicious homemade marshmallows that will impress anyone—even if you’re not an experienced cook!
- Perfect for Celebrations: These festive marshmallows are ideal for St. Patrick’s Day or any fun gathering, adding a pop of color and sweetness to your dessert table.
- Customizable Flavors: You can easily switch up the flavors and colors to match any occasion, making them a versatile treat for every season!
- Light and Fluffy: The airy texture of these marshmallows is simply irresistible, providing a delightful melt-in-your-mouth experience.
- Great for Sharing: These marshmallows are perfect for gifting or sharing with friends and family, making you the star of any get-together!
- Kid-Friendly Fun: Making marshmallows is a fun activity to do with kids, allowing them to get creative with colors and flavors!
FAQ Section
Q1. Can I use overripe bananas in this marshmallow recipe?
Yes, overripe bananas work great in many recipes, but for these marshmallows, we actually don’t use bananas directly. However, if you want to incorporate ripe bananas into your dessert, think about adding them to a banana-flavored variation of these marshmallows!
Q2. How can I make these marshmallows healthier?
You can make your marshmallows a bit healthier by substituting some of the sugar with natural sweeteners like honey or agave syrup. Just be mindful of the measurements, as they can alter the consistency!
Q3. What are some creative ways to enjoy leftover marshmallows?
Oh, there are so many fun options! You can use them in s’mores, toss them in hot chocolate, or even blend them into smoothies for a sweet twist. They can also be added to fruit salads for a fun touch!
Q4. Can I add nuts or other mix-ins to the marshmallows?
Absolutely! Feel free to fold in chopped nuts, mini chocolate chips, or even crushed cookies into the marshmallow mixture before pouring it into the pan. Just be sure not to add too much, or it might affect the texture!
Q5. How long do homemade marshmallows last?
Homemade marshmallows are best enjoyed within a week for optimal freshness. If stored properly in an airtight container, they can last up to two weeks, but I recommend enjoying them sooner for the best taste and texture!
ripe banana recipes healthy for Sweet, Fluffy Marshmallows
- Total Time: 4 hours 25 minutes
- Yield: 24 marshmallows 1x
- Diet: Vegetarian
Description
Delicious St. Patrick’s Day marshmallows for festive treats.
Ingredients
- 1 cup granulated sugar
- 1/2 cup corn syrup
- 1/4 cup water
- 1/4 teaspoon salt
- 1 tablespoon vanilla extract
- 1 tablespoon green food coloring
- 1/4 teaspoon cream of tartar
- 3 egg whites
- Powdered sugar for dusting
Instructions
- In a saucepan, combine sugar, corn syrup, water, and salt over medium heat.
- Stir until the sugar dissolves and the mixture boils.
- In a bowl, beat egg whites and cream of tartar until soft peaks form.
- Slowly add the hot sugar mixture to the egg whites while beating.
- Continue beating until thick and fluffy.
- Add vanilla extract and green food coloring, then mix well.
- Pour the mixture into a greased pan and spread evenly.
- Let it sit for at least 4 hours to set.
- Once set, dust with powdered sugar and cut into squares.
Notes
- Store in an airtight container.
- Use different colors for various occasions.
- Make sure the egg whites are at room temperature for best results.
- Prep Time: 15 minutes
- Cook Time: 10 minutes
- Category: Dessert
- Method: No-bake
- Cuisine: Irish
Nutrition
- Serving Size: 1 marshmallow
- Calories: 40
- Sugar: 9g
- Sodium: 5mg
- Fat: 0g
- Saturated Fat: 0g
- Unsaturated Fat: 0g
- Trans Fat: 0g
- Carbohydrates: 10g
- Fiber: 0g
- Protein: 0g
- Cholesterol: 0mg
Keywords: st patricks day marshmallows, festive treats, homemade marshmallows