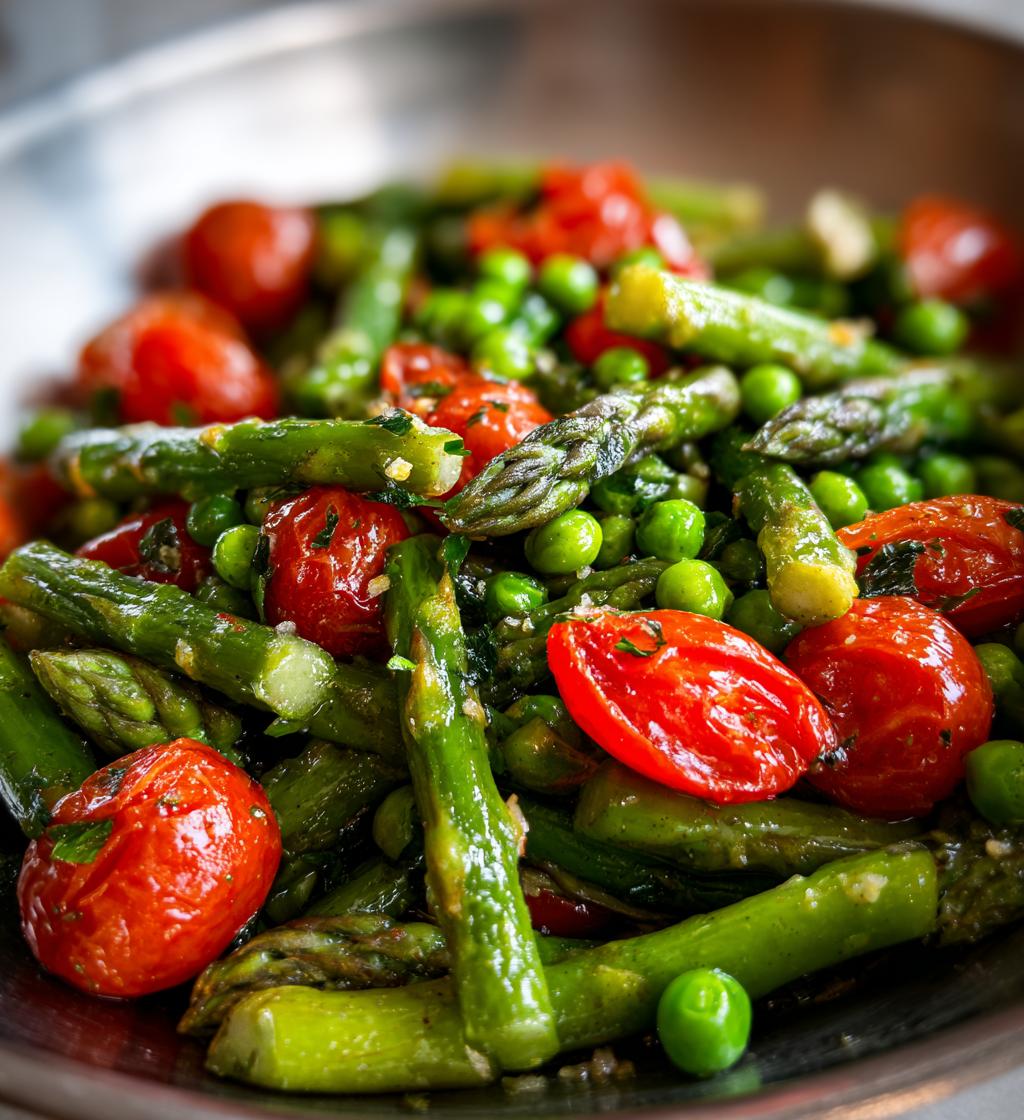
Ah, spring! It’s that magical time of year when everything feels fresh and alive, and my kitchen just begs for vibrant colors and flavors. I can’t tell you how much I look forward to this season when I get to whip up dishes that celebrate all the wonderful seasonal ingredients. There’s something so uplifting about a plate filled with bright green asparagus, tender peas, and juicy cherry tomatoes that just scream spring! Trust me, this dish brings a burst of sunshine to your table.
Using seasonal vegetables not only means better flavor, but it’s also a healthier choice. They’re fresher, packed with nutrients, and often more affordable than out-of-season produce. I love how simple this recipe is while still feeling like a feast for the senses. It’s like a mini celebration of spring in every bite! So, if you’re looking for a quick, easy, and delicious way to embrace the season, you’ve come to the right place. Get ready for a dish that’s not just food, but a reminder of all the beauty spring has to offer!
Ingredients List
Let’s gather everything you need for this delightful *spring food* dish! Here’s what you’ll be working with:
- 1 cup of trimmed asparagus, cut into bite-sized pieces
- 1 cup of fresh or frozen peas
- 1 cup of halved cherry tomatoes, bursting with flavor
- 2 tablespoons of extra-virgin olive oil for that lovely richness
- 1 tablespoon of freshly squeezed lemon juice to brighten everything up
- Salt to taste, because every dish needs a sprinkle
- Pepper to taste, for that little kick!
These ingredients come together beautifully to create a colorful and nutritious side dish that’s perfect for any spring gathering. You’ll love how fresh everything feels, and trust me, they all work in perfect harmony!
How to Prepare Instructions
Now that we’ve got our beautiful ingredients ready, let’s dive into the fun part: preparing this scrumptious dish! Follow these steps, and you’ll have a fantastic *spring food* side dish in no time.
- Preheat your oven: First things first, go ahead and preheat your oven to 400°F (200°C). This will make sure everything bakes perfectly.
- Combine the veggies: In a large mixing bowl, toss together your trimmed asparagus, peas, and halved cherry tomatoes. Just imagine the colors coming together; it’s already looking like spring!
- Add the good stuff: Drizzle those vibrant veggies with 2 tablespoons of olive oil and 1 tablespoon of lemon juice. Don’t be shy—make sure everything gets a nice coating!
- Season it up: Sprinkle in salt and pepper to taste. Remember, you can always adjust later, so start with a little and add more if needed.
- Toss it all together: Use your hands or a spatula to gently toss everything until it’s evenly coated. It’s like giving your veggies a little hug!
- Spread on a baking sheet: Now, spread the mixture out in a single layer on a baking sheet. This helps them roast evenly and get that lovely caramelization.
- Bake it: Pop the baking sheet into the preheated oven and bake for about 20 minutes. You want those veggies to be tender and slightly golden, so keep an eye on them!
- Serve warm: Once they’re out of the oven, let them cool for a minute, then serve warm. You’re going to love how fresh and vibrant this dish tastes!
And there you have it! This simple method transforms these seasonal ingredients into a delightful dish that’s bursting with spring flavors. Enjoy every colorful bite!
Why You’ll Love This Recipe
This *spring food* dish isn’t just a treat for the eyes; it’s packed with benefits that make it a must-try! Here’s why you’ll fall in love with this recipe:
- Quick and Easy: With just a few simple steps, you can have a delicious side dish ready in about 30 minutes. Perfect for those busy weeknight dinners or last-minute gatherings!
- Fresh and Flavorful: Using seasonal vegetables means your dish will burst with the vibrant flavors of spring. Each bite is a delightful celebration of fresh produce!
- Healthy Choice: This recipe is not just delicious but also nutritious! Packed with vitamins and fiber from the veggies, it complements any meal while keeping things light.
- Versatile Side Dish: Whether you’re serving it alongside grilled chicken, fish, or tofu, this colorful medley pairs beautifully with a variety of main courses.
- Beautiful Presentation: The bright colors of asparagus, peas, and cherry tomatoes make this dish a showstopper at any table. It’s like spring on a plate!
Trust me, this recipe brings a burst of joy and flavor that you’ll want to enjoy again and again. It’s a perfect way to embrace the season and nourish your body at the same time!
Nutritional Information Section
Now, let’s take a quick look at the nutritional goodness packed into this *spring food* dish! Here’s a breakdown of the typical values you can expect per serving. Keep in mind, these are estimates, but they give you a good idea of what you’re enjoying:
- Calories: 150
- Fat: 7g
- Saturated Fat: 1g
- Unsaturated Fat: 6g
- Trans Fat: 0g
- Cholesterol: 0mg
- Sodium: 50mg
- Carbohydrates: 20g
- Fiber: 5g
- Protein: 5g
- Sugar: 2g
With a lovely mix of healthy fats, fiber, and protein, this dish is not just a feast for your taste buds, but also a great choice for your overall well-being. Enjoy guilt-free and celebrate the season with every bite!
Tips for Success
To make sure your *spring food* dish turns out absolutely fabulous, here are some handy tips that I swear by! These little nuggets of wisdom will help you achieve the best results and make your cooking experience even more enjoyable.
- Choose Fresh Veggies: Always opt for the freshest asparagus, peas, and cherry tomatoes you can find. Seasonal produce not only tastes better but also adds vibrant colors to your dish. If you can, visit a local farmers market for the best selection!
- Don’t Overcrowd the Baking Sheet: When spreading your veggie mixture on the baking sheet, make sure they’re in a single layer. If they’re too crowded, they’ll steam instead of roast, and you won’t get that delicious caramelization.
- Check for Tenderness: While 20 minutes is a good benchmark for baking, every oven is a little different! Start checking your veggies around the 15-minute mark. You want them tender but still bright and fresh, not mushy.
- Experiment with Seasoning: Feel free to get creative with your seasonings! A pinch of garlic powder or a sprinkle of red pepper flakes can add an extra kick. Just remember to taste as you go!
- Use a Good Quality Olive Oil: Since olive oil is a star ingredient here, using a good quality extra-virgin olive oil really enhances the flavor of your dish. It adds that lovely richness that makes everything taste gourmet!
- Serving Warm: This dish is best served warm right out of the oven. If you’re making it ahead of time, you can reheat it in the oven for a few minutes to bring back that freshly roasted flavor.
- Pairing Ideas: Consider what you’re serving this alongside! It pairs wonderfully with grilled proteins like chicken, fish, or plant-based options like quinoa or chickpeas. Creating a balanced meal is super easy with this vibrant side!
Following these tips will elevate your cooking game and ensure that your *spring food* dish is bursting with flavor and freshness. Happy cooking!
Variations
If you’re anything like me, you love to mix things up in the kitchen! This *spring food* dish is super versatile, and you can easily adapt it to suit your taste or whatever seasonal veggies you have on hand. Here are some fun ideas to keep this recipe lively and interesting:
- Swap the Veggies: Don’t have asparagus? No problem! Try using green beans or zucchini instead. Both add a lovely crunch and pair beautifully with the peas and tomatoes.
- Add Some Color: Try incorporating bell peppers for a pop of color and sweetness. Just chop them up and toss them in with the other veggies for a delightful mix.
- Herb It Up: Fresh herbs can elevate the dish to a whole new level! Consider adding chopped basil, dill, or parsley right before serving. They’ll add a burst of freshness that screams spring!
- Cheesy Goodness: If you’re not keeping it vegan, sprinkle some grated Parmesan or feta cheese on top during the last few minutes of baking. The melted cheese will add a deliciously savory touch to the dish.
- Spice Things Up: Feeling adventurous? Toss in some red pepper flakes or a pinch of smoked paprika for a little heat and depth of flavor. It’s a great way to give your veggies a kick!
- Change the Dressing: Instead of olive oil and lemon juice, try a balsamic glaze or a simple vinaigrette for a different flavor profile. The sweet acidity will complement the roasted veggies wonderfully.
- Roasted Garlic: For a richer flavor, add whole garlic cloves to the baking sheet before roasting. They’ll become sweet and caramelized, adding a delightful depth to your dish.
These variations not only keep things exciting but also let you explore all the wonderful flavors that spring has to offer. So go ahead, get creative, and make this dish your own!
Serving Suggestions
Now that you’ve got this vibrant *spring food* dish ready to shine, let’s talk about how to serve it up for a truly delightful meal experience! This colorful medley of roasted veggies pairs beautifully with a variety of main courses, making it a versatile side dish that will impress your family and friends. Here are some tasty ideas to elevate your dining experience:
- Grilled Chicken: Juicy grilled chicken breasts seasoned with herbs or a hint of lemon make a fantastic pairing. The freshness of the veggies complements the savory flavors of the chicken perfectly!
- Fish Fillets: Light and flaky fish like salmon or tilapia work wonderfully with this dish. The bright veggies add a pop of color and flavor against the delicate fish.
- Stuffed Peppers: Serve it alongside stuffed bell peppers filled with quinoa, black beans, and spices. The combination of flavors and textures creates a beautiful, wholesome meal.
- Vegetarian Tacos: Use this veggie dish as a filling for soft tortillas, topped with avocado and fresh cilantro. It’s a fun and delicious way to enjoy your spring vegetables!
- Pasta Dishes: Toss these roasted veggies into your favorite pasta dish or serve them as a side to a light lemon-garlic pasta. The fresh flavors will brighten up any pasta plate!
- Grain Bowls: Create a hearty grain bowl by layering cooked brown rice, farro, or quinoa, then topping it with this roasted veggie mix. Add a drizzle of tahini or your favorite dressing for extra oomph!
- Salads: Mix these veggies into a fresh salad with mixed greens, nuts, and a tangy vinaigrette. It’s a great way to add some warmth and depth to a classic salad!
These serving suggestions not only enhance your meal but also let the fresh flavors of spring take center stage. So, go ahead and enjoy this lovely dish as part of a balanced and delicious meal! You won’t regret it!
Storage & Reheating Instructions
Let’s talk about how to store those delicious leftovers from your *spring food* dish, so you can enjoy every last bite! Proper storage and reheating are key to keeping the flavors and textures just right. Here’s what you need to know:
- Storing Leftovers: Once your dish has cooled down, transfer any leftovers to an airtight container. This keeps them fresh in the fridge. You can store it for up to 3-4 days, but trust me, it’s so good that it might not last that long!
- Freezing for Later: If you want to save it for a future meal, you can freeze the roasted veggies. Just place them in a freezer-safe container and they’ll be good for about 2-3 months. When you’re ready to enjoy, simply thaw them in the fridge overnight before reheating.
- Reheating Instructions: For the best results, reheat your leftovers in the oven. Preheat it to 350°F (175°C), spread the veggies on a baking sheet, and pop them in for about 10-15 minutes until they’re warmed through. This helps restore their lovely roasted texture!
- Microwave Option: If you’re short on time, you can also use the microwave. Place the veggies in a microwave-safe dish, cover it loosely, and heat on medium power for 1-2 minutes. Just keep an eye on them to avoid overcooking!
- Serving Tip: After reheating, consider tossing them with a splash of fresh lemon juice or a drizzle of olive oil to brighten up the flavors. It’s like giving them a little refresh before serving!
Following these storage and reheating tips will ensure you get to savor your *spring food* dish just as much as when it was freshly made. Enjoy every bite, my friend!
FAQ Section
Got questions about this delightful *spring food* dish? Don’t worry, I’ve got you covered! Here are some common queries that might pop up, along with my answers to help you along the way:
- Can I use frozen vegetables instead of fresh? Absolutely! Frozen peas work beautifully here, and if you can find frozen asparagus, that’s great too. Just make sure they’re thawed and drained before tossing them in. The cherry tomatoes are best fresh, though, for that juicy burst of flavor!
- What if I don’t have asparagus? No problem at all! You can easily swap it out for green beans, zucchini, or even broccoli. Just keep in mind that cooking times may vary slightly, so check for tenderness as they bake.
- How many servings does this recipe make? This recipe yields about 4 servings, making it perfect for a small gathering or a family meal. If you need to feed a crowd, feel free to double the recipe and use a larger baking sheet!
- Can I make this dish ahead of time? Yes, you can prep the veggies and toss them with the olive oil and lemon juice a few hours in advance. Just cover them and keep them in the fridge until you’re ready to bake. It makes for a quick dinner solution!
- What’s the best way to store leftovers? Store any leftovers in an airtight container in the fridge for up to 3-4 days. If you want to freeze them, place them in a freezer-safe container for up to 2-3 months. Just remember to cool them completely before storing!
- Can I add protein to this dish? Definitely! This veggie medley pairs wonderfully with grilled chicken, fish, or even chickpeas for a plant-based option. You can toss cooked protein in with the veggies during the last few minutes of baking for a complete meal!
- How can I adjust the seasoning? Feel free to get creative! If you love a bit of spice, add some red pepper flakes. If you prefer a milder flavor, stick to salt and pepper. Just remember to taste as you go and adjust to your liking!
I hope these answers help you whip up this vibrant *spring food* dish with ease! If you have any other questions, don’t hesitate to reach out. Happy cooking!
Print
Spring Food: 7 Fresh Dishes to Celebrate the Season
- Total Time: 30 minutes
- Yield: 4 servings 1x
- Diet: Vegan
Description
A fresh and vibrant dish perfect for spring.
Ingredients
- 1 cup of asparagus, trimmed
- 1 cup of peas, fresh or frozen
- 1 cup of cherry tomatoes, halved
- 2 tablespoons of olive oil
- 1 tablespoon of lemon juice
- Salt to taste
- Pepper to taste
Instructions
- Preheat the oven to 400°F (200°C).
- In a bowl, combine asparagus, peas, and cherry tomatoes.
- Drizzle with olive oil and lemon juice.
- Season with salt and pepper.
- Toss to coat evenly.
- Spread the mixture on a baking sheet.
- Bake for 20 minutes until tender.
- Serve warm.
Notes
- This dish pairs well with grilled chicken.
- Use seasonal vegetables for the best flavor.
- Prep Time: 10 minutes
- Cook Time: 20 minutes
- Category: Side Dish
- Method: Baking
- Cuisine: American
Nutrition
- Serving Size: 1 serving
- Calories: 150
- Sugar: 2g
- Sodium: 50mg
- Fat: 7g
- Saturated Fat: 1g
- Unsaturated Fat: 6g
- Trans Fat: 0g
- Carbohydrates: 20g
- Fiber: 5g
- Protein: 5g
- Cholesterol: 0mg
Keywords: spring food, seasonal vegetables, healthy side dish