Oh, tiramisu cake – that magical Italian dessert that turns coffee and cream into pure happiness! My first taste was life-changing, at this tiny trattoria in Rome where the waiter winked and said “You’ll dream about this.” And he was right. What makes tiramisu cake so special? It’s that perfect no-bake alchemy: airy mascarpone cream hugging coffee-kissed ladyfingers, all dusted with cocoa like edible velvet. The best part? You don’t even need an oven – just some patience while it chills into creamy perfection. I’ve tweaked my recipe over years of dinner parties, but that first bite still takes me back to that sun-drenched Roman afternoon every single time.
Why You’ll Love This Tiramisu Cake
Let me tell you why this tiramisu cake recipe is my go-to dessert for every occasion—and why it’ll become yours too:
- No baking required: On hot days or when I just can’t be bothered with the oven, this is my lifesaver. Just whip, layer, and chill—that’s it!
- Coffee and cream perfection: The magic happens when the bold coffee soaks into those delicate ladyfingers, balanced by the cloud-like mascarpone cream. Trust me, the first bite is pure bliss.
- Looks fancy, couldn’t be easier: It’s my little secret that something this impressive takes barely any effort. Guests always think I slaved over it!
- Make-ahead dream: I actually prefer making it the night before—the flavors meld into something even more incredible.
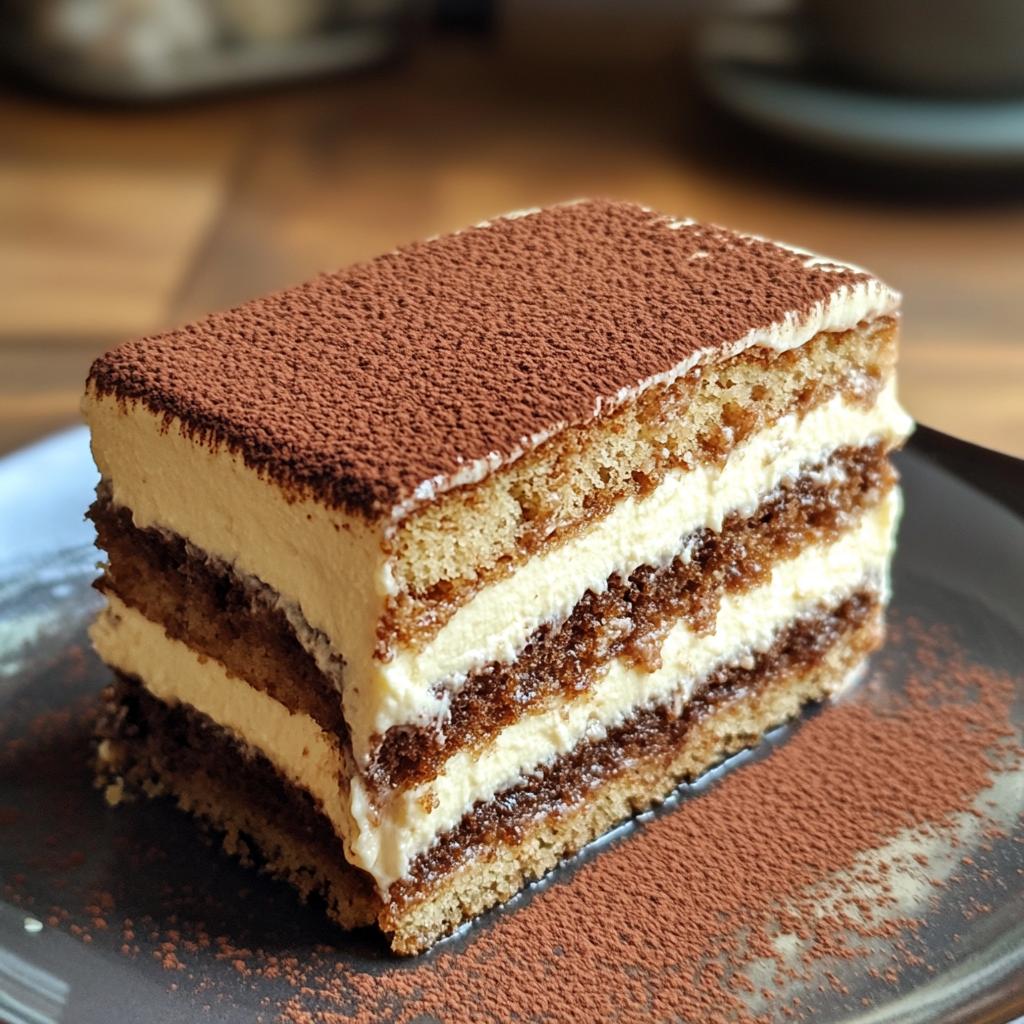
The best part? That gorgeous contrast between the velvety cream and the coffee-kissed, just-slightly-chewy ladyfingers. It’s like eating a caffeinated cloud. Once you try this version, you’ll understand why I’ve been making it for birthdays, dinner parties, and even just “I need tiramisu” Tuesdays for years!
Tiramisu Cake Ingredients
Here’s everything you’ll need to create magic – measured precisely because tiramisu cake is all about balance:
- 250g mascarpone cheese (room temperature – trust me, cold mascarpone will clump!)
- 3 large eggs (separated, and yes, they must be room temp or your cream won’t whip right)
- 100g granulated sugar (I use regular white sugar here – no substitutions!)
- 200ml strong coffee (cooled to room temp – I make mine extra strong with 2 tbsp ground coffee)
- 24 ladyfinger biscuits (look for Savoiardi brand – they hold up better)
- 2 tbsp unsweetened cocoa powder (for that gorgeous dusting on top)
- 1 tbsp coffee liqueur (optional but amazing – Kahlúa is my favorite)
Ingredient Notes
Mascarpone vs cream cheese? No contest – mascarpone’s delicate sweetness makes all the difference. Room temperature eggs whip up fluffier (I leave mine out for 30 minutes). Use decaf if needed, but don’t skip the coffee flavor – it’s tiramisu’s soul! For alcohol-free versions, replace liqueur with extra coffee or a splash of vanilla. And those ladyfingers? They MUST be dry/”hard” type – soft ones turn to mush!
How to Make Tiramisu Cake
Okay, let’s get to the fun part – making this dreamy tiramisu cake! I promise it’s easier than it looks, but there are a few tricks I’ve learned over the years that make all the difference. Grab your mixing bowl and let’s create some magic together.
Preparing the Tiramisu Cream
First things first – the creamy heart of our tiramisu cake. Here’s how I do it:
Start with your room temperature egg yolks (if you forgot to take them out early, just pop them in warm water for 5 minutes). Beat them with the sugar for a good 3-5 minutes – I use my hand mixer on medium until it reaches the “ribbon stage.” That’s when the mixture turns pale yellow and falls off the beaters in thick ribbons. This step builds the foundation for that luscious texture.
Now for the mascarpone – add it in spoonfuls and mix gently just until combined. Overmixing is the enemy here! It’ll make your cream grainy, and we want it smooth as silk. If you’re worried about raw eggs, you can make a zabaglione-style custard by gently cooking the yolks and sugar over a double boiler first.
The egg whites? They’re our secret weapon for lightness. Whip them in a clean, chilled bowl to stiff peaks (when you lift the beaters, the peaks should stand straight up). Then comes the delicate part – folding them into the mascarpone mixture. I use a big rubber spatula and make slow, sweeping motions from the bottom up. It should look like fluffy clouds when you’re done!
Assembling the Tiramisu Cake
Now for the fun assembly! I use an 8×8″ or 9×9″ dish – something with straight sides shows off those lovely layers. Here’s my foolproof method:
Quickly dip each ladyfinger into the cooled coffee – and I mean quickly! Just 1 second per side max. They should feel moist but not soggy (learned this the hard way when my first attempt turned into mush). Arrange them in a single layer in your dish. If they don’t fit perfectly, break some to fill gaps – nobody will see them once we add the cream!
Spread half the cream over the ladyfingers in an even layer – I use an offset spatula for this. Then repeat: another layer of coffee-dipped biscuits, then the remaining cream. The final touch? A generous dusting of cocoa powder through a fine sieve for that signature tiramisu look. I like to do this right before serving for the freshest look, but you can do it now too if you prefer.
Now comes the hardest part – waiting! Pop it in the fridge for at least 4 hours, but honestly? Overnight is even better. The flavors meld together into something magical, and the texture becomes absolutely perfect. I know it’s tempting, but resist sneaking a spoonful early – it’s worth the wait!
Expert Tips for Perfect Tiramisu Cake
After making this tiramisu cake more times than I can count (okay fine, I stopped counting after 50), I’ve picked up some game-changing tricks that’ll take yours from good to “Oh my god, can I have the recipe?” levels of amazing:
- Chill your bowl before whipping egg whites: I pop mine in the freezer for 10 minutes first. Cold bowl + room temp whites = perfect stiff peaks every time!
- Piping bag magic: For picture-perfect layers, I spoon the cream into a piping bag (no tip needed) and pipe it over the ladyfingers. So much neater than spreading!
- Soggy base prevention: My trick? Place a layer of plastic wrap under the first ladyfinger layer before assembling. Remove it after chilling – bye-bye, wet bottom!
- Cocoa powder matters: Splurge on Dutch-processed cocoa for dusting. Its richer flavor and darker color make all the difference – my guests always notice!
- Patience pays off: I know it’s hard, but that overnight chill isn’t just about firmness – the coffee flavor mellows and the cream develops this incredible depth. Worth setting an extra alarm to resist midnight snacking!
Bonus tip from my Italian friend Maria: Right before serving, grate a tiny bit of dark chocolate over the top alongside the cocoa powder. It adds this gorgeous texture contrast that’ll have everyone asking for seconds!
Tiramisu Cake Variations
Sometimes I like to play with my classic tiramisu cake recipe – here are my favorite twists that always impress:
- Chocolate lover’s dream: Add dark chocolate shavings between the layers – the bittersweet crunch against the creamy mascarpone is heavenly.
- Berry surprise: Top with a quick raspberry or strawberry compote for a fresh, fruity contrast to the coffee flavor.
- Matcha magic: Swap coffee for matcha tea (just whisk 1 tbsp powder into warm water) – it gives the most beautiful green layers and earthy flavor.
My rule? Always try the classic first, then get creative – but never skip that mascarpone cream!
Serving and Storing Tiramisu Cake
Okay, you’ve waited patiently (or maybe not so patiently – I totally get it!), now let’s talk about serving this beauty. First rule: that 4-hour minimum chill is non-negotiable. I know, I know – but trust me, it’s what transforms good tiramisu cake into “Oh wow!” tiramisu cake. The flavors need time to get cozy together, and the texture needs to set up properly. If you can resist, overnight is even better – the coffee mellows and the cream becomes impossibly velvety.
When it’s finally time to serve, here’s my pro move: run a thin knife under hot water, dry it, then slice. The warmth helps cut through those perfect layers cleanly. I aim for 8 generous portions – this is dessert, after all! For extra flair, I sometimes use a cookie cutter to make individual round servings that look straight from a fancy café.
Garnishes? Oh, let’s have fun here! Right before serving, I love adding:
- Chocolate curls (just drag a vegetable peeler along a chocolate bar)
- Fresh raspberries or mint leaves for a pop of color
- A light second dusting of cocoa powder through a stencil for a pretty pattern
Now, storing leftovers (if there are any!): Cover tightly with plastic wrap and it’ll keep beautifully in the fridge for 3 days. The flavors actually improve on day two! For longer storage, you can freeze individual portions:
- Slice and place on a parchment-lined tray
- Freeze until solid (about 2 hours)
- Wrap each piece in wax paper, then foil
- Store in an airtight container for up to 1 month
Thaw overnight in the fridge – the texture stays perfect!
One last tip: if you’re making this for a party, assemble it in a clear glass dish. Those gorgeous layers are half the fun, and watching guests’ faces light up when they see them? Priceless.
Tiramisu Cake FAQs
Over the years, I’ve gotten so many questions about my tiramisu cake recipe – here are the ones that pop up most often with my tried-and-true answers:
Can I use instant coffee instead of brewed?
Absolutely! I’ve done this in a pinch – just dissolve 2 tablespoons of good quality instant coffee in 200ml hot water, then let it cool completely. The flavor won’t be quite as complex as freshly brewed, but it’ll still taste delicious. My trick? Add a tiny pinch of salt to the coffee mixture – it somehow makes the flavor pop!
How can I make tiramisu cake without raw eggs?
Safety first! My favorite egg-free method uses whipped cream instead: whip 300ml heavy cream to stiff peaks, then fold it into the mascarpone-sugar mixture. You’ll lose some richness but gain peace of mind. Another option? Gently cook the egg yolks with sugar over a double boiler until 160°F (71°C) to pasteurize them – it makes the cream extra silky too!
Help! My cream split – what went wrong?
Oh no! Usually this happens if the mascarpone was too cold (must be room temp!) or if you overmixed it. Next time, fold the mascarpone in gently just until combined. If it’s already split, try whisking in 1-2 tablespoons of cold heavy cream – sometimes you can bring it back!
Can I make individual tiramisu cake portions?
Yes, and they’re adorable! Use clear glasses or ramekins and build the layers vertically. I like to alternate coffee-dipped ladyfinger pieces (cut to fit) with piped cream. Pro tip: assemble these no more than 4 hours before serving – the small portions can get soggy faster than a whole cake.
Nutritional Information
Estimates vary by ingredients. Calculated with coffee liqueur.
| Serving Size | 1 slice (1/8 of cake) |
|---|---|
| Calories | 420 |
| Fat | 25g |
| Saturated Fat | 15g |
| Carbohydrates | 38g |
| Sugar | 28g |
| Protein | 8g |
| Sodium | 120mg |
Remember – these numbers can change based on your exact ingredients. Using decaf or skipping the liqueur? Your counts will be slightly different. But hey, it’s dessert – sometimes the best nutrition is joy!
Print
Irresistible Tiramisu Cake Recipe in 4 Simple Steps
- Total Time: 4 hours 25 minutes
- Yield: 8 servings 1x
- Diet: Vegetarian
Description
A classic Italian dessert layered with coffee-soaked ladyfingers and creamy mascarpone filling.
Ingredients
- 250g mascarpone cheese
- 3 large eggs
- 100g granulated sugar
- 200ml strong coffee, cooled
- 24 ladyfinger biscuits
- 2 tbsp cocoa powder
- 1 tbsp coffee liqueur (optional)
Instructions
- Separate egg yolks and whites.
- Beat yolks with sugar until pale.
- Fold in mascarpone gently.
- Whisk egg whites to stiff peaks.
- Combine mixtures carefully.
- Dip ladyfingers briefly in coffee.
- Layer soaked ladyfingers and cream.
- Dust top with cocoa powder.
- Chill for 4 hours before serving.
Notes
- Use freshly brewed coffee for best flavor
- Chill bowl before whipping egg whites
- Don’t oversoak ladyfingers
- Prep Time: 25 minutes
- Cook Time: 0 minutes
- Category: Dessert
- Method: No-Bake
- Cuisine: Italian
Nutrition
- Serving Size: 1 slice
- Calories: 420
- Sugar: 28g
- Sodium: 120mg
- Fat: 25g
- Saturated Fat: 15g
- Unsaturated Fat: 8g
- Trans Fat: 0g
- Carbohydrates: 38g
- Fiber: 1g
- Protein: 8g
- Cholesterol: 180mg
Keywords: tiramisu cake dessert italian coffee mascarpone