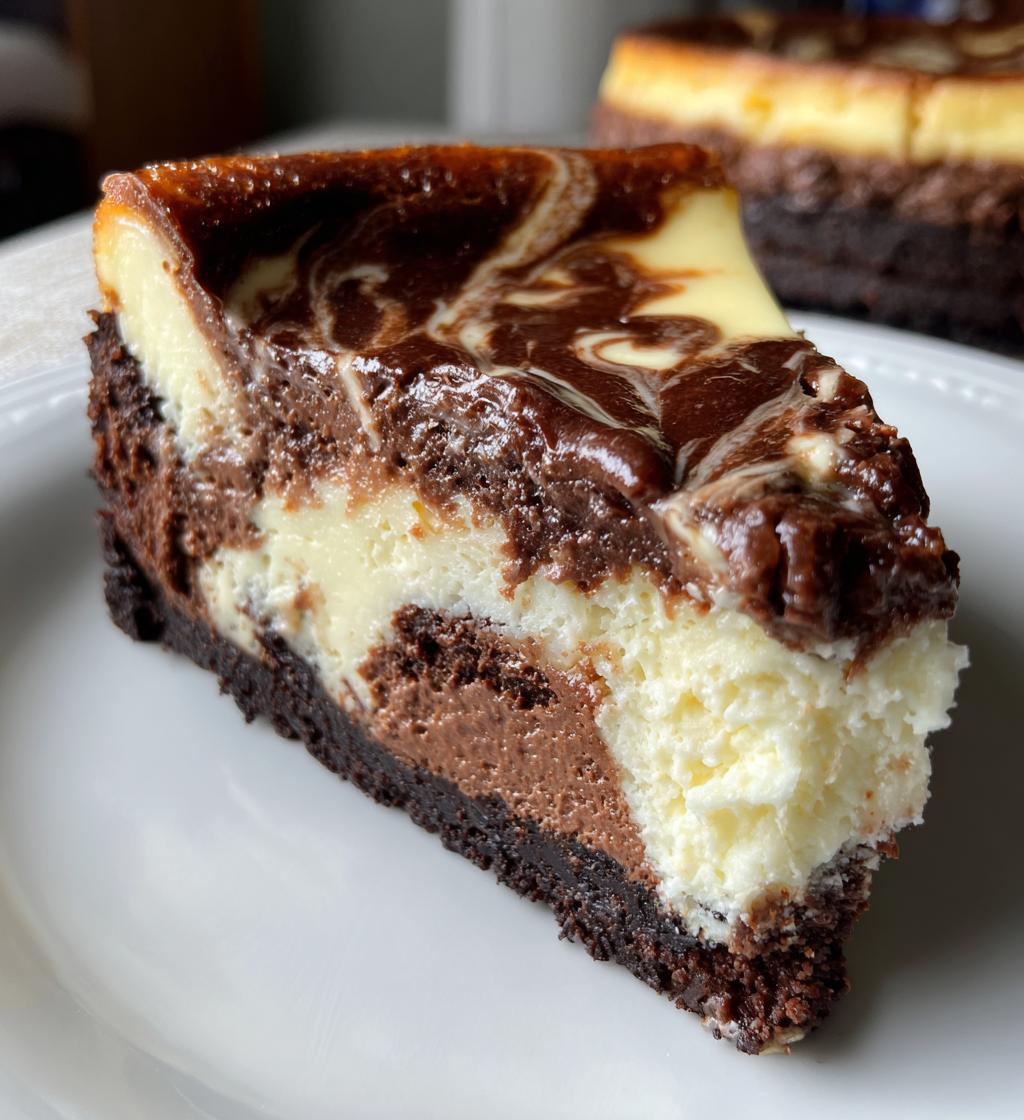
Oh my goodness, these triple chocolate cheesecake bars are my weakness! Imagine biting into creamy cheesecake swirled with not one, not two, but three kinds of chocolate – it’s pure bliss. The best part? They’re surprisingly simple to make. Just a chocolate cookie crust topped with layers of rich cheesecake batter infused with melted semi-sweet, white, and milk chocolate. Trust me, these disappear faster than you can say “chocolate” at any gathering!
Why You’ll Love These Triple Chocolate Cheesecake Bars
Let me tell you why these little squares of heaven will become your new go-to dessert:
- Creamy dreamy texture – The perfect balance between rich cheesecake and fudgy chocolate that melts in your mouth
- Three times the chocolate – Semi-sweet, white, and milk chocolate swirls create an incredible flavor party in every bite
- So simple to make – No water bath, no fancy techniques – just mix, layer, and bake!
- Always a crowd-pleaser – I’ve yet to meet anyone who can resist these (seriously, they vanish at potlucks!)
- Perfect for any occasion – Fancy enough for dinner parties but easy enough for Tuesday night cravings
The chocolate cookie crust adds that wonderful crunch, and the chilled cheesecake layer… oh my stars, it’s just magical. You’ll want to make a double batch – trust me on this!
Ingredients for Triple Chocolate Cheesecake Bars
Here’s what you’ll need to make these decadent bars – I promise it’s all simple stuff you probably have already (or can easily grab at the store):
- 1 1/2 cups chocolate cookie crumbs – Oreos work great, but any chocolate sandwich cookie will do
- 1/4 cup melted butter – unsalted is my preference, but salted works too (just skip any extra salt)
- 16 oz cream cheese, softened – this is KEY for smooth batter (more on that below)
- 1/2 cup sugar – regular granulated works perfectly
- 2 eggs, at room temperature – they blend in much better when not cold
- 1 tsp vanilla extract – the good stuff makes a difference here!
- 1/2 cup semi-sweet chocolate chips, melted – my favorite for that deep chocolate flavor
- 1/2 cup white chocolate chips, melted – adds that lovely creamy contrast
- 1/4 cup milk chocolate chips, melted – because why not have all the chocolates?
Ingredient Notes & Substitutions
Now let’s talk about those ingredients – because I know sometimes you need to improvise (I’ve been there!):
Cookie crust options: No Oreos? No problem! Graham crackers work too – just add 1 tbsp cocoa powder to the crumbs. Or use chocolate grahams if you can find them. Heck, I’ve even used chocolate animal crackers in a pinch!
Chocolate chips: The beauty here is you can mix and match. All out of white chocolate? Use more milk chocolate. Prefer dark? Go for it! Just keep the total amount about the same (about 1 1/4 cups total).
Cream cheese: Please, please let it soften properly. Cold cream cheese = lumpy batter = sad cheesecake. If you forget (we’ve all done it!), cut it into cubes and microwave in 10-second bursts until just soft but not melty.
Butter: If you only have salted, that’s fine – just taste the crust mixture before pressing it in. You might want to skip any extra salt in the recipe.
Remember – baking is part science, part art. These bars are pretty forgiving, so don’t stress if you need to make substitutions!
Equipment Needed
Don’t worry – you don’t need any fancy gadgets for these cheesecake bars! Here’s what I always grab from my kitchen:
- 8×8 inch baking pan – My trusty square pan gets used more than any other. Line it with parchment paper for easy removal!
- Mixing bowls – One medium for the crust, one large for the cheesecake batter (I like glass so I can microwave the chocolate right in them)
- Hand mixer or stand mixer – Makes the cheesecake batter silky smooth in seconds (but a sturdy whisk and some elbow grease works too!)
- Spatula – For scraping every last bit of that delicious batter into the pan
- Measuring cups/spoons – Because eyeballing chocolate quantities never works out right for me
That’s really it! No special tools required – just basic kitchen essentials. The most important “tool” is actually patience while these beauties chill (the hardest part, I know!).
How to Make Triple Chocolate Cheesecake Bars
Alright, let’s get to the fun part – making these heavenly chocolate bars! I promise it’s easier than it looks, and the results will make you feel like a baking rockstar. Here’s exactly how I do it every time:
- Preheat your oven to 350°F – This is crucial for even baking. While it heats up, line your 8×8 pan with parchment paper, leaving some overhang on the sides (your future self will thank you when removing these beauties!).
- Make the crust – Mix those chocolate cookie crumbs with melted butter until it looks like wet sand. Press it firmly into your prepared pan – I use the bottom of a glass to get it nice and even. Pop it in the fridge while you make the filling.
- Whip up the cheesecake base – In a large bowl, beat the softened cream cheese and sugar until completely smooth (no lumps!). Add eggs one at a time, then the vanilla. Go slow – we want creamy, not lumpy!
- Divide and conquer – Split the batter evenly into three bowls (about 1 cup each). Now the magic happens – mix melted semi-sweet chocolate into one bowl, white chocolate into another, and milk chocolate into the third. Watch how each one transforms into a different shade of deliciousness!
- Layer with love – Drop spoonfuls of each chocolate batter randomly over the crust. Alternate colors so you get beautiful swirls. Then take a knife and gently make figure-eight motions – just a few passes! Overmixing = muddy colors.
- Bake to perfection – 25-30 minutes is usually perfect. The edges should be set but the center will still jiggle slightly when you nudge the pan. That’s exactly what we want!
- The hardest part – Let them cool completely at room temperature, then refrigerate for at least 4 hours (overnight is better). I know it’s torture to wait, but trust me – chilled cheesecake slices like a dream.
Tips for Perfect Cheesecake Bars
After making these dozens of times (for research purposes, obviously), here are my golden rules:
- Room temp is key – Cold cream cheese and eggs = lumpy batter. Take them out 2 hours before baking, or use my quick method: cube the cream cheese and microwave in 10-second bursts.
- Melt chocolate carefully – I melt mine in the microwave at 50% power, stirring every 30 seconds. Burnt chocolate is tragic!
- Gentle swirling – Less is more! 3-4 figure-eight motions with a knife create gorgeous marbling without blending the colors.
- Don’t overbake – That slight jiggle in the center? That’s your cue to take them out. They’ll firm up as they cool.
- Chill time is non-negotiable – I know it’s hard, but rushing this step leads to messy slices. Patience rewards you with perfect bars!
- Clean slices – Wipe your knife with a hot, damp cloth between cuts for picture-perfect squares every time.
See? Not so complicated! The most important thing is to have fun with it – even if your swirls aren’t magazine-perfect, they’ll taste absolutely incredible. That’s the magic of chocolate – it forgives all baking sins!
Serving & Storage
Okay, let’s talk about the best ways to enjoy these beauties and keep them fresh (though let’s be real – they rarely last long in my house!). Here’s everything I’ve learned about serving and storing these triple chocolate cheesecake bars:
Serving Tips:
- Chilled is best – These taste absolutely heavenly straight from the fridge. The flavors are richer, the texture is firmer, and they slice like a dream when cold.
- Little goes a long way – They’re rich! I usually cut them into 9 modest squares (about 2×2 inches), but for parties I’ll sometimes do 16 petite bites.
- Dress them up – A dusting of cocoa powder, some fresh berries, or even a drizzle of extra melted chocolate takes them to the next level for special occasions.
- Let them breathe – If you can stand it, take them out of the fridge 10 minutes before serving. That slight softening makes the flavors really sing!
Storage Secrets:
- Airtight is everything – Store these in an airtight container with parchment between layers if stacking. My favorite trick? The same pan they were baked in – just cover tightly with foil!
- Fridge life – They’ll keep beautifully for 5 days in the refrigerator. The crust might soften slightly by day 3, but they’ll still taste amazing.
- Freezer-friendly – Yes! Freeze individual bars on a baking sheet, then transfer to a freezer bag. They’ll keep for 2 months. Thaw overnight in the fridge when cravings strike.
- No-no zone – Don’t leave them at room temperature more than 2 hours. That cream cheese needs to stay chilled for food safety.
Pro tip from my many “experiments” – if you’re making these for a party, bake them the day before. Not only does this give them time to set perfectly, but it means less stress the day of your event. Just slice, arrange on a pretty plate, and watch them disappear!
Nutritional Information
Okay, let’s be real – we’re not eating triple chocolate cheesecake bars for their health benefits! But since you asked (or maybe just feel slightly guilty like I sometimes do), here’s the nutritional breakdown per bar. Remember, these are estimates – your exact numbers might vary depending on the brands you use and how big you slice them!
- Serving Size: 1 bar (about 1/9 of the recipe)
- Calories: 320 (worth every single one!)
- Total Fat: 21g (12g saturated – hello, cream cheese and chocolate!)
- Cholesterol: 75mg
- Sodium: 180mg
- Total Carbohydrates: 28g
- Sugars: 22g (it’s dessert, after all!)
- Protein: 5g
A quick disclaimer from my kitchen to yours: These numbers are calculated based on standard ingredients and measurements. If you use sugar-free chocolate chips, low-fat cream cheese, or different cookie crumbs, your nutritional values will change. The FDA says nutrition labels can be off by up to 20% anyway, so take these as general guidelines rather than absolute facts.
My philosophy? Everything in moderation! These bars are rich enough that one satisfies my chocolate craving (okay, sometimes two…). I like to balance them out with some fresh fruit or a nice walk afterward. But let’s be honest – sometimes you just need a little chocolate therapy, and that’s perfectly okay too!
Frequently Asked Questions
I get so many questions about these triple chocolate cheesecake bars – which makes me happy because it means you’re as obsessed with them as I am! Here are the answers to the questions I hear most often:
Can I freeze these cheesecake bars?
Absolutely! They freeze beautifully. After they’re fully chilled, cut them into squares and freeze on a baking sheet for about an hour. Then transfer to an airtight container with parchment between layers. They’ll keep for 2 months frozen. Thaw overnight in the fridge – no microwave needed!
Can I use all dark chocolate instead of the three types?
You bet! The beauty of this recipe is its flexibility. Swap in dark chocolate for one (or all) of the chocolates if that’s your preference. Just keep the total amount about the same (about 1 1/4 cups melted chocolate total). The texture will be slightly denser but still delicious.
How can I prevent cracks in my cheesecake layer?
The three secrets: Don’t overmix after adding eggs, don’t overbake (that jiggly center is good!), and cool them slowly. I leave mine in the turned-off oven with the door cracked for 30 minutes before cooling completely on the counter. But hey – if cracks happen, just cover them with chocolate drizzle! Tastes the same either way.
Can I make these without eggs?
I’ve tested this with 1/4 cup Greek yogurt per egg as a substitute, and it works pretty well! The texture is slightly less creamy but still tasty. For vegan versions, I’ve had success with silken tofu (1/4 cup blended per egg) and a dairy-free cream cheese alternative.
Why do my bars sink in the middle?
Usually this means they needed just a few more minutes in the oven. Next time, bake until the edges are puffed and the center just barely jiggles when you gently shake the pan. Also, make sure your oven temp is accurate – an oven thermometer is a baker’s best friend!
Final Thoughts
There you have it – my absolute favorite triple chocolate cheesecake bars that never fail to impress! I can’t tell you how many times this recipe has saved me when I needed a quick-but-fancy dessert. Whether it’s book club night, a birthday surprise, or just one of those “I need chocolate NOW” moments, these bars always deliver.
What I love most is how adaptable they are. Play with different chocolate combinations, try adding a sprinkle of sea salt on top, or fold in some chopped nuts if you’re feeling fancy. The basic recipe is foolproof enough for beginners but special enough to wow even the most discerning chocolate lovers.
I’d love to hear how your triple chocolate cheesecake bars turn out! Did you stick with my three-chocolate combo or create your own twist? Did they disappear as quickly at your house as they do at mine? Snap a photo of your masterpiece and tag me – nothing makes me happier than seeing your chocolatey creations!
Now go grab that cream cheese and let it soften – your future self will thank you when you’re biting into that first heavenly, creamy, chocolate-packed square. Happy baking, my fellow chocolate enthusiasts!
Print
Decadent Triple Chocolate Cheesecake Bars in 5 Steps
- Total Time: 45 minutes
- Yield: 9 bars 1x
- Diet: Vegetarian
Description
Rich and creamy triple chocolate cheesecake bars with a chocolate crust.
Ingredients
- 1 1/2 cups chocolate cookie crumbs
- 1/4 cup melted butter
- 16 oz cream cheese, softened
- 1/2 cup sugar
- 2 eggs
- 1 tsp vanilla extract
- 1/2 cup semi-sweet chocolate chips, melted
- 1/2 cup white chocolate chips, melted
- 1/4 cup milk chocolate chips, melted
Instructions
- Preheat oven to 350°F.
- Mix cookie crumbs and melted butter. Press into a lined 8×8 pan.
- Beat cream cheese and sugar until smooth. Add eggs and vanilla.
- Divide batter into three parts. Mix each with melted chocolate.
- Layer batters over crust. Swirl gently.
- Bake 25-30 minutes until set. Cool completely before slicing.
Notes
- Use room temperature cream cheese for smoother batter.
- Chill bars for cleaner slices.
- Store refrigerated up to 5 days.
- Prep Time: 15 minutes
- Cook Time: 30 minutes
- Category: Dessert
- Method: Baking
- Cuisine: American
Nutrition
- Serving Size: 1 bar
- Calories: 320
- Sugar: 22g
- Sodium: 180mg
- Fat: 21g
- Saturated Fat: 12g
- Unsaturated Fat: 7g
- Trans Fat: 0g
- Carbohydrates: 28g
- Fiber: 1g
- Protein: 5g
- Cholesterol: 75mg
Keywords: cheesecake, chocolate, dessert bars