
Oh my goodness, if you’re looking for a simple, melt-in-your-mouth treat, you’ve come to the right place! This easy fudge recipe is my go-to whenever I need a quick dessert that impresses without all the fuss. Seriously, it takes just ten minutes of prep time and a couple of hours in the fridge to transform into a rich, delicious treat that everyone loves. I remember the first time I made this fudge—it was a last-minute decision for a family gathering. I was a bit nervous, but as soon as I poured that silky chocolate mixture into the pan and let it chill, I knew I had struck gold. When I served it, the kids and adults alike were in heaven, and I was hailed as the fudge queen! This recipe has been a staple in my kitchen ever since, and I promise it’ll become a favorite in yours too. So grab your ingredients, and let’s dive into the sweet world of fudge making!
Ingredients for Fudge Recipes Easy
Let’s gather the essentials for this easy fudge recipe! You’ll need just a handful of ingredients, all of which are super simple to find. Here’s what you’ll need:
- 2 cups chocolate chips: I love using semi-sweet chocolate chips for that perfect balance of sweetness and richness. You can even mix it up with milk chocolate or dark chocolate if you prefer!
- 1 can sweetened condensed milk: This creamy addition is the secret to that velvety texture. It adds sweetness and helps everything come together beautifully.
- 1/2 cup butter: Real butter is a must here! It adds richness and contributes to that smooth, melt-in-your-mouth finish.
- 1 teaspoon vanilla extract: This little splash of flavor elevates the fudge and gives it that homemade touch. Trust me, it makes a difference!
With these four simple ingredients, you’re just a few steps away from creating a delightful fudge that will make your taste buds dance. Let’s get ready to whip it up!
How to Prepare Fudge Recipes Easy
Now that we have our ingredients ready, let’s dive into the steps for making this delightful fudge! I promise it’s super straightforward, and you’ll be amazed at how quickly it all comes together. Follow along, and soon you’ll have a luscious batch of fudge to enjoy!
Step 1: Grease the Pan
First things first, we need to prep our pan! Grab an 8×8 inch pan and give it a good greasing. This step is crucial because it helps the fudge release easily once it’s set. I like to use a little butter or cooking spray for this. Just spread a thin layer all around the bottom and sides. You can even line the pan with parchment paper for extra protection—just leave some overhang to make lifting the fudge out easier later on!
Step 2: Melt the Ingredients
Next, it’s time to melt our chocolatey goodness! In a medium saucepan, combine the chocolate chips, sweetened condensed milk, and butter. Keep the heat low—this isn’t the time to rush things! Stir gently and continuously until everything is melted and smooth. The mixture should come together beautifully, so just be patient. This process usually takes about 5-7 minutes. You want to avoid any scorching, so low and slow is the name of the game!
Step 3: Mix in Vanilla Extract
Once your chocolate mixture is velvety and smooth, it’s time to add that splash of vanilla extract. Remove the saucepan from the heat and stir in the vanilla. This little addition is a game changer! It enhances the fudge’s flavor and gives it that lovely homemade aroma. Mix it in well, and you’ll be tempted to dive in right away—it smells heavenly!
Step 4: Pour and Refrigerate
Now comes the fun part—pouring the fudge into the prepared pan! Use a spatula to scrape every last bit of that delicious mixture into the pan. Spread it evenly for a nice, smooth top. Then, pop it in the refrigerator and let it chill for at least 2 hours. This is when the magic happens, and the fudge firms up into those perfect squares we all love!
Step 5: Cut and Serve
Once the fudge is set, take it out of the fridge and let it sit at room temperature for about 5-10 minutes—this makes cutting easier. Use a sharp knife to slice it into squares. You can go for big pieces or bite-sized ones, whatever suits your fancy! Serve it up on a cute plate or package it as a sweet gift. Trust me, everyone will be begging for the recipe!
Nutritional Information Disclaimer
Just a quick note about the nutritional information: it can vary quite a bit based on the specific ingredients and brands you choose to use. For example, different chocolate chips or brands of sweetened condensed milk might have slightly different calorie counts and sugar levels. So, while I’ve provided some general nutritional values for a piece of fudge, they’re not set in stone. Always feel free to adjust based on your preferences or dietary needs! Remember, cooking is all about making it your own!
Why You’ll Love This Recipe
- Quick and Easy: With just a few ingredients and minimal steps, you can whip up this fudge in no time—perfect for those spontaneous sweet cravings!
- Irresistibly Delicious: The rich chocolate flavor paired with that creamy texture will have everyone asking for seconds. Seriously, it’s that good!
- Customizable: Feel free to get creative! Add nuts, sprinkles, or even a swirl of peanut butter for a fun twist.
- Perfect for Any Occasion: Whether it’s a party, holiday, or just a cozy night in, this fudge fits right in. It also makes a great homemade gift!
- No Special Equipment Needed: All you need is a saucepan and a pan to pour it into. No fancy gadgets required!
This fudge recipe is truly a crowd-pleaser, and once you taste it, you’ll understand why it holds a special place in my heart (and my kitchen). So go ahead, give it a try—you won’t regret it!
Tips for Success
Before you dive into making your fudge, let me share some of my top tips to ensure it turns out perfectly every single time. Trust me, these little nuggets of wisdom can make a big difference!
- Use Quality Chocolate Chips: The flavor of your fudge hinges on the chocolate, so splurge a little on good-quality chocolate chips. Brands like Ghirardelli or Guittard really elevate the taste!
- Experiment with Flavors: Don’t hesitate to mix things up! Try adding a pinch of sea salt for that sweet and salty combo, or swirl in some nut butter for a creamy twist. You can even add a tablespoon of espresso powder for a mocha fudge kick!
- Chill Properly: Make sure to let the fudge set in the fridge for the full 2 hours—or even a bit longer if you can. The longer it chills, the firmer and easier it will be to cut!
- Cutting Hacks: For clean cuts, warm your knife under hot water, then dry it off before slicing. This helps create smooth edges and prevents the fudge from sticking!
- Add Mix-Ins: If you love texture, toss in some chopped nuts, mini marshmallows, or even crushed cookies before pouring the mixture into the pan. They add a delightful crunch!
- Store Correctly: Keep your fudge in an airtight container at room temperature for up to a week. If you want it to last longer, you can freeze it—just make sure to wrap it well to prevent freezer burn!
These tips will help you make the most delicious fudge ever. Enjoy experimenting and have fun with it—after all, that’s what baking is all about!
Storage & Reheating Instructions
Now that you’ve whipped up this delicious fudge, let’s talk about how to store it so you can enjoy it for days to come! Proper storage is key to keeping your fudge fresh and tasty.
First off, make sure to let the fudge cool completely in the pan before transferring it. Once it’s ready, I recommend cutting it into squares and storing them in an airtight container. This helps keep that perfect texture and prevents it from drying out. You can layer the fudge pieces with parchment paper in between to avoid sticking.
Store your fudge at room temperature for up to a week. If you think you won’t finish it all within that time, you can freeze the fudge for longer storage. Just wrap each piece individually in plastic wrap and then place them in a freezer-safe bag or container. It should last up to three months in the freezer!
If you want to enjoy the fudge after it’s been frozen, simply take it out and let it thaw at room temperature for about 30 minutes. No need to reheat it since it’s delicious served cold or at room temperature. However, if you prefer it a little warm, you can pop a piece in the microwave for about 10-15 seconds. Just be careful not to overdo it, or you might end up with a gooey mess!
With these simple storage and reheating tips, your fudge will stay fresh and ready for whenever that sweet tooth strikes! Enjoy every delicious bite!
Print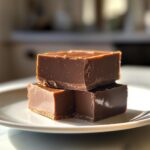
Fudge Recipes Easy: 5 Secret Tips for Irresistible Treats
- Total Time: 2 hours 20 minutes
- Yield: 16 pieces 1x
- Diet: Vegetarian
Description
This is an easy fudge recipe that anyone can make at home.
Ingredients
- 2 cups chocolate chips
- 1 can sweetened condensed milk
- 1/2 cup butter
- 1 teaspoon vanilla extract
Instructions
- Grease an 8×8 inch pan.
- In a saucepan, melt the chocolate chips, sweetened condensed milk, and butter over low heat.
- Stir until smooth and fully combined.
- Remove from heat and stir in the vanilla extract.
- Pour the mixture into the prepared pan.
- Refrigerate for at least 2 hours until set.
- Cut into squares and serve.
Notes
- Store fudge in an airtight container.
- Can add nuts or other toppings if desired.
- Prep Time: 10 minutes
- Cook Time: 10 minutes
- Category: Dessert
- Method: Stovetop
- Cuisine: American
Nutrition
- Serving Size: 1 piece
- Calories: 150
- Sugar: 15g
- Sodium: 30mg
- Fat: 8g
- Saturated Fat: 5g
- Unsaturated Fat: 2g
- Trans Fat: 0g
- Carbohydrates: 18g
- Fiber: 1g
- Protein: 2g
- Cholesterol: 15mg
Keywords: fudge recipes easy